background image

06

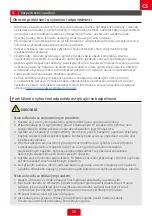
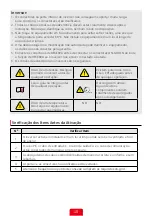
Před zapnutím napájení zkontrolujte položky

Měnič:

1. 

Konektory ve spodní části měniče nesmí být nadměrně zatíženy. V opačném případě může 
dojít k poškození měniče.

2. 

Všechny štítky a varovné značky musí být po instalace čisté. Neseškrabujte, nepoškozujte 


ani nezakrývejte žádné štítky na zařízení.

3. 

Nedotýkejte se spuštěného zařízení a vyhněte se tak zranění – jeho teplota může dosahovat 
až 60 ℃. Neinstalujte zařízení do míst, do kterých mají přístup děti.

4. 

Nepovolené rozebírání nebo úpravy mohou vyústit v poškození zařízení. Na takové 
poškození se nevztahuje záruka.

5. 

Nejdříve připojte svorky ZÁLOŽNÍHO ZDROJE a až potom svorky PŘIPOJENÍ K ROZVODNÉ 
SÍTI. Pokud není měnič připojen k baterii, nespouštějte funkci ZÁLOŽNÍHO ZDROJE. 

6. 

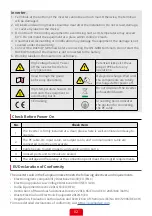
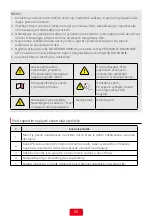
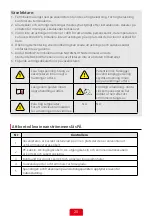
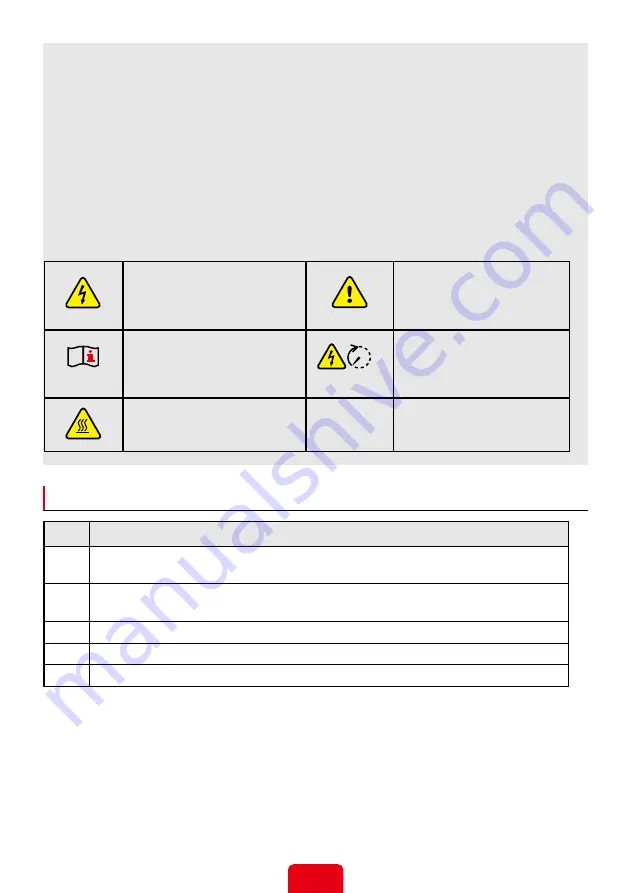
Varovné štítky na měniči jsou následující.

Nebezpečí zasažení 

elektrickým proudem. 


Před jakoukoliv manipulací 

nejprve vypněte měnič.

Hrozí nebezpečí. Před 

jakýmkoliv provozem 


si oblékněte adekvátní 

osobní ochranné pomůcky.

Před jakýmkoliv provozem 


si přečtěte příručku.

Opožděné vybití. 


Po vypnutí vyčkejte, dokud 

se komponenty zcela 

nevybijí.

Nebezpečí vysoké teploty. 

Nedotýkejte se zařízení – hrozí 

nebezpečí vzniku popálenin.

Nedostupné Nedostupné

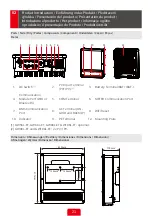
Č.

Kontrola položek

1

Měnič je pevně nainstalován na čistém místě, které je dobře odvětrávané a snadno 
dostupné.

2

Kabel PE, kabel vstupního stejnosměrného napětí, kabel výstupního střídavého 
napětí a komunikační kabel jsou správně a bezpečně připojeny.

3

Kabelové svorky jsou správně a rovnoměrně vedeny a bez otřepů.

4

Nepoužité porty a konektory jsou zapečetěny.

5

Napětí a frekvence v bodě připojení musí splňovat požadavky rozvodné sítě.

5min

Summary of Contents for ET Series

Page 1: ...ET Series Quick Installation Guide Hybrid Inverter V1 1 2021 07 10 ...

Page 2: ... Disclaimer DC Side 1 Ensure the component frames and the bracket system are securely grounded 2 Connect the DC cables using the delivered PV connectors The manufacturer shall not be liable for the damage if other connectors are used 3 Ensure the DC cables are connected tightly securely and correctly Inappropriate wiring may cause poor contacts or high impedances and damage the inverter 4 Measure ...

Page 3: ...r power off High temperature hazard Do not touch the equipment to avoid being burnt Do not dispose of the inverter as household waste CE marking Grounding point Indicates the position for connecting the PE cable 5min No Check Item 1 The inverter is firmly installed at a clean place where is well ventilated and easy to operate 2 The PE cable DC input cable AC output cable and communication cable ar...

Page 4: ...formationen zur Garantie finden Sie unter https en goodwe com warranty asp Allgemeiner Haftungsausschluss DC Seite 1 Stellen Sie sicher dass die Bauteilrahmen und die Halterung ordnungsgemäß geerdet sind 2 Verbinden Sie die DC Kabel mit den im Lieferumfang enthaltenen PV Steckern Der Hersteller haftet nicht für Schäden wenn andere Stecker verwendet werden 3 Vergewissern Sie sich dass die DC Kabel ...

Page 5: ...wenn der Wechselrichter nicht mit der Batterie verbunden ist 6 Folgende Warnhinweise sind auf dem Wechselrichter zu finden Warnung vor Hochspannung Schalten Sie den Wechselrichter zuerst aus bevor Sie daran arbeiten Vorliegen potenzieller Risiken Tragen Sie bei allen Arbeiten die richtige Schutzausrüstung Lesen Sie vor jedem Eingriff die Anleitung Warnung vor Restspannung Warten Sie bis alle Baute...

Page 6: ...dnosti Strana obvodu se stejnosměrným proudem 1 Ujistěte se že rámy komponentů a systém držáků jsou správně uzemněny 2 Připojte kabely pro stejnosměrný proud k dodávaným FV konektorům Výrobce není zodpovědný za žádné poškození způsobené použitím jiných konektorů 3 Ujistěte se že kabely pro stejnosměrný proud jsou pevně bezpečně a správně připojeny Chybné zapojení může způsobit špatné kontakty nebo...

Page 7: ...unkci ZÁLOŽNÍHO ZDROJE 6 Varovné štítky na měniči jsou následující Nebezpečí zasažení elektrickým proudem Před jakoukoliv manipulací nejprve vypněte měnič Hrozí nebezpečí Před jakýmkoliv provozem si oblékněte adekvátní osobní ochranné pomůcky Před jakýmkoliv provozem si přečtěte příručku Opožděné vybití Po vypnutí vyčkejte dokud se komponenty zcela nevybijí Nebezpečí vysoké teploty Nedotýkejte se ...

Page 8: ...a garantía visite https en goodwe com warranty asp Exención de responsabilidad general Lado de CC 1 Asegúrese de que los bastidores de los componentes y el sistema de soporte estén conectados a tierra de forma segura 2 Conecte los cables de CC utilizando los conectores FV suministrados El fabricante no asumirá ninguna responsabilidad por daños si se utilizan otros conectores 3 Asegúrese de que los...

Page 9: ...ncuentran las siguientes etiquetas Riesgo de alta tensión Apague el inversor antes de realizar cualquier operación Existen posibles riesgos Póngase un EPI adecuado antes de realizar cualquier operación Lea la guía detenidamente antes de realizar cualquier operación Descarga con retardo Espere hasta que los componentes estén completamente descargados después de la desconexión Riesgo de altas temper...

Page 10: ...e détails sur la garantie veuillez consulter https en goodwe com warranty asp Avis général de non responsabilité Côté CC 1 S assurer que les châssis des composants et le système de supports sont convenablement mis à la terre 2 Brancher les câbles CC à l aide des connecteurs PV fournis Le fabricant ne peut être tenu responsable des dommages causés par l utilisation d autres connecteurs 3 Veiller à ...

Page 11: ...leur n est pas connecté à la batterie 6 Les étiquettes d avertissement sur l onduleur sont les suivantes Risque de haute tension Mettre l onduleur hors tension avant toute manipulation Des risques potentiels existent Porter un EPI approprié avant toute manipulation Lire attentivement le guide dans son intégralité avant toute manipulation Décharge retardée Attendre que les composants soient entière...

Page 12: ... sito web GoodWe all indirizzo https en goodwe com warranty asp Esclusione di responsabilità di carattere generale Lato CC 1 Garantire un adeguata messa a terra dei telai dei componenti e del sistema di staffe 2 Collegare i cavi CC ai connettori fotovoltaici forniti Il produttore non si assume la responsabilità per danni causati dall utilizzo di altri connettori 3 Assicurarsi che i cavi CC siano c...

Page 13: ...ollegato alla batteria 6 Le etichette di avvertenza sull inverter sono le seguenti Rischio di alta tensione Spegnere l inverter prima di effettuare qualsiasi operazione Presenza di potenziali rischi Indossare dispositivi di protezione personale adeguati prima di effettuare qualsiasi operazione Leggere molto attentamente la guida prima di effettuare qualsiasi operazione Scaricamento ritardato Atten...

Page 14: ...ie vindt u op https en goodwe com warranty asp Algemene disclaimer DC zijde 1 Zorg ervoor dat de frames van de onderdelen en het beugelsysteem goed geaard zijn 2 Verbind de DC kabels met de meegeleverde PV connectoren De fabrikant is niet aansprakelijk voor schade veroorzaakt door het gebruik van andere connectoren 3 Controleer of de DC kabels stevig veilig en correct zijn aangesloten Verkeerde be...

Page 15: ... op de accu is aangesloten 6 Op de omvormer vindt u de volgende waarschuwingsetiketten Hoogspanningsgevaar Schakel de omvormer eerst uit voordat u werkzaamheden verricht Er bestaan potentiële risico s Draag de juiste persoonlijke beschermingsmiddelen PBM voordat u met de werkzaamheden begint Lees eerst de handleiding door voordat u werkzaamheden verricht Vertraagde ontlading Wacht tot de component...

Page 16: ...na znaleźć na stronie https en goodwe com warranty asp Ogólne wyłączenie odpowiedzialności Po stronie DC 1 Upewnić się że ramy elementów i system wsporników są bezpiecznie uziemione 2 Połączyć przewody DC przy użyciu dostarczonych złączek PV Producent nie ponosi odpowiedzialności za szkody spowodowane użyciem innych złączek 3 Upewnić się że przewody DC są prawidłowo bezpiecznie i solidnie połączon...

Page 17: ...alownik nie jest podłączony do akumulatora 6 Na falowniku znajdują się następujące etykiety ostrzegawcze Ryzyko związane z wysokim napięciem Przed przystąpieniem do jakichkolwiek czynności najpierw wyłączyć zasilanie falownika Istnieje potencjalne ryzyko Przed przystąpieniem do jakichkolwiek czynności założyć odpowiednie ŚOI Przed przystąpieniem do jakichkolwiek czynności zapoznać się z instrukcją...

Page 18: ...Para mais detalhes sobre a garantia visite https en goodwe com warranty asp Aviso Geral Lado CC 1 Garanta que as estruturas dos componentes e o sistema de suportes estão aterrados de forma segura 2 Conecte os cabos CC usando os conectores FV fornecidos O fabricante não será responsável por danos que ocorram caso sejam utilizados outros conectores 3 Garanta que os cabos CC estão conectados de manei...

Page 19: ...se o inversor não estiver conectado à bateria 6 Os rótulos de advertência no inversor são os seguintes Risco de alta tensão Desligue primeiro o inversor antes de qualquer operação Existem potenciais riscos Use o EPI adequado antes de qualquer operação Leia o guia na íntegra antes de qualquer operação Descarga com atraso Aguarde até os componentes estarem totalmente descarregados após o desligament...

Page 20: ...nformation om garantin besök https en goodwe com warranty asp Allmän friskrivning DC sidan 1 Säkerställ att komponentramarna och fästsystemet är säkert jordade 2 Anslut DC kablarna med hjälp av de medföljande FV kontakterna Tillverkaren ansvarar inte för skador till följd av att andra kontakter används 3 Säkerställ att DC kablarna är ordentligt säkert och korrekt anslutna Felaktig kabeldragning ka...

Page 21: ...iktaren inte är ansluten till batteriet 6 Följande varningsdekaler finns på växelriktaren Fara högspänning Stäng av växelriktaren innan några handlingar utförs Potentiell risk föreligger Använd lämplig personlig skyddsutrustning innan några handlingar utförs Läs igenom guiden innan några handlingar utförs Fördröjd urladdning Vänta tills komponenterna har laddat ur helt efter att strömmen stängts a...

Page 22: ...n das Produkt Představení výrobku Presentación del producto Présentation du produit Introduzione al prodotto Het product Informacje ogólne o produkcie Apresentação do Produto Produktöversikt 9 10 11 12 1 2 3 4 5 6 7 8 Parts Teile Díly Partes Composants Componenti Onderdelen Części Peças Delar Dimension Abmessungen Rozměry Dimensiones Dimensions Dimensioni Afmetingen Wymiar Dimensão Dimensioner 1 G...

Page 23: ... do Inversor Installation av växelriktaren 1 x 1 x MC4 QC4 10 AMPHENOL 1 x 1 x 1 x 1 x means the number of actual accessories may differ depending on different model Space Requirements Platzbedarf Požadavky na místo Requisitos de espacio Espace requis Requisiti di spazio Benodigde ruimte Wymagania dotyczące przestrzeni Requisitos de Espaço Utrymmeskrav 1 x 1 x N x N x N x N x 1 x 1 x 300mm 300mm 5...

Page 24: ...quisiti dell angolazione Benodigde hoek Wymagania dotyczące kątów Requisitos de Ângulo Vinkelkrav Inverter Installation Installation des Wechselrichters Instalace měniče Instalación del inversor Installation de l onduleur Installazione dell inverter Installatie van de omvormer Instalacja falownika Instalação do Inversor Installation av växelriktaren 15 0 95 RH 35 60 IP66 1 2 3 ...

Page 25: ...iting Połączenia elektryczne Conexão Elétrica Elanslutning PE Cable Connection Anschluss des Schutzleiters Připojení kabelu PE Conexión del cable de tierra PE Connexion du câble PE Collegamento del cavo PE Aansluiting PE kabel Podłączenie przewodu PE Conexão do Cabo PE Anslutning PE kabel 5 4 M5 1 2 2N m L L1 1 2 mm L1 Copper 4 6mm2 1 2 3 4 M5 1 5 2N m ...

Page 26: ...DROJI Conexión del cable de CA A LA RED y RESERVA Connexion du câble CA SUR RÉSEAU SECOURS Collegamento del cavo CA ON GRID e di BACKUP Aansluiting AC kabel ON GRID en BACKUP Podłączenie przewodu AC sieć i zasilanie rezerwowe Conexão do Cabo CA ON GRID e RESERVA Anslutning AC kabel NÄTANSLUTNING OCH BACKUP 1 Φ 13 18mm 20 25mm 7 9mm Copper 4mm2 S 6mm2 2 3 4 1 1 2 2 1 1 2 2 1 3 1 4 2 1 3 ...

Page 27: ...proudem PV Conexión del cable de CC FV Connexion du câble CC PV Collegamento del cavo CC FV Aansluiting DC kabel PV Podłączenie przewodu DC PV Conexão do Cabo FV Anslutning DC kabel FV Crimp contact and PV connectors are various depending on different inverters The actual deliverables may differ 7mm 7mm 2 3 4 1 1 2 3 4 1 2 3 4 5 2 2 Click Click 2 5mm2 S 4mm2 PV1 PV2 PV1 PV2 1000V 1 1 咔哒 PV1 PV1 PV...

Page 28: ...cable de la batería BAT Connexion du câble de batterie BAT Collegamento del cavo della batteria BAT Aansluiting accukabel BAT Podłączenie przewodu akumulatora BAT Conexão do Cabo BAT da Bateria Anslutning batterikabel BAT 2 15mm 4mm2 S 6mm2 15mm Φ 5 5 8mm Φ 5 5 8mm 3 4 BAT 2 1 2 1 3 3 BAT 1 1 2 3 1 2 3 1 1 1 ...

Page 29: ... 6 DRM 4 8 or DI_4 15 16 7 COM DRM0 or REF_1 17 DO Dry Contact of Load Control 8 REFGEN or REF_2 18 DO 1 3 5 7 9 11 13 15 17 2 4 6 8 10 12 14 16 18 2 4 1 5 3 6 8mm 0 12 0 8mm2 1 2 Example 05 Communication Connection Kommunikationsanschluss Připojení komunikace Conexión de comunicación Connexion des communications Collegamento per la comunicazione Communicatieverbinding Połączenia komunikacyjne Con...

Page 30: ...1 2 1 5N m 1 5N m 1 3 2 4 1 3 2 4 1 3 2 4 3 1 4 1 4 2 4 3 3 2 7 7 5 3 8 1 5N m 3 3 9 1 0 10 9 10 8 7 9 RS485 DRED RCR Remote Shutdown Do not remove the resistor and short circuit wire when the pins are not used ...

Page 31: ...ollegamento del contatore intelligente e BMS Verbindingen Smart Meter BMS Połączenia z inteligentnym miernikiem i BMS Conexão do Smart Meter e do BMC Anslutning av Smart Meter och BMS No Color BMS Smart Meter 1 Orange White 485_A2 NC 2 Orange NC NC 3 Green White 485_B2 485_B1 4 Blue CAN_H NC 5 Blue White CAN_L NC 6 Green NC 485_A1 7 Brown White NC 485_B1 8 Brown NC 485_A1 To Smart Meter To Battery...

Page 32: ...ET GWK ET GW10K ET only L1 L2 L3 N PE Battery DC Breaker AC Breaker AC Breaker To Battery Loads Power Meter AC Breaker Grid PV Strings 3 4 5 1 2 To Smart Meter Load AC Breaker 6 CT A CT B CT C BACK UP Loads E BAR The E N link applies to Australia New Zealand South Africa etc Please refer to local regulations E N Link 06 Wiring System Verdrahtungssystem Systém zapojení Sistema de cableado Système d...

Page 33: ...e monitoraggio Ingebruikneming en bewaking Uruchomienie i monitorowanie Comissionamento e Monitoramento Driftsättning och övervakning Commissioning via PV Master APP Inbetriebnahme über die PV Master App Uvedení do provozu prostřednictvím aplikace PV Master Puesta en marcha mediante la aplicación PV Master Mise en service via l application PV Master Messa in servizio attraverso l app PV Master Ing...

Page 34: ...onitorización mediante SEMS Portal Surveillance via SEMS Portal Monitoraggio attraverso il portale SEMS Bewaking via SEMS portaal Monitorowanie przez portal SEMS Monitoramento via Portal SEMS Övervakning via SEMS portalen Initial Password goodwe2010 Configure basic settings following the hints after log in 1 3 2 ...

Page 35: ... 2 1 Please contact GoodWe or the dealer to obtain the account and password Configure WiFi following the WiFi Configuration Instruction For WiFi module only play App Store SEMS Portal APP SEMS Portal 5 6 Test ...

Page 36: ...35 For more detailed instructions scan the QR code below to see the user manual ET Series User Manual PV Master User Manual WiFi Configuration Instruction ...

Page 37: ...GoodWe Technologies Co Ltd No 90 Zijin Rd New District Suzhou 215011 China www goodwe com service goodwe com 340 00537 01 ...

Reviews: