Goodmans GTVL26W26HDF User Manual Download Page 13

English

- 10 -

To watch a specific channel, highlight it using

or

button and then press

“SELECT”

button, while the “Se-

lect” item on Channel List menu is highlighted by using

or

button.

Then the name and number of the selected channel
will be displayed in the top-left and top-right of the chan-
nel display at the top-right of the screen, respectively.

Deleting the channels in the channel list

Press

or

button to select the channel that will be

deleted.

Press

or

button to select the ‘’

Delete

’’ item on

Channel List menu. As seen on Channel List menu,

SELECT

is written next to

Delete

item at the bottom of

the screen to indicate that press the “

SELECT

” button to

delete the highlighted channel in the channel list.

SELECT

i

SELECT

CHANNEL LIST

1

BBC ONE

1. BBC ONE
2. BBC TWO
3. ITV 8
4. Channel 4
5. BBC THREE
6. Teletext
7. BBC FOUR
8. Sky Travel
9. UKHistory
10. RTL

Select

Delete

Edit Name

Lock

Favourites

Function

Select Channel

Delete

More

Press the “

SELECT

’’ button to delete the highlighted

channel in the channel list. Then the message below
appears on the screen.

The selected service will be permanently

deleted. Are you sure?

Yes

No

Press

or

button to highlight the desired option. If

SELECT

’’ button is pressed while “Yes” is highlighted,

the highlighted channel is deleted. Selecting “No” can-
cels the delete operation.
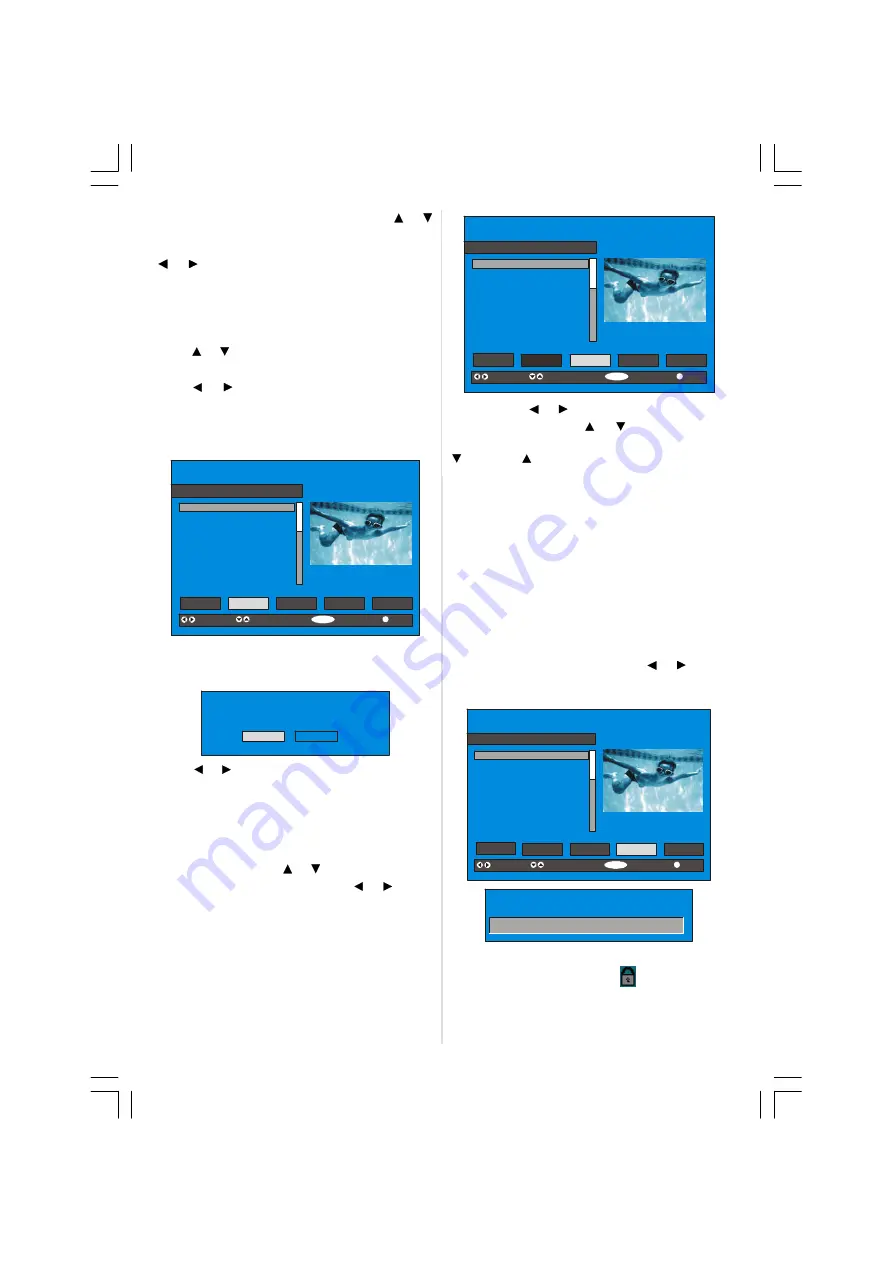
Renaming channels

To rename a specific channel, the channel must be
highlighted via pressing

or

button and then high-

light the

Edit Name

item by pressing

or

button.

Press the “

SELECT

” to activate rename feature.

SELECT

i

SELECT

CHANNEL LIST

1

BBC ONE

1. BBC ONE
2. BBC TWO
3. ITV 8
4. Channel 4
5. BBC THREE
6. Teletext
7. BBC FOUR
8. Sky Travel
9. UKHistory
10. RTL

Select

Delete

Edit Name

Lock

Favourites

Function

Select Channel

Edit Name

More

Now pressing

or

button moves to the previous/

next character. Pressing

or

button toggles the

current character, i.e., ‘

b’

character becomes ‘

a’

by

and ‘

c’

by

. Pressing the numeric buttons ‘

0...9’

replaces the highlighted character with the charac-
ters printed above the button one by one as the but-
ton is pressed.

Press the

"M"

button to cancel the editing or “

SE-

LECT” button to save the new name.

Adding locks to channels

Channel Locking provides a password-protected ac-
cess to channels selected by parents. In order to lock a
channel you should know the Parental Lock password
(default value is set to 0000 in the factory and can only
be changed from the

Configuration Menu

).

Select the channel to be locked by highlighting it and
select the

“Lock”

option by pressing

or

button.

When the “

SELECT

” button is pressed, a password box

is displayed.

SELECT

i

SELECT

CHANNEL LIST

1

BBC ONE

1. BBC ONE
2. BBC TWO
3. ITV 8
4. Channel 4
5. BBC THREE
6. Teletext
7. BBC FOUR
8. Sky Travel
9. UKHistory
10. RTL

Select

Delete

Edit Name

Lock

Favourites

Function

Select Channel

Lock/Unlock

More

Enter Lock Key

Enter the password using the digit buttons on the

remote control. The Lock icon

will now be dis-

played next to the selected channel. Repeat the same
operation to cancel the Lock.

ENG-26770W-1602UK-26 INCH 17MB22 UK IDTV-(WO VGA-WO PIP)-50103428.p65

30.03.2007, 13:45

10

Summary of Contents for GTVL26W26HDF

Page 1: ...Goodmans LCD Colour Television Model GTVL26W26HDF Product Information Helpline 0871 230 1777 User Guide GOODMANS KAPAK 50103428 p65 30 03 2007 15 52 1...

Page 2: ...BOX CONTENTS 26 LCD TELEVISION REMOTE CONTROL WARRANTYCARD INSTRUCTION BOOKLET BATTERY x 2 3 YEARS INSURANCE PLAN GOODMANS KAPAK 50103428 p65 30 03 2007 15 52 2...

Page 3: ...GOODMANS KAPAK 50103428 p65 30 03 2007 15 52 3...

Page 4: ...sic Operations 7 Everyday Operation 7 IDTV Menu System 9 Analogue TV Menu System 15 Other Features 20 Teletext 21 Connect Peripheral Equipment 22 Tips 23 Specifications 23 Appendix A Aerial Connection...

Page 5: ...function Update No function GUIDE IndexPage Reveal WIDE Expand Image size Mix No function Teletext Time Subpage RED Page Down GREEN PageUp Mute I II Mono Stereo Dual A B Volume Down P CH Programme Do...

Page 6: ...k cover are in tended for ventilation and to ensure reliable opera tion To prevent overheating these openings must not be blocked or covered in anyway 6 Heat and Flames The set should not be placed ne...

Page 7: ...old cathode fluoresant lamp in LCD PANEL con tains a small amount of mercury please follow lo cal ordinates or regulations for disposal The mains plug is used to disconnect the TV from the mains and t...

Page 8: ...witch the TV on Your TV will switch on in two steps 1 Connect the power supply cord to the system Press Power On Off button Then the TV switches itself to stand by mode Optional 2 To switch on the TV...

Page 9: ...channel search appears on the screen TV switches to the analogue TV mode Yes Do you want to search for analogue channels No To seach for analogue channels select Yes The menu below is displayed to se...

Page 10: ...conds Press directly the programme number to reselect single digit programmes Everyday Operation Pressing the TV DTV button at any time while watch ing television programmes will switch the TV set be...

Page 11: ...their first pop song I More Change Day Navigate Change Time With RED GREEN buttons you can change sched ule time By pressing YELLOW BLUE you can ad vance the schedule backward forward of a day If you...

Page 12: ...to do this you need to setAutomatic Down load to Enabled in Receiver Upgrade setting For de tails see page 13 Widescreen Depending on the type of broadcast being transmitted programmes can be viewed i...

Page 13: ...e item by pressing or button Press the SELECT to activate rename feature SELECT i SELECT CHANNEL LIST 1 BBC ONE 1 BBC ONE 2 BBC TWO 3 ITV 8 4 Channel 4 5 BBC THREE 6 Teletext 7 BBC FOUR 8 Sky Travel 9...

Page 14: ...hannels First Time Installation Automatic Search Manual Search AutomaticSearch Automatic search is started by pressing the OK but ton in the auto search pop up menu All the services are searched and a...

Page 15: ...Menu Channel List Installation Configuration Timers Language TV Setup Common Interface The various configuration functions are displayed in a list along with a quarter screen image of the currently se...

Page 16: ...tton and acti vated via pressing the SELECT button After Search for New Version is activated the IDTV tunes to each frequency that have been stored in its database and looks for the new software Softw...

Page 17: ...h the digit buttons on the remote control in 24 hour format The frequency mode determines how often the receiver operates this event and is set with the or button to be either Once Daily or Weekly If...

Page 18: ...V to the mains supply switch on and then wait for few moments until the card is activated Some CAMs may require the following set up Please set the CAM by entering the IDTV menu Common Interface then...

Page 19: ...nge the level of the balance Balance level can be adjusted between 32 and 32 Headphone By pressing button select Headphone Press button to enter hedphone menu volume By pressing button select Volume P...

Page 20: ...alogue TV source as well If this source is set to digital mode connected de vice displays digital source In order to avail this function EXT 2 Output should be set to TV DTV Blue Background You can se...

Page 21: ...Delete To delete a programme press the YELLOW button Pressing the YELLOW button again erases the se lected programme from the programme list and the programmes below shift one up APS Auto Programming...

Page 22: ...ed will be displayed on the screen Install menu in AV modes The following screen appears in the install menu INSTALL Colour System VCR Store Colour System By pressing select Colour System By press ing...

Page 23: ...signal or the signal from an external device the TV automatically changes the ZOOM mode according to the WSS signal When the AUTO mode does not function correctly due to poor WSS signal quality or whe...

Page 24: ...ill be displayed on screen after pressing button If the programme does not have teletext transmission no information will be displayed When button is pressed while in teletext mode the screen will be...

Page 25: ...ou may attain a better dis play resolution TV And Video Recorder Connect the aerial cables Better picture quality can be obtained if you also con nect a Scart cable to SCART sockets Playback NTSC Conn...

Page 26: ...sult your dealer No Picture means that your TV is not receiving a transmission Have you selected the correct button on the remote control Try once more Sound You can not hear any sound Did you perhaps...

Page 27: ...IDEO IN IN OUT IN OUT HEADPHONE AUDIO VIDEO SATELLITE RECEIVER ANTENNA CAMCORDER VHF UHF 75 Round 75 ohm coaxial cable Rear of TV Outdoor Aerial Connection Appendix A Aerial Connection ENG 26770W 1602...

Page 28: ...y blend if the two peripherals are used at the same time Thus these two are not to be used at the same time S VHS Input Video Input Audio Inputs s Audio Line Outs s Headphone Power Cord Input Power On...

Page 29: ...st be connected to the terminal which is marked with the letter E or by the earth symbol or coloured green or green and yellow The wire which is coloured blue or black must be connected to the termina...

Reviews: