Goodmans GTVL19W17HVF Instruction Manual Download Page 33

USING THE FEATURES

USING THE FEA

TURES

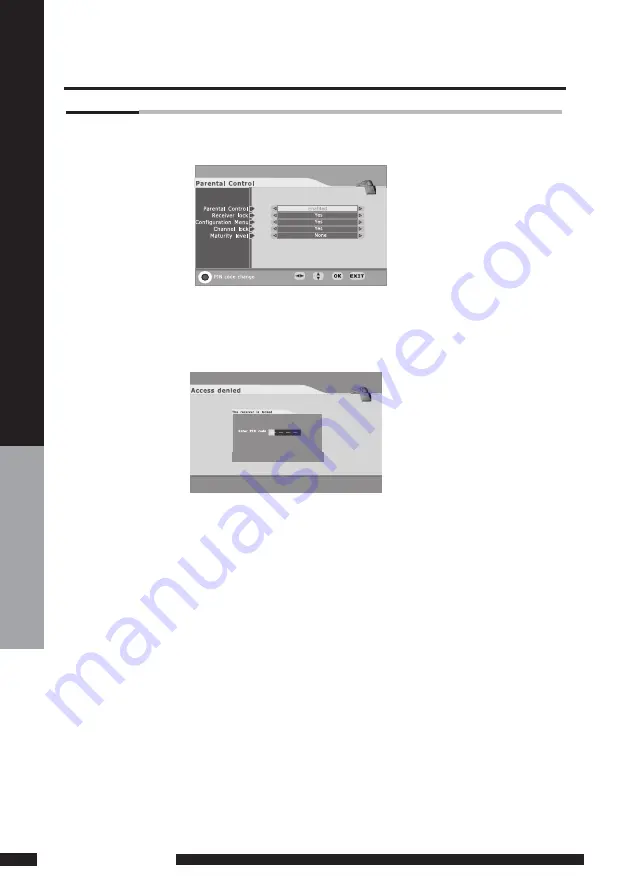
Highlight the parental control line in the parental control menu and use◄/► buttons to cycle 

through the enable and disable option. Toggle this option to enable, then the following items 

can be altered.

CONFIGURATION MENU


If you toggle this option to YES, you will enter the PIN CODE before enter the configuration  menu.

CHANNEL LOCK 

If you toggle this option to YES, the channels you locked in the edit channel list menu can’t be 

displayed before you enter the PIN CODE.

MATURITY LEVEL

There are 18 levels total. If you toggle this option to a number (1-18), for example, you toggle it to 15, 

that’s to say, if the channels broadcast material is not suitable for the family members who are under 

15 years old , you must enter the PIN CODE before you can view them. (The maturity level information 

should be broadcast with these programs.)

RECEIVER LOCK

You should enter the PIN CODE before you can see the DTV program while you power on the 

TV and select the DTV INPUT.

PARENTAL CONTROL

Using the DTV OSD Settings

Summary of Contents for GTVL19W17HVF

Page 1: ...SB Interface Goodmans Helpline 0871 230 1777 ATV DTV DVD CH VOL GUIDE 10 EXIT INFO INPUT CH LIST MENU 1 4 7 8 9 0 5 6 2 3 OPEN CLOSE STOP PLAY PAUSE SEARCH SKIP I II DVD SLEEP DVD SUBTITLE SUBTITLE USB CARD TITLE FAST TEXT AUDIO SETUP ZOOM DVD MENU GO TO ...

Page 2: ...This symbol is intended to alert the user to the presence of important operating and maintenance instructions in the literature accompanying the appliance CAUTION TO AVOID THE RISK OF ELECTRIC SHOCK DO NOT REMOVE COVER OR BACK NO USER SERVICEABLE PARTS INSIDE REFER SERVICING TO QUALIFIED SERVICE PERSONNEL Use of controls or adjustments or performance of procedures other than those specified herein...

Page 3: ...er 2 core or 3 core Follow the appropriate wiring instructions given below In both cases ensure that the outer sheath of the cable is firmly held by the cable clamp WARNING Do not connect either wire to the earth terminal This symbol indicates that this 2 core appliance is Class II and does not require an earth connection 2 CORE BLUE Neutral Cable clamp BROWN Live Fuse The wire coloured blue must ...

Page 4: ...t Unplug the unit immediately it gets wet and consult your servicing technician Always unplug the unit before cleaning it Wipe dust off the cabinet of the unit with clean dry soft cloth Apply non ammonia cleansing lotion onto the cloth not directly onto the screen Do not place heavy objects on top of the unit Avoid exposing your unit directly to sunlight or other heat sources Put your unit in a we...

Page 5: ...erial 14 Connecting a VCR Video Camera 16 Connecting a TV box and satellite Receiver 17 Connecting an Audio Receiver 18 HDMI 19 USING THE FEATURES Basic Operation 20 OSD Menu Operation 21 The Video Settings 22 The Audio Settings 22 The Setup Settings 23 The Parental Settings 24 The Screen Settings 24 Using The Digital TV Features 25 Using The DVD Features 34 SPECIFICATIONS 44 ...

Page 6: ...nnection 1 set of composite A V input terminals 1 SCART input terminals 1 set of component Video input terminals 1 VGA Audio input terminal 1 HDMI Audio input terminals 1 Headphone terminal High Definition Multimedia Interface HDMI High Definition Multimedia Interface HDMI is a small user friendly interconnect that can carry up to 5 Gbps of combined video and audio in a single cable This system el...

Page 7: ... need to set up and operate the LCD TV in its basic configuration Package Contents VIDEO Cable Remote Control AAA Batteries x 2 User s Manual AUDIO Cable Power Adapter ATV DTV DVD CH VOL GUIDE 10 EXIT INFO INPUT CH LIST MENU 1 4 7 8 9 0 5 6 2 3 OPEN CLOSE STOP PLAY PAUSE SEARCH SKIP I II DVD SLEEP DVD SUBTITLE SUBTITLE USB CARD TITLE FAST TEXT AUDIO SETUP ZOOM DVD MENU GO TO Power Cord Quick Start...

Page 8: ...l attached with the bottom foam packaging material in the package Read all instructions before continuing with the stand installation a Open the box and make sure all necessary parts are in the box The package contains b Cover an even stable surface with a soft cloth Place the LCD TV unit face down on the cloth Fit the stand onto the bottom of the LCD TV unit as shown c Then push until stand into ...

Page 9: ...t the 2 batteries supplied in remote control 1 2 3 Do not use caustic cleaners porcelain stainless steel toilet or oven cleaner etc on the remote as it may suffer damage Pull the tab of the back cover and pull up on the cover to open the battery compartment of the remote control Insert two AAA size batteries Make sure to match the and ends of the batteries with the and ends indicated in the batter...

Page 10: ...D mode Power Turns the LCD TV on and into standby mode CHANNEL Scans up and down through channels Selects sub menu item when in the OSD mode Input Chooses from different input signal sources EARPHONE SOCKET Connects to the external earphone for private listening LED The LED light indicates when the LCD TV is activated VOL CH MENU INPUT POWER PREPARATION PREPARTION Your LCD TV Front Left Right Side...

Page 11: ...ie playout for MPEG1 MPEG2 on your TV DVD mode 4 PLAY PAUSE Press to start play back or pause DVD mode 5 OPEN CLOSE Press to open and close the disc tray DVD mode To View USB or SD MMC card you must select DVD mode then attach insert USB SD Card Using the remote control to navigate and to select the file shown on the TV screen within the SD MMC Card or USB memory disk stick Use the arrow navigatio...

Page 12: ...kets on your video equipment 4 AV3 VIDEO AUDIO L R Connects to the composite A V output sockets on your video equipment 5 AV4 Y Pb Pr AUDIO L R Connects to the component Y Pb Pr video sockets and audio L R sockets of your DVD player HDTV or video equipment 6 AV5 VGA IN PC AUDIO IN Connects to a PC or other devices with a VGA interface 7 AV6 HDMI IN Connects to devices with a HDMI interface 8 DIGIT...

Page 13: ...els up and down VOL Increase and decrease volume SLEEP Set the LCD TV sleep time Press the SLEEP Button to select the number of minutes followed by 15 30 60 minutes and off The timer begins to count down from the number of minutes selected To check the remaining sleep time press the SLEEP Button once To cancel the sleep time repeatedly press the SLEEP Button until the display off appears If you tu...

Page 14: ...DTV mode shows programme information OK INPUT Cycle among the different input signal sources TV DVD AV1 SCART AV2 S VIDEO AV3 CVBS AV4 YPbPr AV5 VGA AV6 HDMI DTV Allow you to move select and set up the OSD options USB CARD Display the main index in Teletext mode Press this button to switch between DVD Card Reader and USB memory disk stick DVD mode AUDIO Reveal hidden information such as the answer...

Page 15: ...F IN DC 12V IN DIGITAL OUT Unplug from a wall DC IN VOL CH MENU INPUT POWER R POWE 14 PREPARATION PREPARTION Chapter 2 Installing the LCD TV Refer to the owner s manual of any external equipment to be connected When connecting any external equipment do not connect any AC power cords to wall outlets until all other connections are completed Antenna Connection The aerial requirements for good digita...

Page 16: ...ns socket a blue light will show on the front centre panel of the TV b Press the POWER button the red light will change to green and the First Time Installation screen will show 1 Make sure an aerial is fitted then press OK button on the remote to start the Auto Programme Scan APS 2 In a short while you will see the TV programmes briefly as each channel is received and stored in the memory When AP...

Page 17: ...o the LCD TV s SCART socket Connect all power sources before turning on the LCD TV or other connected equipments Press the POWER button to turn on your LCD TV METHOD A AV2 METHOD B AV3 METHOD C AV1 To watch VCR press the INPUT button to select AV1 AV2 or AV3 To watch video camera press the INPUT button to select AV2 or AV3 Audio R Video Audio Cable ideo Audi L V o VHF UHF IN PC VGA IN 5 Not all ca...

Page 18: ...V Cable Box s RGB output sockets to your LCD TV Use a 3 5mm socket to RCA adapter cable for connecting audio Method E AV1 Use a SCART cable to connect the TV Cable Box s SCART socket to the LCD TV s SCART socket Connect all power sources before turning on the LCD TV or other connected equipments Audio R Video Audio Cable ideo Audi L A Pb Pr E VGA CABLE D HDMI CABLE F V o PC VGA IN SATELLITE RECEIV...

Page 19: ...e audio receiver s digital coaxial Input to LCD TV s DIGITAL OUT sockets Only for DVB T DVD input sources Press the POWER button to turn on your LCD TV Connect all power sources before turning on the LCD TV or other connected equipments Rear of TV VHF UHF IN PC VGA IN Connecting an Audio Amplifier ...

Page 20: ...ia Interface HDMI This TV SET supports HDCP High bandwidth Digital Content Protection Protocol for TV SET 480p 720p 1080i modes When you connect to the output of an HD ready player DVD Player Set Top Box or PC switch to the AV6 HDMI function and the TV will automatically detect the resolution used by the HDMI source To get the best picture quality adjust the DVD Player or Set Top Box output resolu...

Page 21: ...uttons To power off press the POWER button the green light will change to red Selecting a INPUT Press the INPUT button to display the function required TV AV Using the arrow buttons on the remote highlight the function required and press the OK button to select the function Select TV Channel Press the CH button on the remote control and the CH button on the LCD TV to change the TV channels You can...

Page 22: ...ight your main menu option then press OK to enter your selected option Use to highlight an option of the sub menu Use to change the value of the item Press the EXIT button to exit menu VIDEO Use this Video setting menu to adjust the picture quality which best corresponds to your viewing requirements The Video Menu includes the following options OPTION DESCRIPTION Picture Mode Custom Select for use...

Page 23: ...gh Blue Stretch Allows you to adjust the blue stretch Green Stretch Allows you to adjust the green stretch Color Temp Allows you to adjust the color temp to be cool warm standard OPTION DESCRIPTION Volume presets the volume to a given setting Balance Adjust to emphasize left or right speaker balance Use this AUDIO setting menu to adjust the sound and balance and volume to your listening requiremen...

Page 24: ...lovakia Turkey Others Manual Search Allows you to adjust the manual search by hand if signal is too weak or picture is blurry Channel Setup Press the button to select Sort Delete Skip Finetune Save Sort Allows you to manually sort the stored programme Delete Allows you to delete the stored programme Skip Allows you to skip the stored programme Finetune Allows you to finetune the stored programme S...

Page 25: ... timer to be off 15min 30min 60min OSD Timer Allows selection of the display time of the on screen menu 5 s 10 s 15 s 20 s 25 s OSD Reset Allows you to restore the factory settings OPTION DESCRIPTION Horizontal Size Allows you to adjust the Horizontal Size from 0 to 100 Horizontal Position Allows you to adjust the Horizontal Position of the picture Vertical Position Allows you to adjust the Vertic...

Page 26: ...y a favourite list Delete a favourite list OK EXIT CREATE A FAVOURITE LIST Highlight the Create a favourite list item pressing OK button then The menu is displayed on the screen now Once you enter the Create a favourite list menu a new channel list will be created you can create four favourite lists at most You can lock or unlock the selected channel by pressing the RED button pressing the BLUE bu...

Page 27: ... enter the PIN Code that is set in the parental control menu at first before the channel is displayed By pressing the YELLOW button you can sort the channels in the list Then you can sort the channels alphabetically by pressing the RED button or sort the channels manually by pressing the BLUE button If you have locked several channels by pressing the YELLOW button the locked channels will be place...

Page 28: ... O K to confirm MODIFY A FAVOURITE LIST You can modify the favourite list which you have create The list named TV RADIO is the default list the rest are created Select a favourite list then press OK button to modify the list as you do in the create a favourite list menu Modifty a favourite list TV RADIO FAV 1 FAV 2 OK EXIT If you skip a channel it cannot be shown in the list menu Press OK button w...

Page 29: ...the channel installation menu If you want the TV to auto search the channels press OK button to continue Then you should choose the installation type by using the buttons and press the OK button to start the installation process If you choose add the new channels will be added in the channel list If you choose new the new channels will replace the previous channels in the channel list CONFIGURATIO...

Page 30: ... Using to cycle the channel option then the bar graphs of signal level and signal quality will indicate whether any channels are likely to be found You should choose the channel of which the signal quality bar is high as well then press OK button to scan the channels NEW DETECTED CHANNELS The New Detected Channels menu shows the channels that you add in the channel list recently The type icon of t...

Page 31: ...UBTITLE LANGUAGE This function selects the desired subtitle language whenever subtitle information is broadcast Highlight the subtitle language line in the user settings menu and use buttons to cycle through the language option SYSTEM PARAMETERS Using the buttons to highlight the system parameters item in the configuration menu then press OK button to display the system parameters menu SYSTEM UPGR...

Page 32: ...uration menu pressing OK button to display the Signal information menu Cycle through the channel option by using the buttons on the remote control The signal level and signal quality of the channel that offers the upgrade software can be observed on the two bar graphs The bar graphs of signal quality and signal level give a good indication of whether the selected channel is likely to be found If t...

Page 33: ...u locked in the edit channel list menu can t be displayed before you enter the PIN CODE MATURITY LEVEL There are 18 levels total If you toggle this option to a number 1 18 for example you toggle it to 15 that s to say if the channels broadcast material is not suitable for the family members who are under 15 years old you must enter the PIN CODE before you can view them The maturity level informati...

Page 34: ...essing this button again you can close this window Press RED button to set a Reminder to automatically view a chosen channel by pressing this button again you can cancel this reminder REMINDER 14 58 27 09 2005 PIN CODE CHANGE Pressing the RED button will popup the PIN code change menu enter the previous code by using the 0 9 buttons on the remote control then enter the new code twice to confirm an...

Page 35: ... Select INPUT to DVD 3 Insert a disc with label side facing front of TV CD R CD RW DVD R DVDRW VCD SVCD DVD R or DVD RW 4 After the disc is inserted Smart NAVl will show the contents of the disc automatically 5 If DVD cannot automatically play press or Button to select play content and press OK Button or PLAY PAUSE Button on the remote control to the start playing content USB CARD SCART CVBS Y Pb ...

Page 36: ...er Card Reader Mode 5 Press Button on the remote control to select the file you want to play and then press OK Button to play the file NOTE 1 The card socket and the DVD player cannot be used simultaneously so please insert either a card or a disc not both at once 2 If you want to view the DVD program or turn USB file on please press USB CARD Button to switch it USB Universal Serial Bus Insert a U...

Page 37: ...e 3 Now Insert a Card Label side facing you or USB cable Note If DVD has been previously played its important that the disc is removed and that the USB CARD Button on the remote is pressed before inserting a card or USB cable Failure to do so will result in the card USB failing to be read and shown on the monitor DVD Supports following formats 1 CVR VBR bite rate range 32kbps 320kbps WMA bite rate...

Page 38: ...7 Repeat On Off 4 Subtitle Angle 8 Time Display Mode Both VCD and DVD discs share the same instructions For CD discs Press the GO TO key on the remote control the screen will display as following order Track 03 71 05 33 Disc Go To Track Go To Select track WMA Playback The DVD player can playback discs including CD R CD RW DVD R DVD RW DVD R or DVD RW recorded with audio files Multiple and multi le...

Page 39: ...PEG files The DVD player is compatible to Kodak Picture CD and discs containing JPEG MPEG1 MPEG2 MPEG4 image files with JPG file extension This function is similar to playback function Upon loading a Kodak Picture CD JPEG files TV screen will display the following Operations Picture selection Preview Press cursor buttons to select the target picture and press OK Button to show The player will show...

Page 40: ...e show mode when playing pictures MPEG 4 Playback Upon loading the disc the screen shows a window as follows The following picture just for reference only 1 Choose your preferred directory use the Buttons to navigate and then press the OK Button to confirm 2 Select the AVI file by using cursor button to choose the preferred AVI fileand press OK Button to play it 3 Return to the main directory Pres...

Page 41: ... OSD Language The default language is English You can select other OSD languages English Norwegian Sweden Finish Dainish Greek Italian Polish Hungarian Czech French DIGITAL OUTPUT Output There are 3 kinds of SPDIF output mode for choose SPDIF OFF SPDIF RAW and SPDIF PCM SPDIF OFF Set as default there will be no digital audio signal output RAW Set as default the digital audio signal output will be ...

Page 42: ...st Memory ON Each time when you turn off the player it will memorize the last played file So if you turn on the player or play the same disc next time it will resume from the same point OFF Disable the last memory function OPTION DESCRIPTION DOWNMIX DOWNMIX LT RT Select this option when the DVD player is connected to external amplifier with Pro Logic decoding function STEREO Press down button to s...

Page 43: ...t channel audio Note This setting is used to play Dolby AC 3 encoded 2 channel discs Some DVDs may not being change in this menu setting DYNAMIC Dynamic When set the dynamic range to FULL the soft music will be automatically increase and the loudness of the music will automatically decrease When set the dynamic to OFF the function will be disabled Note This setting is used to play Dolby Digital en...

Page 44: ...ish PARENTAL PARENTAL Allows the user to set a maximum rating of movie that can be played e g PG rating Movies rated higher than the level set will not be played The parental lock can only be changed after input the correct password NOTE This function is available only when the discs have rating encoded on PASSWORD MODE Select to change old password to new password Factory default is 000000 and th...

Page 45: ... cable TV Press the POWER button on the remote Press the TV button on the remote then press INPUT button repeatedly to select the connected video INPUTs Picture OK poor sound Sound may be muted Press the button on the remote Press the VOL button to increase the volume Poor picture sound OK Check the interface cable between TV and antenna cable TV Try another channel the station may have broadcast ...

Page 46: ...Television System PAL I Brightness 450 cd m2 Contrast Ratio 800 1 Inputs Output SCART 1 VGA 1 PC Audio In 1 Video In 1 S video In 1 Phones 1 Y Pb Pr 1 HDMI IN 1 Coxial Out 1 TV 1 DVD INPUT 1 USB 1 CARD READER 1 Speaker Power 3 W 3 W Power Source 12 DC via supplied AC adaptor Dimension W x D x H 572 9 x 169 8 x 382mm Weight Net 5 3 Kg SPECIFICATIONS ...

Reviews: