Goodmans GTVL19W17HD Instruction Manual Download Page 3

2

LCD TV User Guide

Saf

ety Instructions

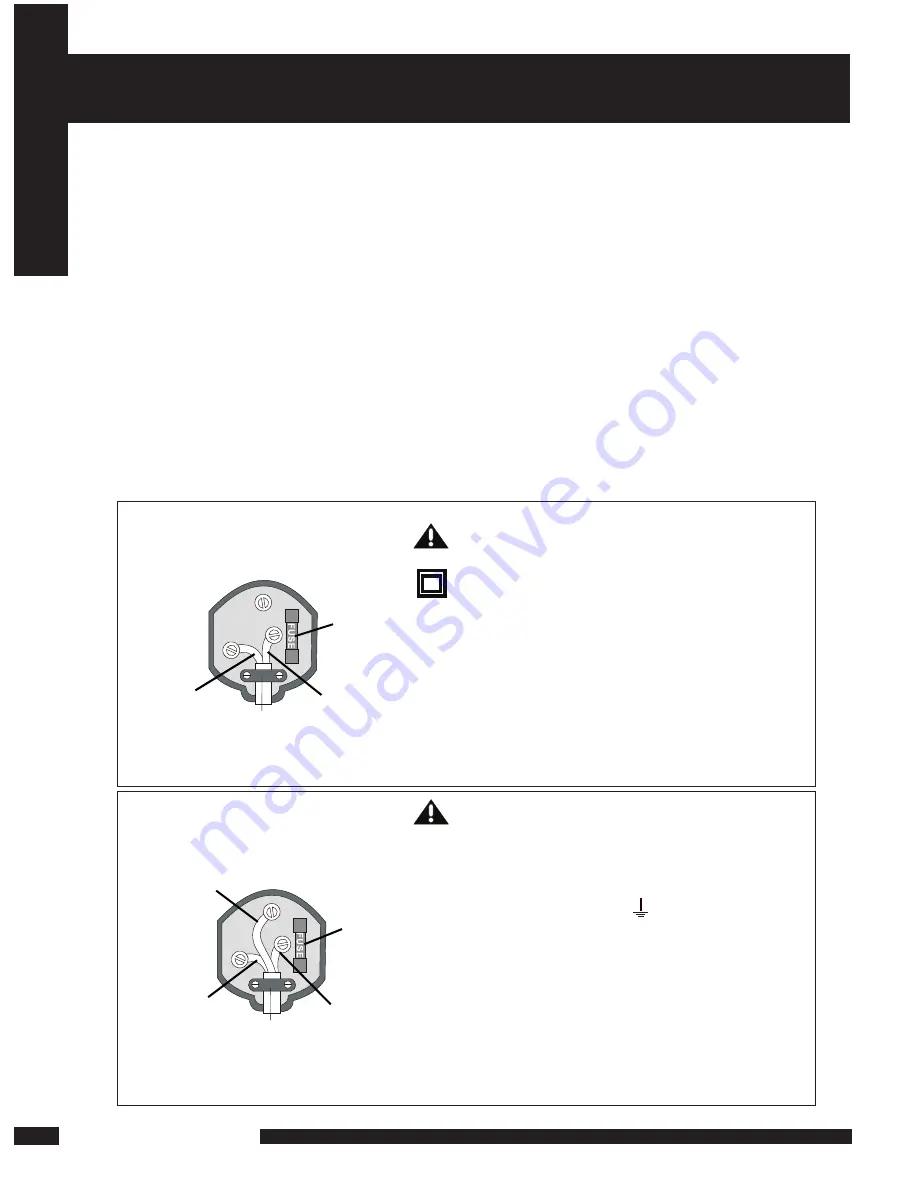
MAINS PLUG WIRING

Electrical Information

This appliance is fitted with a BS1363/A 13 amp plug. If it is not suitable for your 
supply sockets it must be removed and replaced with an appropriate plug. If the 
plug becomes damaged and/or needs to be replaced please follow the wiring 
instructions below. The plug removed must be disposed of immediately. It must not 
be plugged into a supply socket as this will be an electrical hazard. If the fuse needs 
to be replaced it must be of the same rating and ASTA approved to BS1362. If the 
plug is changed, a fuse of the appropriate rating must be fitted in the plug, adapter or 
at the distribution board. If the fuse in a moulded plug is replaced, the fuse cover 
must be refitted before the appliance can be used.

Wiring Instructions

The supply cable will be either 2-core or 3-core. Follow the appropriate wiring 
instructions given below. In both cases ensure that the outer sheath of the cable is 
firmly held by the cable clamp.

WARNING! Do not connect either wire to 
the earth terminal.

This symbol indicates that this 2-core 
appliance is Class II and does not require an 
earth connection.

2- CORE

BLUE
(Neutral)

Cable
clamp

BROWN
(Live)

Fuse

The wire coloured blue must be connected to 
the terminal marked with the letter N or 
coloured black.

The wire coloured brown must be connected to 
the terminal marked with the letter L or 
coloured red.

WARNING! This appliance must be 
earthed.

The wire coloured green and yellow must be 
connected to the terminal marked with the letter 
E, or by the earth symbol,    , or coloured green 
or green and yellow.

The wire coloured blue must be connected to the 
terminal marked with the letter N or coloured 
black.

The wire coloured brown must be connected to 
the terminal marked with the letter L or coloured 
red.

3- CORE

BLUE
(Neutral)

Cable
clamp

BROWN
(Live)

Fuse

GREEN and
YELLOW
(Earth)

Summary of Contents for GTVL19W17HD

Page 1: ...TV SCART CH VOL BACK EXIT INFO INPUT FAST TEXT MENU 1 4 7 8 9 0 5 6 2 3 S MODE P MODE P SIZE I II CH LIST COLOUR SLEEP...

Page 2: ...personnel This symbol is intended to alert the user to the presence of important operating and maintenance instructions in the literature accompanying the appliance RISK OF ELECTRIC SHOCK DO NOT OPEN...

Page 3: ...er 2 core or 3 core Follow the appropriate wiring instructions given below In both cases ensure that the outer sheath of the cable is firmly held by the cable clamp WARNING Do not connect either wire...

Page 4: ...Unplug the unit immediately it gets wet and consult your servicing technician Always unplug the unit before cleaning it Wipe dust off the cabinet of the unit with clean dry soft cloth Apply non ammon...

Page 5: ...CD TV 12 Using your LCD TV 13 INSTALLATION 14 Connecting a TV Cable or Aerial 14 Connecting a DVD Player 15 Connecting a VCR a Video Camera 16 Connecting a TV Box and Satellite Receiver 17 HDMI 18 USI...

Page 6: ...socket Features High Brightness Contrast Image Brightness 450 cd m2 Contrast Ratio 800 1 640x480 60Hz 1024x768 75Hz NICAM FM Stereo Function Auto Programme Sort APS Manual search Sleep Timer User sel...

Page 7: ...l of the following contents are included If you re missing any items please contact your dealer These items are all you need to set up and operate the LCD TV in its basic configuration Audio Cable Use...

Page 8: ...s in standby mode IR Infrared Receiver POWER Turns the LCD TV on and into standby mode MENU Presses once to display the OSD on screen display presses again to turn the OSD off VOLUME Adjusts the volum...

Page 9: ...posite A V output sockets on your video equipment 5 AV4 Y Pb Pr AUDIO L R Connects to the component Y Pb Pr video sockets and audio L R sockets of your DVD player HDTV or video equipment 6 AV5 PC VGA...

Page 10: ...ess the SLEEP button until the display off appears c If you turn the set off after setting the sleep timer the setting will be erased CH LIST Display all channel list name COLOUR Allows to select Colo...

Page 11: ...IT INFO INPUT FAST TEXT MENU 1 4 7 8 9 0 5 6 2 3 S MODE P MODE P SIZE I II CH LIST COLOUR SLEEP INFO Accesses the TELETEXT items or corresponding pages Displays the OSD menu on screen display Allows y...

Page 12: ...ds of the batteries with the and ends indicated in the battery compartment Align the lower tabs of the back cover to the remote control and squeeze the cover into place Do not use caustic cleaners por...

Page 13: ...necessary parts are in the box How to install the TV Stand Cover an even stable surface with a soft cloth Place the LCD TV unit face down on the cloth Fit the stand onto the bottom of the LCD TV unit...

Page 14: ...disconnect the main voltage please switch off the power switch on the rear of the TV or remove the power plug from the socket 1 13 PREPARATION PREPARATION Using your LCD TV PC AUDIO IN PC VGA IN AC 23...

Page 15: ...aerial to the Aerial input socket on the TV Connect all AC power sources before turning on the power switch at the back of the TV Press the POWER button on your remote to turn on your LCD TV Press the...

Page 16: ...ress the INPUT button to select AV1 AV2 AV3 AV4 1 METHOD A AV3 Use an A V cable to connect the DVD s composite output sockets to your LCD TV METHOD B AV2 Use an Audio cable to connect the DVD s audio...

Page 17: ...connect the VCR s the VIDEO CAMERA s audio output sockets to your LCD TV Use a S Video cable to connect your LCD TV and VCR player VIDEO CAMERA METHOD C AV1 Use a SCART cable to connect the VCR s SCA...

Page 18: ...a Component cable to connect the Y Pb Pr sockets on the TV Cable Box to your LCD TV Use an Audio cable to connect TV cable box s audio output sockets to LCD TV 1 Connect all power sources before turni...

Page 19: ...a Interface HDMI This TV SET supports HDCP High bandwidth Digital Content Protection Protocol for TV SET 480p 720p 1080i modes When you connect to the output of an HD ready player DVD Player Set Top B...

Page 20: ...s the INPUT button to display the function required TV AV Using the arrow buttons on the remote highlight the function required and press the OK button to select the function Select TV Channel 1 Press...

Page 21: ...n menu will appear on the screen 3 Use to highlight your main menu option then press OK to enter your selected option Use to highlight an option of the sub menu Use to change the value of the item Pre...

Page 22: ...ast Enhancemen to be off low mid high Blue Stretch Enhance Blue scenes such as sky and sea scenes Green Stretch Green scenes such as Grass fields woodlands etc will be more vivid Color Temp Allows you...

Page 23: ...Czech Rep Germany Denmark Spain France Finland UK Greece Hungary Italy Norway Netherlands Portugal Poland Sweden Slovenia Slovakia Turkey Others Manual Search Allows you to adjust the manual search by...

Page 24: ...he sleep timer to be off 15min 30min 60min OSD Timer Allows selection of the display time of the on screen menu 5 s 10 s 15 s 20 s 25 s OSD Reset Allows you to restore the factory settings Preferences...

Page 25: ...POWER button on the remote Press the TV button on the remote then press the INPUT button repeatedly to select the connected video sources Make sure that the main power switch on the back panel is swi...

Page 26: ...pixels horizontal x 900 pixels vertical Television System PAL I Brightness 450 cd m2 Contrast Ratio 800 1 Inputs Output SCART 1 HDMI 1 VGA 1 PC Audio In 1 Video In 1 S video In 1 PHONES 1 Y Pb Pr 1 T...

Page 27: ...just the screen resolution by referring to your video card user guide otherwise there may be no video Y Pb Pr Mode Resolution Vertical Frequency Hz Aspect Ratio 480P 720 x 480 60 16 10 Wide 4 3 480I 7...

Reviews: