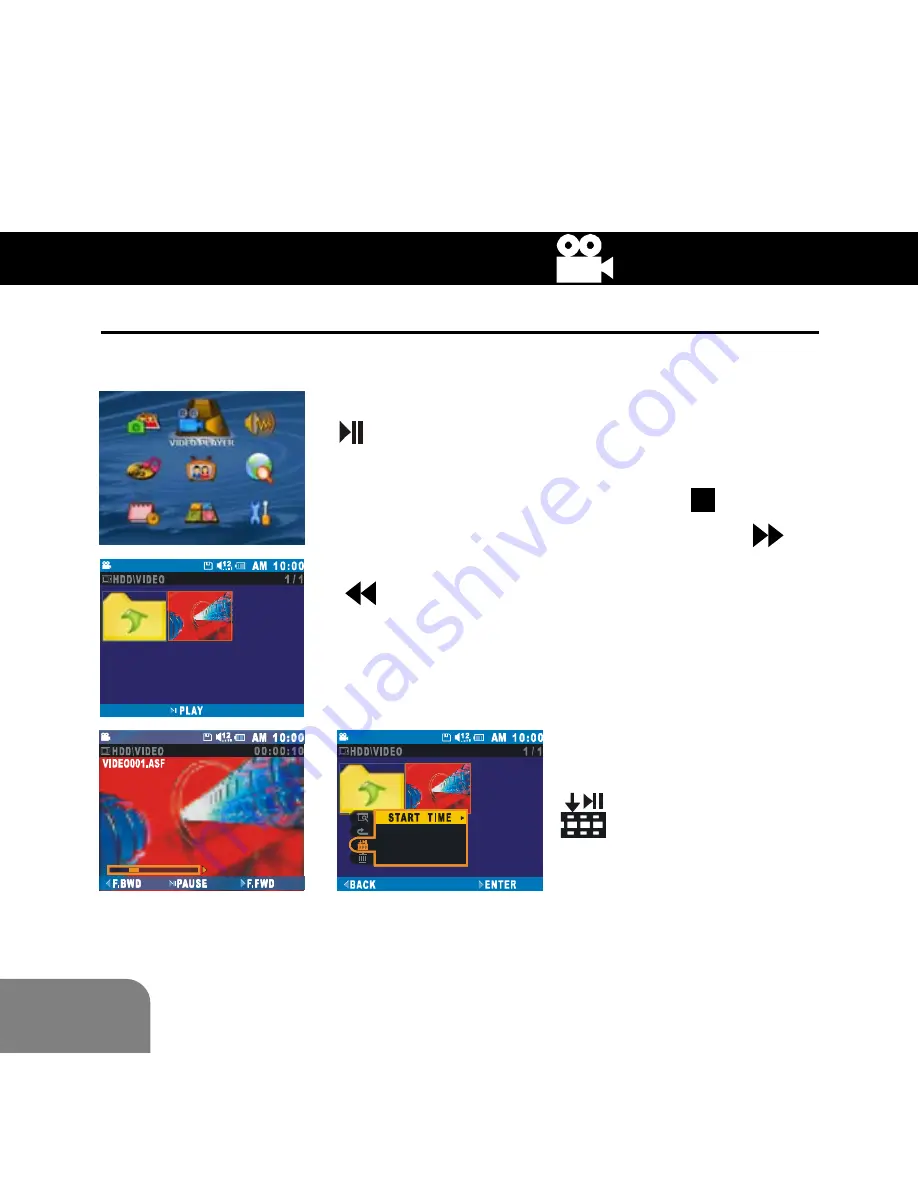
Goodmans GPDR 40 User Manual Download Page 32

22

VIDEO PLAYER

Video Playback

Select 

VIDEO PLAYER

 in the 

Main Menu

 and press 

OK

 button to enter.

Use the joystick to select a video and press


/

 OK

 button to play. Use the joystick Up /

Down to scroll through files.

During Playback, press 

MODE

 /   button to

stop playback, press the joystick right (

) to

advance playback and press the joystick left
(

) to reverse playback.

Tip:

You can choose the point at which to start
playback of the selected video before playing.

Press 

MENU / INFO

 button

and scroll down to select

. Press the joystick

right twice to enter the
start time sub-menu.

Note:

 To turn off the power during video playing, first press

the 

STOP

 button to stop playback and then press the

power button to turn it off.

Summary of Contents for GPDR 40

Page 1: ...PERSONAL ENTERTAINMENT SYSTEM GPDR 40 USER GUIDE 82 176 00062...

Page 2: ...l and electronic equipment should be disposed at the end of its life separately from your household waste There are separate collection systems for recycling in the EU For more information please cont...

Page 3: ...oft cloth Do not try to disas semble or repair the device Always connect the cables correctly Do not subject the device to low tempera tures or high humidity Do not expose to direct sunlight or extrem...

Page 4: ...se only the supplied charger Use of a different charger may present a risk of fire or explosion Should the battery become exhausted recharge the unit using the Supplied AC adapter as soon as possible...

Page 5: ...battery for at least 3 5 hours BEFORE operation 1 Plug one end of the power adapter to the DC IN socket of the GPDR40 the other end in to the appropriate wall socket 2 The red recharge indicator will...

Page 6: ...highlight DAY and press the joystick up down to set the day Press OK button to confirm and continue 6 Press the joystick up down to set the month and press OK button to confirm and continue 7 Press th...

Page 7: ...CAUTION III HDD FORMATTING CAUTION III BATTERYRECHARGE IV DATE TIME SET UP V OVERVIEW 1 SOFTWARE INSTALLATION 4 CONNECTING TO PC 6 Adding Files to the GPDR40 Mass Storage 6 Converting and Transferrin...

Page 8: ...elete the Voice Clip Attached to a Photo 17 Slide Show Playback 19 Effects 20 Memory Mix 21 Video Player 22 Video Playback 22 Repeat Playback 24 Delete 27 Voice Player 29 Voice Playback 29 Record Voic...

Page 9: ...Music Playback 37 Alarm 38 AV Center 40 Record from External Equipment to the GPDR40 40 Timer Record 44 File Browser 47 Sort 48 Rename 49 Create New Folder 50 Calendar 52 Game 53 TIC TAC TOE 53 PUZZL...

Page 10: ...56 Change the Startup Sound Button Sound 58 DPS Menu 60 DPS 60 How to Print 61 OSD Menu 66 Photo Player Menu 66 Video Player Menu 68 Voice Player Menu 69 Music Player Menu 71 AV Center Menu 72 File Br...

Page 11: ...harge indicator D Speaker E LCD Power button Press briefly to turn the LCD Display on off Press and hold for approximately 3 seconds to power off F Mode Stop button G Joystick H Play OK button I Menu...

Page 12: ...in the unlikely event that no buttons function To power on after resetting press the POWER button T Lock Slide the switch to this position to activate the key lock U Unlock Slide the switch to this po...

Page 13: ...3 Y Stand Installation of the Stand Turn over the GPDR40 Align the tabs on the stand with the guide holes on the GPDR40 Slide the stand upwards into place...

Page 14: ...Insert the Installation CD into CD ROM drive on a PC The Select Language dialog box appears 2 Select your preferred language and click OK to continue 3 A Welcome dialog box appears Click Next 4 The S...

Page 15: ...ply click Next to continue 6 The Start Copying Files dialog box appears confirming that the listed software will be installed Click Next to continue 7 Follow the on screen instructions to continue and...

Page 16: ...he PC Try to connect directly to the PC and avoid connecting via passive USB hubs as this may cause transfer problems z Plug the smaller plug into the USB socket on the unit z Switch ON the unit Windo...

Page 17: ...ote for Windows 2000 users Windows 2000 will only support one mass storage device from a single USB port Therefore only one of the drives will be shown To fix this problem down load service pack 4 fro...

Page 18: ...e been copied to the removable drives double click on the icon in the system toolbar to stop or eject Windows will report when the drives have been safely stopped Remove the USB cable from the USB soc...

Page 19: ...t it to the computer with theprovided USB cable For details on connection see page 6 2 After connecting the GPDR40 to the PC the PVR Console Refer to Page 13 for more information will be shown on the...

Page 20: ...hoose the destina tion where the converted files will be uploaded to The To Folder option will save the converted files to the folder list below The To Device will upload the converted files directly...

Page 21: ...formats However MediaConverter does not support all video formats or codecs MediaConverterTM Supported File Type File Type Format Extension File Name Windows Media Audio and Video File Format asf wmv...

Page 22: ...the file to a format that the GPDR40 can recognise When converting please ensure that all the required CODECs are installed before opening the file converter tool If the video file plays on the PC the...

Page 23: ...up and Disk Defragmenter programs for system diagnosis and defragmentation C Personal Style Changes the Startup Screen and Sound Effects for the GPDR40 D MAX Console Opens MAX Console software for ima...

Page 24: ...and press OK button to enter Thumbnail View Default The photos will be displayed as thumbnails with 6 to a page Single Photo View To view a single photo in full screen use the joystick to select the...

Page 25: ...om While viewing a photo as full screen press OK button The selected photo will be magnified by 2X To magnify to 4x press OK button again To return to normal viewing press the OK button again PHOTO PL...

Page 26: ...button When the recording is done a icon will appear on the right top of the photo Tip You can change the audio quality setting before recording Simply use the joystick to highlight and press OK butt...

Page 27: ...ct icon Press the joystick right to highlight PLAY VOICE Play Voice Press OK button to display the voice sub menu Use the joystick to highlight the OK option and press OK button to play the voice clip...

Page 28: ...To select a different voice message to be deleted scroll up to icon and press the joystick left right to select To delete the voice clip attached to the currently displayed photo highlight the option...

Page 29: ...enter the slide show sub menu Tip You can change the interval and transition effect setting To change the interval scroll up to and press OK button to enter Press the joystick up down to set the time...

Page 30: ...e in Thumbnail View use the joystick to select the photo to apply effects to Press MENU INFO button and scroll down to Press the joystick right to enter the effects sub menu Use the joystick up down t...

Page 31: ...to highlight MEMORY MIX Press OK button to enter a frame sub menu Scroll up to highlight and use the joystick left right to change the photo to apply the frame to Scroll up to highlight Use the joyst...

Page 32: ...op playback press the joystick right to advance playback and press the joystick left to reverse playback Tip You can choose the point at which to start playback of the selected video before playing Pr...

Page 33: ...o set the hours Press OK button and then press the joystick up down to set the minutes Press OK button and then press the joystick up down to set the seconds Finally press OK button to confirm Press j...

Page 34: ...INFO button and scroll down to select icon from the menu VIDEO PLAYER Repeat Normal Press the joystick right to highlight NOR MAL PLAYBACK from REPEAT menu Press OK button to confirm Playback will st...

Page 35: ...selected video file repeatedly To return to normal playback select NORMAL PLAYBACK from the menu Repeat All Select REPEAT ALL from REPEAT Menu and press OK button to confirm Press the joystick up down...

Page 36: ...g the playback press OK button to set point A and then press OK button again to set point B The section between points A B will then be repeated To cancel A B Repeat press the OK button again To retur...

Page 37: ...screen on the left appears Delete One Press the joystick right to highlight ONE and then press OK button Scroll up to highlight and use the joystick right left to select the video file to delete Scrol...

Page 38: ...All Use the joystick to highlight ALL and then press OK button A message will be shown on the screen for further confirma tion Scroll up to highlight and press OK button to delete all video files VID...

Page 39: ...ress the joystick right to advance playback and press the joystick left to reverse playback Tip If the audio file to play resides in the sub folder under the current AUDIO folder press the joystick up...

Page 40: ...EC button to start recording To stop press MODE or REC button Tip You can change the audio quality setting before recording Press the joystick up to highlight and press OK button to enter To change th...

Page 41: ...MENU INFO button and scroll down to select icon from the menu Press the joystick right to highlight NORMAL PLAYBACK Press OK button to confirm Playback will start with the selected song and will play...

Page 42: ...the current selected audio file repeatedly To return to normal playback select NORMAL PLAYBACK from the menu Repeat All Select REPEAT ALL from REPEAT Menu and press OK button to confirm Press the joy...

Page 43: ...udio file and press OK button to start playback During the playback press OK button to set point A and then press OK button again to set point B The section between points A B will then be re peated T...

Page 44: ...rt playback all the audio files in a random order To return to normal playback select NORMAL PLAYBACK from the menu Please note that when using the joystick up down to change the tracks during playbac...

Page 45: ...ck right to enable the function Time Set Up Press the joystick right and then press OK button to set the time the alarm should turn on After setting highlight SAVE and press OK button to enable the fu...

Page 46: ...s OK button Scroll up to highlight and use the joystick right left to select the audio file to delete Scroll down to highlight and press OK button to delete the selected file Delete All Press the joys...

Page 47: ...the MP3 file you want to play resides in the sub folder under the current MUSIC folder press the joystick up down to highlight the sub folder and then press OK button to enter Note To save power you m...

Page 48: ...croll down to select icon The screen on the left appears Press the joystick right to enable the function Turn on Time Press the joystick right and then press OK button to set up the time Note Voice Pl...

Page 49: ...continue Press the joystick up down to set the hour and press OK button to confirm and continue Press the joystick up down to set the minute and press OK button to confirm and continue Press the joys...

Page 50: ...vided AV cable to the AV IN OUT socket of the GPDR40 2 Connect the other end 3 RCA audio video connectors to the corresponding AV OUT connectors of the external equipment For details of which sockets...

Page 51: ...RT plug to the corresponding SCART OUT connector of the external equipment For details of which sockets to use on the external equipment please consult the instruction book of that equipment 3 Power o...

Page 52: ...scroll down to select TV SYSTEM Press the joystick left right to select the correct TV system and press MODE button to return to the Main Menu Start Recording Select AV CENTER in the Main Menu and pre...

Page 53: ...e that there is enough time remaining before commencing recording Set the Recording Length Press OK button again to enter time length setting 04 00 indicates maximum time for recording To set the reco...

Page 54: ...imation of the available time is shown above the menu To enter TIMER RECORD sub menu highlight and press the joystick right twice Change Record Quality Press OK button to enter QUALITY setting Press t...

Page 55: ...ton to move to year Press the joystick up down to set the day and press OK button to confirm and continue Set Start Time Highlight START TIME and press OK button to enter START TIME setting Press the...

Page 56: ...the joystick up down to set hour and press OK button to move to minute Press the joystick up down to set minute and press OK button to confirm and continue Scroll down and press OK button to save the...

Page 57: ...press OK button to enter Select a file Press the joystick up down to highlight the folder or file and press the joystick right or OK button to select To cancel the selection press the joystick right o...

Page 58: ...O button and scroll down to select icon Press the joystick right to highlight BY TYPE and press OK button to confirm The files will be sorted by different types accordingly Instead of sorting files by...

Page 59: ...utton and scroll down to select icon Press the joystick right to highlight RENAME and press OK button to confirm An on screen keyboard refer to Page 52 for keyboard definition will be shown on the rig...

Page 60: ...ight NEW FOLDER and press OK button to confirm An on screen keyboard appears on the right side with the folder name shown above To keep the folder name simply press OK button to exit To change the fol...

Page 61: ...51 On Screen Keyboard Filename bar Letters area Digits area Symbols area Escape key Space key Enter key Backspace key FILE BROWSER...

Page 62: ...and press OK button to enter The Calendar appears You will see TODAY is highlighted in orange color Note The Calendar appears with a monthly display To switch to clock view press the OK button To retu...

Page 63: ...to enter TIC TAC TOE Complete three symbols of in a row horizontal vertical or diagonal before the GPDR40 gets three symbols of X in a row How to Play Use the directional buttons to select a square an...

Page 64: ...ect position How to Play Use the directional buttons to select the picture and the level of difficulty you want to play and press OK button to start For more information please refer to the Game Help...

Page 65: ...ect the level of difficulty and press OK button to start the game Use the directional buttons to select a square in the Mine Field and press OK button to display the contents or press button to mark i...

Page 66: ...tup Screen open the PVR Console and press the Personal Style button and select Startup Screen The below screen appears Change the Startup Screen PVR CONSOLE Other Functions Browse Apply Delete Default...

Page 67: ...to locate the image file bmp or jpg the file will then be imported into the Image List Select it from the list and press the APPLY button to tranfer to the GPDR40 Reminder Please note that the startup...

Page 68: ...Sound Button Sound To change the Startup Sound or Button Sound open the PVR Console and press the Personal Style button and select Sound Effect The below screen will be shown Delete Exit Default Apply...

Page 69: ...ton to transfer to the GPDR40 To preview the file before the transfer press button Import a sound from your computer Press the BROWSE button to locate the sound file wav the file will then be imported...

Page 70: ...ervices then the photos can be printed directly without attaching to a computer Use the DPS Menu to set up advanced print setting SELECT PHOTO BROWSE NONE OPTIMAL ON OFF PHOTO SET COPIES 1 9 SIZE DEFA...

Page 71: ...w to Print 1 Power on the GPDR40 and connect it to the printer with the USB cable The screen below appears 2 Press the joystick down to select DIRECT PRINT and press OK button to enter DPS Menu DPS ME...

Page 72: ...K button to browse photos 4 Press the joystick up down left right to highlight the photo s and press OK button to select them To remove the mark highlight the photo and press OK button again 5 When th...

Page 73: ...hlight OPTIMAL a setting that will provide the most satisfactory print quality 7 Press the joystick left right to enable or disable the setting Press the joystick down to continue 8 Press the joystick...

Page 74: ...paper size Press the joystick down to continue 11 Press the joystick left right to select the paper type and press the joystick down to continue DPS MENU Note If you select DEFAULT in paper size sett...

Page 75: ...he entire photo and maintain 1 1 image proportion it is recommended to add borders to your photo X X When you are satisfied with the above settings press OK button to start printing To cancel the prin...

Page 76: ...of the available menus PHOTOPLAYERMENU Enter PHOTO PLAYER and press MENU INFO button to open this menu The menu contains the following OSD MENU VIEW LIST MULTIPLE SINGLE Use the joystick to select a...

Page 77: ...other photos with voice attached Select this icon to delete the voice attached to the photo DELETE VOICE Cancel and exit menu Interval 01 60 second s Transition NONE RANDOM and etc SLIDE SHOW START Us...

Page 78: ...last for one time ONE Repeat the selected video file continuously ALL Repeat all the video files continuously REPEAT A B Repeat the video from point A to point B START TIME HH MM SS Use the joystick...

Page 79: ...playback from the current selected one to the last for one time ONE Repeat the selected audio file continuously ALL Repeat all the audio files continuously A B Repeat the audio from point A to point B...

Page 80: ...joystick to select audio for deletion Select this icon to delete the selected audio ONE Cancel and exit menu Select this icon to delete all audio files DELETE ALL Cancel and exit menu VOICE PLAYER MEN...

Page 81: ...PEAT RANDOM Repeat the music in a random order ON Set up the time for alarm clock ALARM OFF Use the joystick to select music for deletion Select this icon to delete the selected music ONE Cancel and e...

Page 82: ...ress MENU INFO button to open this menu The menu contains the following QUALITY DATE YY MM DD START TIME AM PM HH MM END TIME AM PM HH MM ON SAVE TIMER RECORD OFF ELAPSED TIME RECORDING TIME DISPLAY T...

Page 83: ...r FILE BROWSER and press MENU INFO button to open this menu The menu contains the following FILE BROWSER MENU OSD MENU ALL PHOTO VIDEO AUDIO TYPE MUSIC SELECT NONE BY NAME BY TYPE SORT BY SELECTED COP...

Page 84: ...ed files SELECTED Cancel and exit menu Select this icon to delete all the unselected files UNSELECTED Cancel and exit menu Select this icon to delete all files DELETE ALL Cancel and exit menu RENAME H...

Page 85: ...75 CALENDARMENU Enter CALENDAR and press MENU INFO button to open this menu The menu contains the following CALENDARMENU OSD MENU DD MM YY DATE SAVE AM PM HH MM TIME SAVE...

Page 86: ...OFF Upon startup a screen will be shown on the Unit Display The screen can be changed using the PVR Console DATE TIME DISPLAY DATE TIME Select to display date or time in the top right corner of the s...

Page 87: ...T MEMORY ON OFF Unit will automatically select the last played file when entering a mode DATE FORMAT YY MM DD MM DD YY DD MM YY Select the date format to be used on the GPDR40 LANGUAGE Press the joyst...

Page 88: ...ve 6 SD MMC Card Reader 7 Digital Voice Recorder Display 3 6 Color TFT LCD Hard Disk 40 GB HDD Microphone Built in Speaker Built in TV System NTSC PAL DPS Support Yes Interface AV In AV Out Earphone D...

Page 89: ...2 Built in Charger through Power Adapter Power Source External Power Adapter Mass Storage Windows 98SE Me 2000 XP Mac OS 9 X and 10 1 above Dimensions 110x 80 x 30 mm L x W x H Weight 290g Internal R...

Reviews: