background image

15

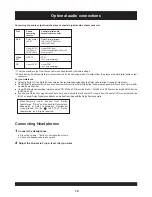
During playback, press F.FWD button

or F. BWD button

to fast forward/rewind.

Press PLAY button to resume normal play.

Press STOP
For your convenience:

When player is stopped, the player records the point where
STOP was pressed (RESUME function). Press PLAYagain,
playback will resume from this point . When the tray is

Opened or STOP is pressed again, the RESUME function
will be cleared.

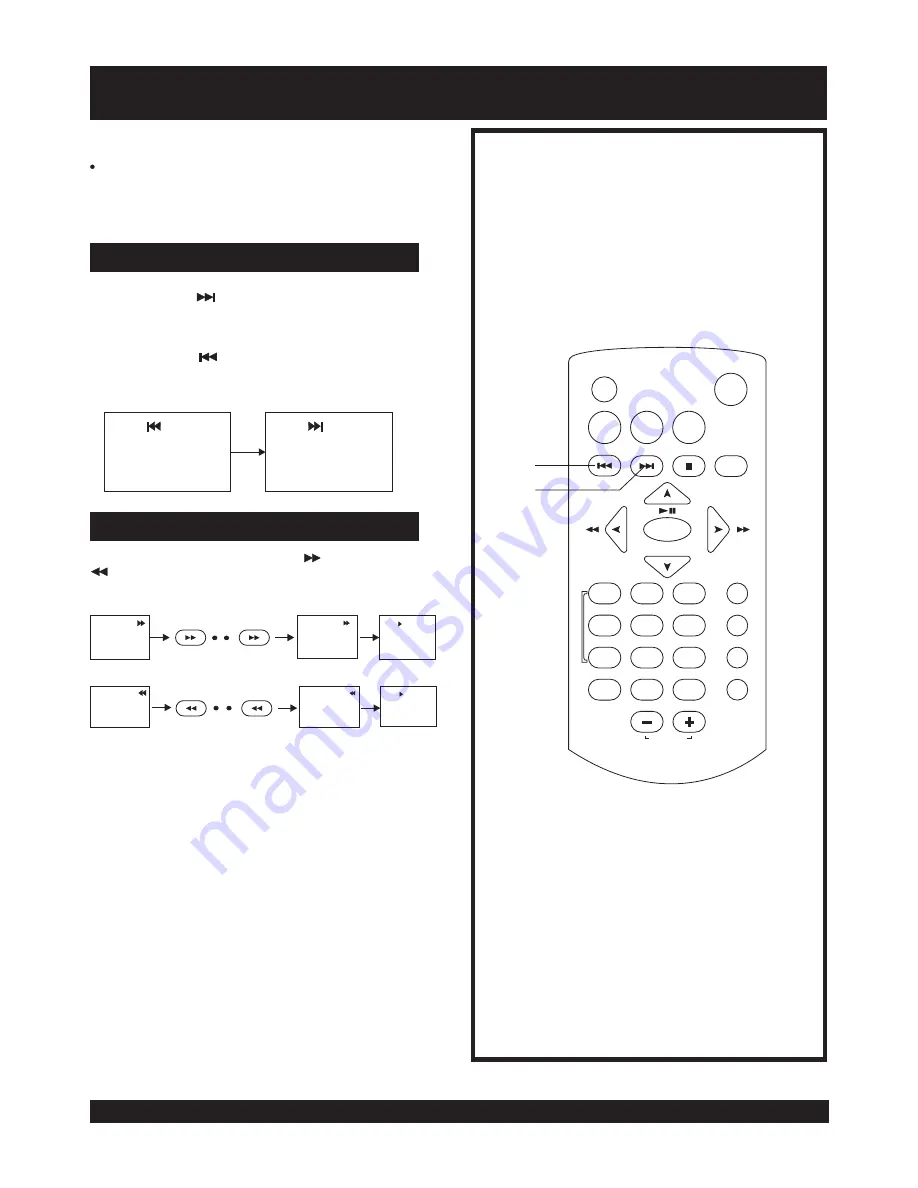
Skipping ahead or back

Skipping ahead

Skipping back

Press NEXT SKIP

button during play

A chapter(DVD) or a track (Video CD/CD) is skipped each
time the button is pressed.

Rapid advance (Rapid reverse)

Press PREV SKIP

button during play

A chapter (DVD) or a track (Video CD/CD) is skipped each
time the button is pressed.

X 2

Fast forward

F.FWD

F.FWD

Fast backward

F.BWD

F.BWD

PREV

NEXT

FORWARD

X 20

FORWARD

X 2

BACKWARD

X 20

BACKWARD

PLAY

PLAY

LCD

TITLE

MENU

SETUP

ON/STANDBY

STOP

DISPLAY

OK

SUBTITLE

AUDIO

SEARCH

REPEAT

PROGRAM

ZOOM

VOLUME

1

2

3

4

5

6

7

8

9

0

ANGLE

SLOW

PLAY/PAUSE

PREV

NEXT

Stopping play

Summary of Contents for GDVD90W13

Page 1: ...ayer please read these instructions completely All the illustrations included are for reference purpose only and subject to any change without prior notice Retain this manual for future reference PORTABLE DVD VCD CD PLAYER MODEL GDVD90W13 User Manual ENTER ...

Page 2: ...1 MAINS PLUG WIRING FITTED TO YOUR AC ADAPTOR ...

Page 3: ... Keep your unit away from magnetic objects motors TV sets and transformers Do not place heavy objects on top of the unit Avoid exposing your unit directly to sunlight or other heat sources Put your unit in a well ventilated area away from high humidity The apparatus and AC DC adaptor shall not be exposed to dripping or splashing and that no objects filled with liquids such as vases shall be placed...

Page 4: ...c play 14 Stopping play 15 Skipping ahead or back 15 Rapid advance Rapid reverse 15 MP3 playback 16 Kodak JPEG Picture CD 17 18 Play mode 17 Skip to next previous pictures 17 Rotating pictures 17 Flipping pictures 17 Picture shrink zoom 17 Slide show effects 18 Enjoying Video CDs with playback control 18 ON Screen display information 19 Program play 19 Repeat play 20 Changing subtitle language 21 ...

Page 5: ...erations and settings can easily be performed by operating the remote control while monitoring the TV screen The audio soundtrack can be heard in up to 8 languages The number of audio sound languages depends on the software Subtitles may be displayed in one of a maximum of 32 languages depends on the software This function allows you to choose the viewing angle of scenes which were shot from a num...

Page 6: ...evaporate Depending on the reception condition of the TV interference may appear on the TV screen while you are watching a TV broadcast and the player is left on This is not a malfunction of the player or the TV To watch a TV broadcast set the player to the standby mode Touching internal parts of this player is dangerous and may cause serious damage to the player Do not attempt to disassemble the ...

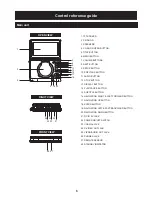
Page 7: ... BUTTON 11 AUDIO BUTTON 12 STOP BUTTON 13 DISPLAY BUTTON 14 PLAY PAUSE BUTTON 15 SUBTITLE BUTTON 16 NAVIGATION RIGHT FAST FORWARD 17 NAVIGATION UP BUTTON 18 19 NAVIGATION LEFT FAST BACKWARD BUTTON 20 NAVIGATION DOWN BUTTON 21 22 23 24 25 26 27 28 STANDBY INDICATOR BUTTON ENTER BUTTON DC IN 9V JACK POWER ON OFF SWITCH COAXIAL JACK S VIDEO OUT JACK VIEDO AUDIO OUT JACK PHONES JACK REMOTE SENSOR Good...

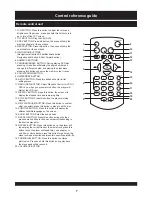
Page 8: ...ress this button the screen will display the elapsed time and remaining time 13 STOP BUTTON Press this button the player will stop playing 14 OK PLAY PAUSE BUTTON Press this button to confirm what you select press this button to play or halt the disc 15 SUBTITLE BUTTON Press this button will display the different subtitle language on the screen 16 AUDIO BUTTON Select the sound track 17 SEARCH BUTT...

Page 9: ...e hot due to poor contact Be sure to clean the cigarette lighter socket before use After use disconnect the 9V car power adaptor from both the unit and cigarette lighter socket FUSE REPLACEMENT FUSE NOTE This unit works either on the battery pack supplied or the AC power unplug the AC Power adapter from the DC input jack to work on the battery pack after fully charged plugging the AC Power adapter...

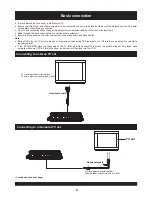
Page 10: ...an circulate freely Read through the instructions before connecting other equipment Ensure that you observe the color coding when connecting audio and video cables Note During DVD play the TV volume may be at a lower level than during TV broadcasts etc If this is the case adjust the volume to the desired level If the DVD VCD CD player is connected to the TV through a video cassette recorder the pi...

Page 11: ...S video input connector S video output connectors The S separate video output connector separates the colour C and luminance Y signals before transmitting them to the TV set in order to achieve a sharper picture Use the S video cable optional when connecting the player to a TV set equipped with an S Video input connector for the best picture clarity possible Video audio cable Basic connection ...

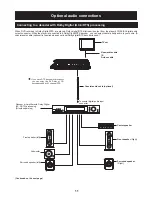
Page 12: ... required when an optional Dolby digital DTS decoder is used Continued on the next page TV set Video audio cable S video cable OR Decoder or Amplifier with Dolby Digital AC 3 DTS processing All sold separately Front speaker left Subwoofer Surround speaker left Center speaker Front speaker Right Surround speaker Right To coaxial digital audio input connector 11 If you have DTS decoder or processor ...

Page 13: ...having 96 KHz sampling is converted into 48 KHz sampling when it is output from the player s coaxial digital audio output connector DVD Video CD CD Dolby Digital AC 3 Dolby Digital bitstream 2 5 1ch or PCM 2ch 48 kHz 16 bit 1 Linear PCM 2ch 48 kHz sampling 16 bit only 2 or no output 1 Linear PCM 48 96 kHz 16 20 24 bit MPEG 1 Linear PCM PCM 44 1 kHz sampling Linear PCM 44 1 kHz sampling Disc Sound ...

Page 14: ...t also to burns if contact is made with the electrolyte Wipe away any electrolyte leaking inside the remote control unit and install new batteries If any electrolyte should come into contact with parts of your body wash it off thoroughly with water Note Do not point bright lights at the remote control sensor Do not place objects between the remote control unit and the remote control sensor Do not ...

Page 15: ...ch the TV ON and select Video as the TV input Switch on the stereo system s power if the player has been connected to a stereo system 3 Place a disc onto the disc compartment Hold the disc without touching either of its surfaces position it with the printed title side facing up align it with the guides and place it in its proper position 4 Close the disc cover After close the disc cover play begin...

Page 16: ...ahead or back Skipping ahead Skipping back Press NEXT SKIP button during play A chapter DVD or a track Video CD CD is skipped each time the button is pressed Rapid advance Rapid reverse Press PREV SKIP button during play A chapter DVD or a track Video CD CD is skipped each time the button is pressed X 2 Fast forward F FWD F FWD Fast backward F BWD F BWD PREV NEXT FORWARD X 20 FORWARD X 2 BACKWARD ...

Page 17: ... Current song Current folder Current disc type 4 Press NEXT and PREV button to select track directly 5 Press REPEAT button to change play mode 2 Select the folder you want to play by the navigation buttons and press OK button to confirm 3 The files in this folder are displayed and select your favourable song by using the up down navigation buttons and press OK button to start playback Maximum 8 ch...

Page 18: ...ture CD select the folder you want to play by the navigation buttons and press OK button to confirm The files in this folder are displayed and select your favourable pictures by using the up down navigation buttons and press OK button to start playback Thumbnail of picture will be displayed while you scrolling across the file name Press ZOOM button continuously it will zoom the picture to zoom 2 3...

Page 19: ...Video CDs with playback control When playing VCD 2 0 3 0 with PBC the TV screen After a few seconds a menu will appear on the screen 1 WHAT WILL I DO 2 HEAR ME CRY 3 WITHOUT YOU 4 MOVE CLOSER VCD 1 WIPE TOP 2 WIPE BOTTOM 3 WIPE LEFT 4 WIPE RIGHT 5 DIAGONAL WIPE LEFT TOP 6 DIAGONAL WIPE RIGHT TOP 7 DIAGONAL WIPE LEFT BOTTOM 8 DIAGONAL WIPE RIGHT BOTTOM 9 EXTEND FROM CENTER H 10 EXTEND FROM CENTER V...

Page 20: ...igit Some figure inputs may be useless because it s greater figure than total title chapter track number on the disc 3 To start program play select PLAY on the menu or press PROGRAM button again to exit without program play 4 To clear programmed items input another digit to clear the current programmed track To clear all items select the CLEAR on the menu and then press OK button on remote control...

Page 21: ...peat play Repeating sections between twospecific points A B repeat 1 Press REPEATbutton continuously during play at the point where repeat play is to be started A 2 Press REPEAT button at the point where repeat play is to be ended B Repeat play of the selection between pointsAand B starts 3 Press REPEAT button again to return to normal play REPEAT A REPEAT A B A B CANCEL LCD TITLE MENU SETUP ON ST...

Page 22: ...d at the initial settings This operation works only with discs on which multiple audio soundtrack languages are recorded Press AUDIO button during playing DVD disc the screen will change the sound track language and display the current sound track number PressingAUDIObuttonduring playing VCD disc will change audio output mode MONO L MONO R and stereo VCD disc only NOTE When no soundtrack languages...

Page 23: ...m a number of different angles For these discs the same scene can be views from each of these different angles using theANGLE button Press ANGLE during play number of angle being playback will be displayed in the screen and change to different angles If the have no multi angle scenes was recorded in the disc pressing this button will not work Note TT Time Title time CH Time Chapter time TT 01 05 C...

Page 24: ...ut code format Options If you are not connecting to an amplifier via digital output please select this option Used in general home theatre select this can output 5 1 channels audio Select this it can only output 2 channel but you will get higher quality audio output SPDIF OFF SPDIF RAW SPDIF PCM it is used to select the TV mode Options Please select this option as per your TV set Options 4 3 16 9 ...

Page 25: ...e sided play sometime in the future for even longer duration play This contains recordings of pictures and sound whose quality is on a par with that of videotape This player also supports Video CDs with playback control version 2 0 Recorded onto some DVD discs are scenes which have been simultaneously shot from a number of different angles the same scene is shot from the front from the left side f...

Page 26: ...he battery is exhausted replace it with a new one Point the remote control unit at the remote control sensor and operate Operate the remote control unit at a distance of not more than 7 m from the remote control sensor Remove the obstacles between the remote control unit and remote control sensor Press POWER to set the player to the standby mode and then back to ON Alternatively press POWER to set...

Page 27: ...age discs if you store them in the following places Areas exposed to direct sunlight Humid or dusty areas Areas directly exposed to a heat outlet or heating appliance Be sure to press POWER to set the player to the standby mode and disconnect the AC power cord before maintaining the player Wipe this player with a dry soft cloth If the surfaces are extremely dirty wipe clean with a cloth which has ...

Reviews: