


67
D
VD+R/R
W
Rec
ord
er
RW
D
D
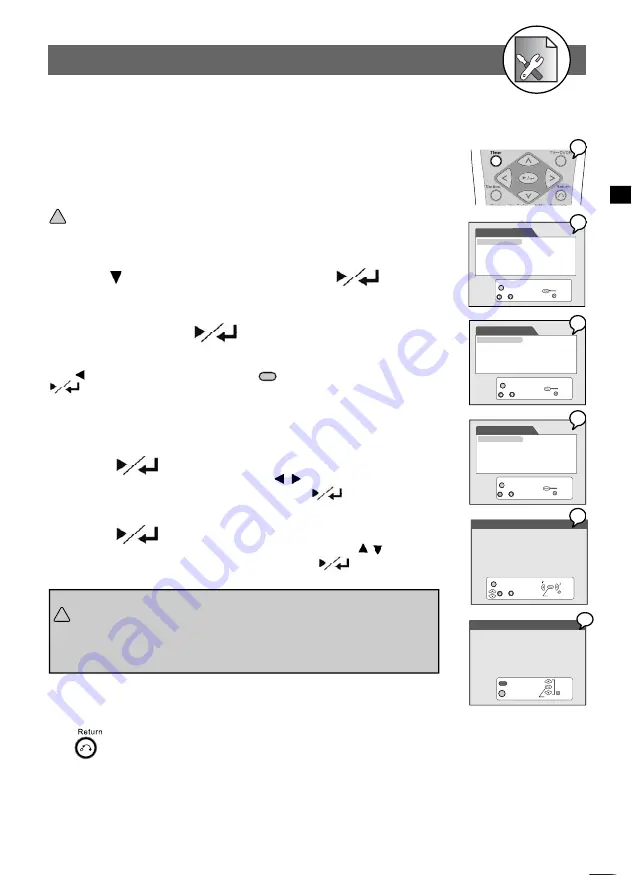
Initial Settings
4
Exit
Event Date Quality Prog Start End Freq
01 04/25/04 HQ Scart 07:00 08:00 Mon-Fri
02 __/__/__ __ _____ __:__ __:__ ______
03 __/__/__ __ _____ __:__ __:__ ______
04 __/__/__ __ _____ __:__ __:__ ______
05 __/__/__ __ _____ __:__ __:__ ______
06 __/__/__ __ _____ __:__ __:__ ______
07 __/__/__ __ _____ __:__ __:__ ______
08 __/__/__ __ _____ __:__ __:__ ______
Select
Con
fi
rm
Return
Delete selection
Clear
Event Date Quality Prog Start End Freq
01 04/25/04 HQ Scart 07:00 08:00 Mon-Fri
Blank Disc space available: 60 minutes
HQ: 60 minutes
SP: 121 minutes
LP: 121 minutes
EP: 243 minutes
SLP: 365 minutes
~
Change selection
Return
Select
fi
eld
Con
fi
rm
Exit
Timer
Timer
Video Plus+
Programme List Video Plus+ Code:
Date Time Setting
-- -- -- -- -- -- -- -- --
Exit
Timer
~
Input number
Con
fi
rm
Return
Timer
Video Plus+
Programme List Enter Programme Numbers
Date Time Setting
X X
-- --
Exit
Timer
~
Input number
Con
fi
rm
Return
Timer
Video Plus+
Programme List Video Plus+ Code:
Date Time Setting
X X X X X X X X X
-- -- -- -- -- -- -- -- --
Exit
Timer
~
Input number
Con
fi
rm
Return
4-5
TIMER Setup
Video Plus is the encoding of a programme schedule information represented by a number
of up to eight digits. These code are printed in most TV programme Guide in your area.
To programme your favourite TV programs, simply input the code for timer recording.
Depending on different regions of the world, the name of programming system may be
various, for example, VCR Plus (North & South America), G-Code (Asia, Australia), Video
Plus+ (United Kingdom), and ShowView (Europe & Africa).
!
Important
: Make sure Date Time Setting be the same as your local time. Otherwise,
the Video Plus recording will be invalid
.
1
Press
Timer
in the stop mode to display the menus.
2
Press to select “Video Plus+” and press
.
An empty space appears to let you enter the number.
3
Input the Video Plus + code number via the remote
control, then press
.
Check your local newspaper or TV programme guide for Video Plus+ code corresponding
to the programme you want to record for your area. If you want to correct the number.
Press
button to erase the number or press
Clear
button to re-enter the number. Press
to con
fi
rm and save the number.
4
Input the Video Plus+ Programme number .
You can
fi
nd the Video Plus+ Programme number next to the Video Plus+ code number in
your TV programme guide.
5
Press
.
The programme summary appears. You can move
/ buttons on the remote control to
highlight and change the option for recording, then Press
.
6
Press
again.
A programme list with 8 entries information appears. You can move / buttons on the
remote control to select each entry for editing, then press
.
Video Plus+ Setting
6
6
!
Important
:
After
fi
nishing the schedule recording, a reminder message “
Press Standby for
timer recording
” will appear on the screen. You have to press the
POWER
but-
ton on the remote control to power standby mode. Only by doing this, the timer
recording will be complete.
To return to the Setup MENU screen
Press
button.
To
fi
nish the setup operation
1
2
3
4
5


