background image

13

45

o

20

o

90

o

A

A

B

C

C

 . 

But they can be placed in the area 

C

 .

30

o

60

o

C

D

C

D

You can vary the level of each speaker as follows. 

Press the 

SELECT

 button to select a channel. The level of the

channel will appear on the front panel display and TV screen.
FL (Front-left level), CNT (Center level), FR (Front-right level), SR
(Surround-right level), SL (Surround-left level) and SUB
(Subwoofer level) adjustable range: -15 dB to  +10 dB, 1 dB/step.

Use the 

MASTER / -

 buttons to adjust the selected

channel

s level.

If you do not press the 

SELECT

 or 

MASTER /-

 button

for a few seconds, the value turns off and is stored in the system.

Note

• 

The optional items vary with the changing of listening mode.

To adjust the volume of all the speakers (Master Volume) at

one time.

Use the 

MASTER /- 

 buttons in normal mode.

Selecting the listening mode

Press 

SURROUND

 to select the listening mode as following:

Dolby Digital, Dolby Pro Logic, DTS, Stereo.

Please note these optoins vary depending on the disc or source
selected.

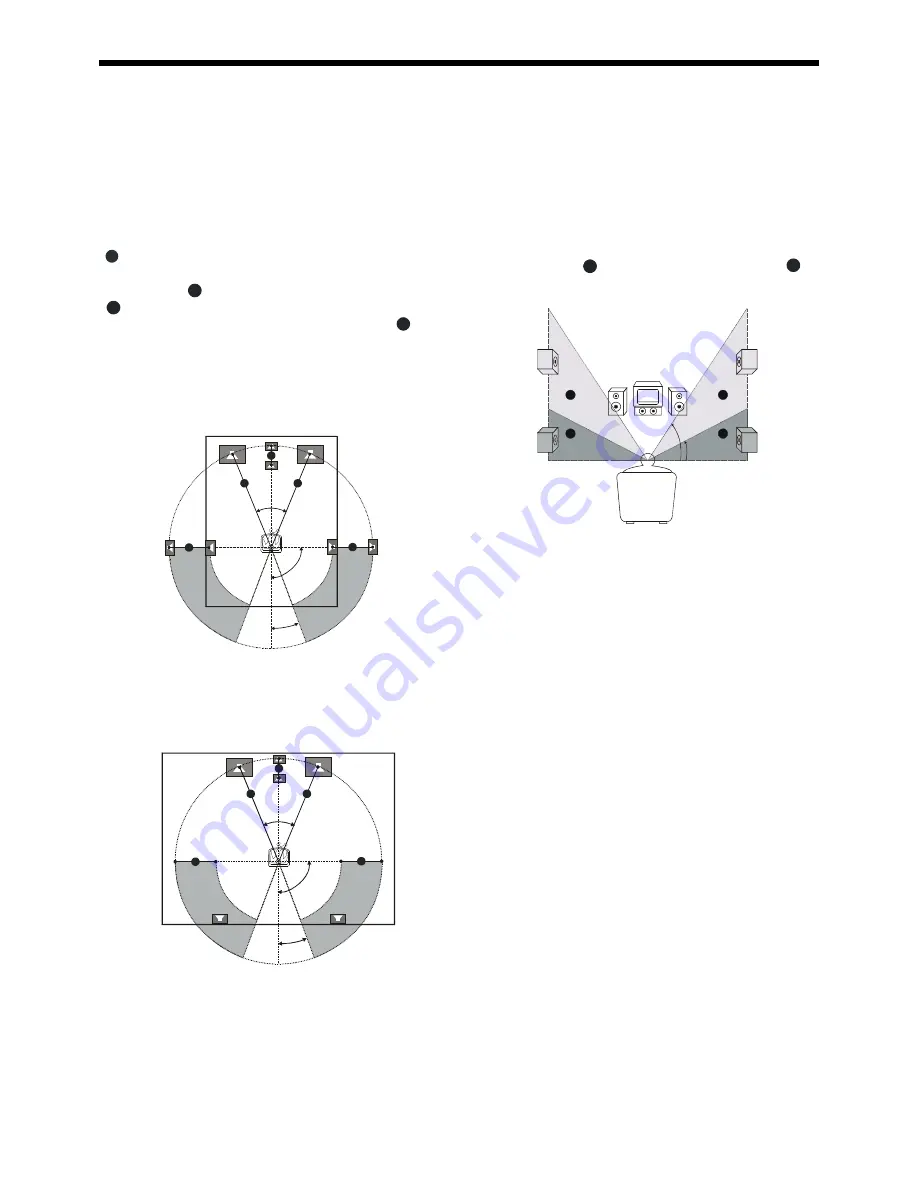
Setting up the surround sound system

You must connect all the speakers and setup the system properly in
order to enjoy the Digital Cinema experience at home.

Position

For the best possible surround sound all the speakers other than the
subwoofer should be the same distance from the listening position
(      ).
However, this system allows you to place the center speaker up to 1.
6 meters closer ( 

B

 ) and the rear speakers up to 4.6 meters closer

C

 ) to the listening position.

The front speakers can be placed from 1.0 to 15.0 meters ( 

A

 ) from

the listening position.

You can place the subwoofer at any position. If possible, place
the subwoofer near a corner to maximize the bass response.

45

o

20

o

90

o

A

A

B

C

C

You can place the rear speakers either behind you or to the side,
depending on the shape of your room, etc.

A

Basic Setup

Height

The best height for the front speakers is when the high fre-
quency speakers (tweeters) are at ear height (while seated).

• 

The best height for the center speaker is at the height of your
ears (while seated).

• 

The height of the rear speakers is not lower than the height of
your ears (while seated).
See the following diagram.The  best position to place the rear
speakers is area  

D

Summary of Contents for GDVD100R

Page 1: ...GDVD100R OPERATING INSTRUCTIONS Before operating this unit please read this owners manual carefully ...

Page 2: ...fuse 2 Never use the plug without the fuse cover fitted Replacement fuse covers are avail able from your dealer or most electrical retail outlets 3 If the mains plug is cut off the cable rewire the replacement plug in accordance with instruction give in this manual 4 CAUTION Under no circumstances should the discarded plug be inserted into the mains socket To prevent a shock hazard carefully dispo...

Page 3: ... personnel only The following marking is printed on the rear panel WARNING This symbol is intended to alert the user of the presence of uninsulated dangerous voltage within the product s encasement that may be of sufficient magnitude to constitute a risk of electric shock to persons This symbol is intended to alert the user of the presence of important operating and maintenance servicing instructi...

Page 4: ...d Keep the AC power cord away from the heating appliances Never put any heavy object on the AC power cord Do not attempt to repair or reconstruct the AC power cord in any way Location and Handing Air vents are provided in the cabinet to prevent excessive tem peratures inside the unit Do not place this unit in closed spaces cover it or otherwise block the vents Do not place this unit in direct sunl...

Page 5: ...listening mode 13 General setup 14 Speaker setup 14 Audio setup 15 Parental control 15 Change the password 15 Playing Discs General operation 16 Basic playback 16 Playing video CDs with PBC 17 Using the menu for each DVD 17 Checking the information 18 Selecting the start time 19 Program play 19 Selecting the audio channel and language 19 Special Function Angle selection 20 Picture Zooming 20 Selec...

Page 6: ...ay scratched discs You cannot play disc that are dusty soiled or marked with finger prints Glossary of disc terms Title DVD The longest sections of a picture or a music piece on a DVD a movie ect for a picture piece on a video software or an album etc for a music piece on a audio software Each title is assigned a title number enabling you to locate the title you want Chapter DVD Sections of a pict...

Page 7: ...ons Do not install more than 1 disc on disc tray Do not place the disc on the tray up side down Do not try to close the disc tray when the disc is not installed properly Accessory Check that you have the following items Main unit 1 Subwoofer 1 Speakers 5 Remote control 1 AAA batteries 2 Video cable 1 Audio cable 1 Speaker Wire 5 pcs 22AMG MW loop antenna 1 FM pigtail antenna 1 Operations Manual 1 ...

Page 8: ...IDEO OUT SOCKET Connect to TV with S video input connector 10 VIDEO OUT Connect to TV video input connector Function Overview Front panel 6 PREVIOUS In DISC mode press to skip to previous track In TUNER mode press to select radio preset 7 NEXT In DISC mode press to skip to next track In TUNER mode press to tuning the higher frequency 8 PLAY PAUSE Press to start or stop temporarily playback 9 VOLUM...

Page 9: ...GLE Press to change the angle viewed where available 16 SUBTITLE Press to select a desired subtitle language 17 RETURN Press to return back the menu for VCD and DVD with title 18 SEARCH Press to set search function 19 SURROUND Press to select set the surround function 20 AUDIO Press to select audio language and audio channel for sound 21 TITLE Press to playback the title menu 22 RESET Press to res...

Page 10: ...ollowing precautions when con necting the speakers Make sure the stripped end of each speaker cord does not touch another speaker terminal or the stripped end of another speaker cord Connections Connecting to Speakers Examples of poor conditions of the speaker cord Stripped speaker cord is touching another speaker terminal Stripped cords are touching each other due to excessive removal of insulati...

Page 11: ...aerial to the FM socket Move the aerial in various direction until the clearest signal is received Note Keep the aerial as far away as possible from the TV AUX or any radiation source to prevent unwanted noise If you have poor FM reception For better FM reception use a 75 ohm coaxial cable not supplied to connect the system to an outdoor FM aerial Connections ...

Page 12: ...T sockets to the corresponding AUDIO IN sockets on the TV CD or TAPE recorder Connect to an amplifier with DTS Dolby Digital decoder or CD recorder If your TV have no SCART input socket you can select one of the following connections as below Option Connect the S VIDEO OUT socket to the S Video input socket on the TV using a S Video cable Connect the VIDEO OUTsocket to the Video input sockets on t...

Page 13: ...lected Setting up the surround sound system You must connect all the speakers and setup the system properly in order to enjoy the Digital Cinema experience at home Position For the best possible surround sound all the speakers other than the subwoofer should be the same distance from the listening position However this system allows you to place the center speaker up to 1 6 meters closer B and the...

Page 14: ...or OSD This function allows you to select the desired language The default setting is ENGLISH VIDEO output setting Selects the video output terminals The default setting is SCART Speaker setting Center delay setting If the listening position is closer to the center speaker than the front speaker you can set the center delay time to impove the sound field effect Options off 1ms 2ms 3ms 4ms or 5ms D...

Page 15: ... can be limited depending on the age of the user Note This functin only works with disc that are recorded with paren tal control if the disc does not contain this feature it will be played anyway PREFERENCES SETUP Change the Password To set a new password for the parental control or to change the password The default password is 9999 a b Basic Setup DYNAMIC MAIN PAGE FULL 6 8 4 8 2 8 OFF AUDIO REL...

Page 16: ...Discs Repeat For DVD discs Press REPEAT repeatedly to select the following on the display REPEAT 1 repeat chapter REPEAT repeat title disc For VCD discs Press REPEAT repeatedly to select the following on the display REPEAT 1 repeat the current track REPEAT repeat the entire disc Note For VCD discs this function can only be used when PBC is turned off Repeat A B This function can play a specific se...

Page 17: ...isc Playing Video CDs with PBC When playing Video CDs Version 2 0 with PBC functions you can enjoy simple interactive operations operations with search functions etc PBC playback allows you to play Video CDs interactively following the menu on the TV screen 1 Start playing a Video CD without PBC functions Press MENU PBC to set PBC function ON 2 The menu appears on the TV screen 3 Use the number ke...

Page 18: ...eo CD or CD 1 Press the DISPLAY repeatedly to show on TV screen as the fol lowing PBC OFF VCD CD SINGLE ELAPSED 00 01 23 T 01 16 SINGLE REMAIN 00 03 21 T 01 16 TOTAL ELAPSED 00 12 34 T 01 16 TOTAL REMAIN 00 54 32 T 01 16 OFF Playing Discs Note z For CD the information about track and time appears simply on the front panel display z Depending on the VCD the time information may not appear on the TV...

Page 19: ...ding type number of channels recorded and audio language The relevant message appears on the TV display as shown below z For CD discs Press AUDIO repeatedly to select the following MONO LEFT MONORIGHT STEREO Selecting the start time This function allows you to start playing at any chosen time on the disc When playing DVD disc 1 Press the SEARCH repeatedly the following menu appears on the TV scree...

Page 20: ...epeatedly to select a zoom factor as below ZOOM x 1 5 ZOOM x 2 ZOOM x 3 ZOOM OFF 2 To pan through the enlarged image press buttons to move the zoomed picture left right up or down Selecting subtilte language This function can only be used for DVD disc recorded with multi subtitle language You can set a preferred language for subtitle in the SETUPmenu 1 Press SUBTITLE repeatedly to select a desired...

Page 21: ...umber keys 0 9 10 to select the desired preset number 4 Press SLOW MEMORY l to store the station 5 To preset another stations repeat steps 1 4 Listening to preset radio stations 1 In tuner mode press PRESET l l or number keys 0 9 10 to select the desired preset stations If an FM program is noisy Press ST MO on the remote control STEREO appears on the front panel display There is not stereo effect ...

Page 22: ...everse is performed Press PLAY PAUSE ll to return to normal play mode Check the speaker settings The left and right sounds are unbalanced or reversed Check that the speakers and components are connected correctly and securely Adjust front balance parameter using SELECT and VOLUME Severe hum or noise is heard Check that the speakers and components are connected securely Check that the connecting co...

Page 23: ...ed power 1 kHz Frequency response 180 Hz 20 kHz 3 dB Signal to Noise ratio 65 dB CCIR Input sensitivity 400 mV General Power supply 230V 50 Hz Power consumption 100 W Dimension W430 x H69 x D370 mm Weight 5 7 kg Speaker Front Center 1 way shielded Surround 1 way no shielded Impendance 8 ohm Speaker drivers 3 full range Dimension W92x H146x D111 mm Weight 0 53 kg each Subwoofer Subwoofer 5 1 4 Outp...

Reviews: