background image

User manual

20

21


Fig. 6:

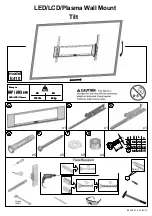
 Wall mounting

1.  Before drilling, attend to live cables or other lines lying behind plaster, and  
  do not  damage them.
2.   Use a spirit level to mark the drill holes on the wall.
3.    Drill the holes with a 10mm concrete drill 60mm deep. 
4.  Plug a concrete anchor (W-B) in each drilling hole. 
5.   Mount the wall mount (B) by using the wall screws (W-A) and washers  
 (W-C).

4.3  Mounting the flat screen

Warning level

Safety instruction

Bid / Ban

Risk of injury by tripping and falling

>>

Place, transport and install product, parts 

and acceories in a safe way.

Risk of material damage by improper 

procedure

>> Only use moderate force when tightening 

the screws in order to avoid damaging 

threads.

>>

>>

NEVER set the screen on the front during 

installation!

Do not damage the flat screen by too 

long screws.

Tab. 15:

 Mounting the flat screen

4.3.1   Flat screens with flat back


Fig. 7:


Flat screens with flat back

1.   Lean the flat screen vertically on a soft, large surface or a wall and protect it  

  of scratches and overturning.
2.  Install one adapter bracket (A) on each side with the washers (M-F) and the 

  fitting screws, matching to your flat screen on the top and bottom side as 

 shown.

Make sure that the slots are on the flat screens top.


4.3.2   Flat screens with arched back


/

/

M-C

M-D

M-F

M-G

M-F

M-H

M-F

M-H

M-G

M-C

M-D

M-C

M-D

M-F

M-H

M-E

M-F

M-H

M-E

M-G

M-F

M-H

M-E

M-G

/

/


Fig. 8:

 Flat screens with arched back


1.  Apart from the following working step - proceed like shown in chapter 4.3.1.

2.  Mount the fitting TV spacers (M-G) and/or  (M-H) between adapter bracket  
  (A) and flat screen like shown.

63473+63493_V5.indd   20-21

30.05.2018   14:11:24

Summary of Contents for TV EasyFix SuperSlim

Page 1: ...EITUNG USER MANUAL MODE D EMPLOI ISTRUZIONI PER L USO TV Wandhalter TV mount TV Support mural Supporto per TV 63473 Goobay TV EasyFix SuperSlim 63493 Goobay TV EasyFix Ultraslim XL 63473 63493_V5 indd...

Page 2: ...enutzung sichern Verletzungsgefahr durch ungeeignete Umgebungsbedingungen Extreme Umgebungsbedingungen k nnen Personen verletzen Auf in der Wand liegende stromf hrende Kabel oder andere Leitungen acht...

Page 3: ...Reparatur Geschulte Fachkr fte spezielle Sicherheitsma nahmen Fachwissen und Werkzeuge n tig Tab 1 Benutzergruppen 1 3 Warnstufen Warnung vor Gefahren die bei Missachtung der Sicherheitshinweise unmi...

Page 4: ...ge 4 1 Vorbereitung Vollst ndigkeit und Unversehrtheit pr fen Packungsinhalt mithilfe des Lieferumfangs auf Vollst ndigkeit und Unversehrtheit kontrollieren Kompatibilit t sicherstellen Warnstufe Sich...

Page 5: ...Gewinde nicht zu besch digen Flachbildschirm NIE flach auf den Boden legen Flachbildschirm nicht durch zu lange Schrauben besch digen Tab 6 Flachbildschirmmontage 4 3 1 Flachbildschirme mit flacher R...

Page 6: ...den Technikern ihre Arbeit sehr wenn Sie eventuelle Fehler ausf hrlich beschreiben nur dann haben Sie Gew hr dass auch selten auftretende Fehler mit Sicherheit gefunden und beseitigt werden Der Herste...

Page 7: ...nic Standard Organisation f r die oben genannten Anwendungen 3 Standards festgelegt Mit Hilfe des auf Ihrem Anzeigeger t oder in dessen Betriebsanleitung stehenden jeweiligen VESA Standards und den te...

Page 8: ...tion does not fulfill required functions can cause quality losses or material damage The specifications of all used products must match or be within the specified range Risk of injury by inappropriate...

Page 9: ...10 User Groups 1 3 Warning Levels Warnings against hazards that will result directly in serious injuries or death in case of non observance Warnings against hazards that may result in serious injurie...

Page 10: ...the packing content by comparing it to the scope of delivery regarding completeness and integrity Ensuring compatibility Warning level Safety instruction Bid Ban Risk of material damage by improper pr...

Page 11: ...creen on the front during installation Do not damage the flat screen by too long screws Tab 15 Mounting the flat screen 4 3 1 Flat screens with flat back Fig 7 Flat screens with flat back 1 Lean the f...

Page 12: ...allation operation or maintenance not described in the manual Do not alter or modify the product or its accessories Any use other than described in this User manual is not permitted and causes loss of...

Page 13: ...and the specifications in Chapter Specifications in this manual you are able to define the possible points of attachment Some models allow for an infinitely variable individual attachment e g 300 x 30...

Page 14: ...d monta ge d entretien et de r paration Risque de blessures par coupures Les enfants peuvent se couper avec les mat riaux d emballage Prot gez les mat riaux d emballage contre une utilisation involon...

Page 15: ...ase peuvent effectuer ce travail Ne laissez pas les enfants et les personnes souf frant de d ficiences mentales et motrices utiliser le produit Entretien r paration Uniquement r serv aux sp cialistes...

Page 16: ...ction n est pas autoris e La n gligence et l ignorance de ces r gles et consignes de s curit peuvent causer de graves accidents des blessures et des dommages mat riels Reportez vous aussi au chapitre...

Page 17: ...r avec une m che b ton de 10 mm 4 Bouchez avec une vis d ancrage b ton W B dans chaque trou de per age 5 Montez le support mural B l aide des vis murales W A et rondelles W C 4 3 Montage de l cran pla...

Page 18: ...t mural B et le verrouiller si n cessaire Fin de l assemblage Proc der dans l ordre inverse du d montage 5 Garantie et responsabilit Le fabricant accorde une garantie de 2 ans un appareil neuf Comme l...

Page 19: ...ans les diverses normes europ ennes V rifiez l paisseur murale et celle du mat riau sous le pl tre papier peint Demandez un sp cialiste Quels trous doi vent tre perc s Lisez le chapitre 4 2 Il est dif...

Page 20: ...t sont r glement s par les lois d tat et f d rales concern es Les l ments recyclables sont int gr s dans le cycle de recyclage des d chets afin d en retirer de nouvelles mati res premi res Les mat ria...

Page 21: ...agliarsi con I materiali di imballaggio Proteggere materiali di imballaggio per prevenire usi inappropriati Pericolo di lesioni provocate da condizioni ambientali inappropriate Le condizioni estreme p...

Page 22: ...oro Impedire ai bambini ed alle persone con disabilit mentali e motorie di utilizzare il prodotto Manutenzione ripa razione Solo personale specializzato Sono necessari speciali misure di sicurezza con...

Page 23: ...iutti 4 Installazione 4 1 Preparazione Controllo della completezza e dell integrit Controllare il contenuto della confezione e confrontarlo con i Contenu ti della confezione per quanto riguarda la com...

Page 24: ...e caduta Collocare trasportare ed installare il prodotto sue parti ed accessori in modo sicuro Rischio di danni materiali a causa di procedure inappropriate Utilizzare solo una forza moderata per str...

Page 25: ...scorrere la barra di sicurezza C trogolo adattatore staffe A e del supporto B e bloccarlo se necessario Fine del installazione Procedere in ordine inverso rispetto sullo rimozione 5 Garanzia e respon...

Page 26: ...timale Altre domande Rivolgersi al rivenditore Tab 37 Risoluzione dei problemi 8 Specifiche Dimensione Specificazione Unit Dimensione TV 63473 58 147 max 58 63493 94 190 max 75 cm VESA 63473 max 400x2...

Page 27: ...V 63473 63493 Revision 2018 05 30 Version 5 0 Goobay by Wentronic GmbH Pillmannstra e 12 38112 Braunschweig Germany Made in China Hotline 49 0180 5005882 E Mail info mygoobay com Web www mygoobay com...

Reviews: