-
7-
7.
Video Mode Switched Button
To switch extend mode or mirror mode
(1)
Extend mode: the windows on master and slave output are different. The extend mode function
must be on dual-view, triple-view and quad-view layout mode.
-
On dual-view mode: press “MODE” button to enter extend mode. Select one of windows A-B
to show on slave output and then press “MODE” button to confirm. The other will show on
master output.
-
On triple-view mode: press “MODE” button to enter extend mode. Select one or two of
windows A-C to show on slave output and then press “MODE” button to confirm. The others
will show on master output.
-
On quad-view mode: press “MODE” button to enter extend mode. Select two of windows A-D
to show on slave output and then press “MODE” button to confirm. The others will show on
master output.
-
Under extend mode, the button LED of “MODE” and “selected layout” button will be solid red.
-
Press “MODE” button for 3 seconds to exit extend mode and enter mirror mode
(2)
Mirror mode: the windows on master and slave output are the same. User can press video layout
selected button to change video layout.
8.
Mute Button
Turn off the audio or audio/video
(1)
Press button to turn off audio and button LED will blink yellow light
(2)
Press button for 3 seconds to turn off audio/video and button LED will blink red light
(3)
On (1) or (2) state, user can press button to unmute audio or audio/video.
9.
Arrow(up)/ Input 1 Button
(1)
Arrow(up) function is for OSD menu
(2)
Input 1 function is for selected source
10.
Arrow(right)/ Input 2/ Enter/ Audio Source Button
(1)
Arrow(right) function is for OSD menu
(2)
Input 2 function is for selected source
(3)
Enter function is for OSD menu
(4)
Audio source function
To select the audio source of the master & slave output. Firstly, press audio source button and
the arrow(up), arrow(down) and arrow(right) buttons will show respectively red(master output),
blue(slave output), and purple(master & slave output) light. Select one of them and the selected
button will blink. Next, press one of the windows A-D buttons and the source’s audio of selected
window will be on selected output.
11.
Arrow(down)/ Input 3 Button
(1)
Arrow(down) function is for OSD menu
(2)
Input 3 function is for selected source
12.
Arrow(left)/ Input 4/ OSD menu/ Lock Button
(1)
Arrow(left) function is for OSD menu
(2)
Input 4 function is for selected source
(3)
OSD menu: press this button to enter OSD menu.
(4)
Lock/unlock function: press this button for 3 seconds to lock/unlock front panel. Under lock
status, the button LED will blink red light.
-
8-
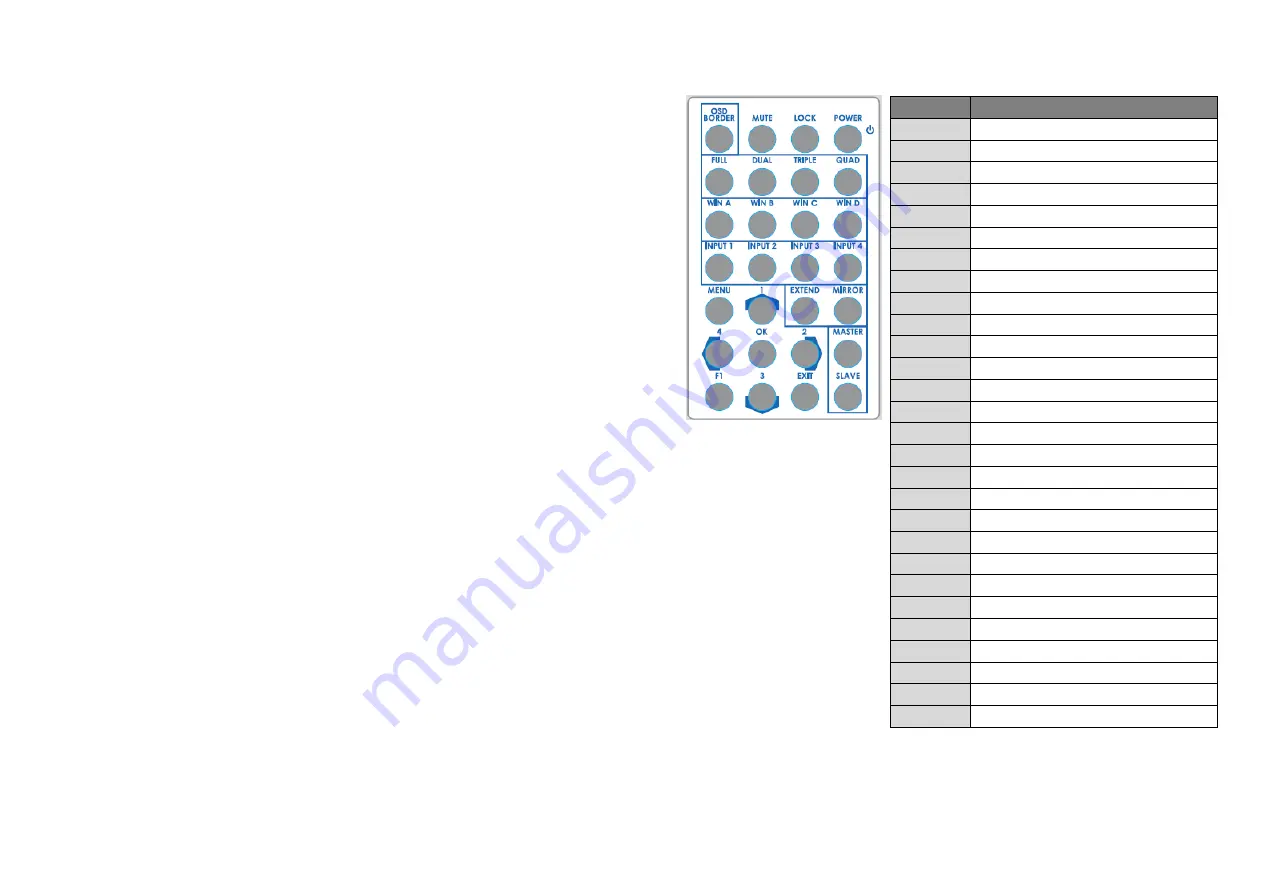
Method B: IR Remote Control
`
Button
Function
POWER
Power on/off the device
LOCK
Lock/unlock the device
MUTE
Turn off the audio
OSD Border Turn on/off border/label
QUAD
Fast switch to quad-view mode
TRIPLE
Fast switch to triple-view mode
DUAL
Fast switch to dual-view mode
FULL
Fast switch to full screen mode
WIN D
Select windows D
WIN C
Select windows C
WIN B
Select windows B
WIN A
Select windows A
Input 4
Select input 4 to be the input source
Input 3
Select input 3 to be the input source
Input 2
Select input 2 to be the input source
Input 1
Select input 1 to be the input source
MIRROR
Switch to mirror mode
EXTEND
Switch to extend mode
▲
Arrow button (up)
MENU
OSD menu
MASTER
Select audio source of master output
Arrow button (right)
OK
Trigger the setting
Arrow button (left)
Slave
Select audio source of slave output
EXIT
Exit from the menus
▼
Arrow button (down)
F1
Start/Stop recording function
▲
▲


