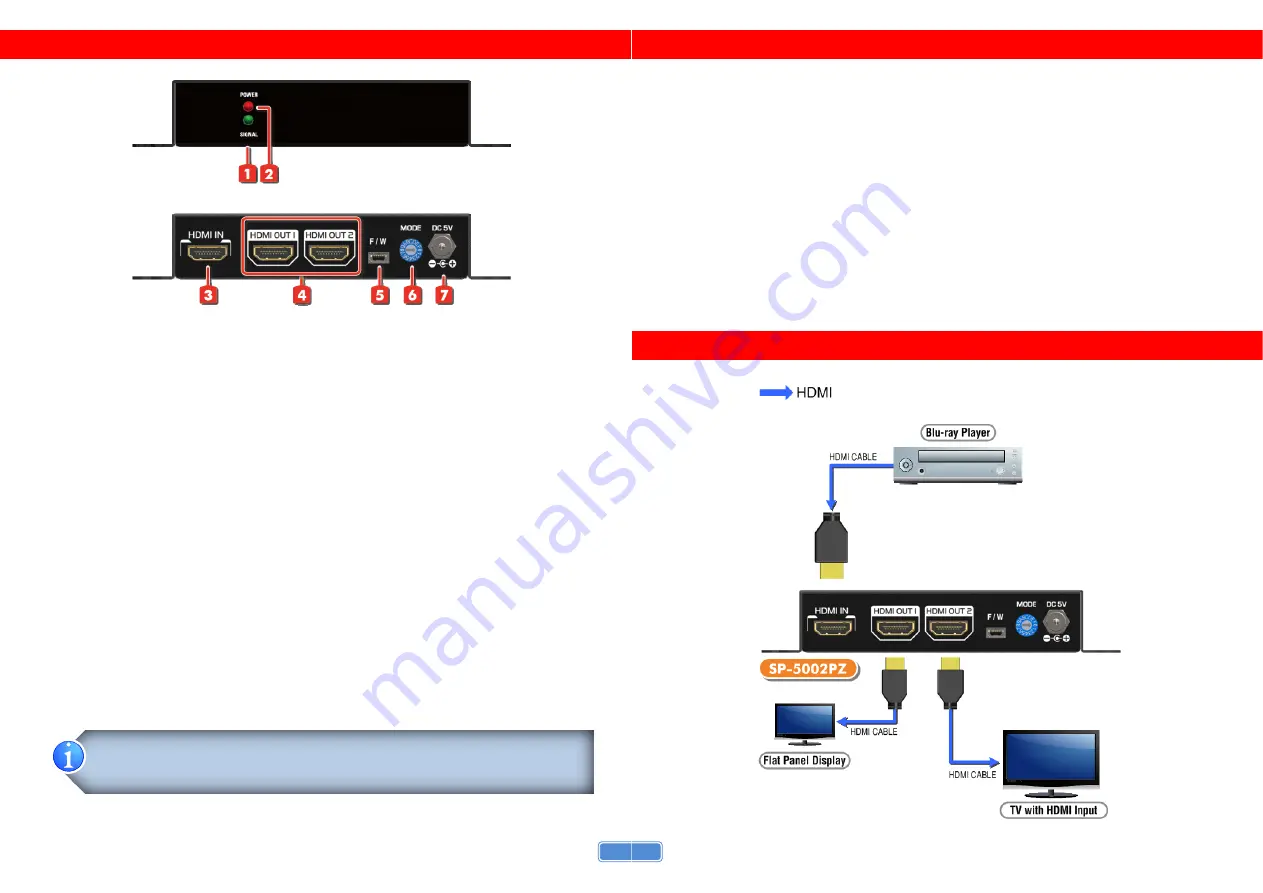
3
PANEL DESCRIPTIONS
1. Signal
LED:
Signal LED indicator
2. Power
LED:
Lights on when device is ready
3. HDMI
IN:
Connect to a HDMI input source
4. HDMI
OUT1-2:
HDMI outputs to HDMI displays
5. Mini-USB:
For technical support only [firmware update]
6. MODE:
0 - F/W update mode
1 - EDID Ultra-HD(4K2K@60) - 24bit 2D video & 7.1ch audio
2 - EDID Ultra-HD(4K2K@60) - 24bit 2D video & 2ch audio
3 - EDID Ultra-HD(4K2K@30) - 24bit 2D video & 7.1ch audio
4 - EDID Ultra-HD(4K2K@30) - 24bit 2D video & 2ch audio
5 - EDID Full-HD(1080p@60) - 24bit 2D video & 7.1ch audio
6 - EDID Full-HD(1080p@60) - 24bit 2D video & 2ch audio
7 - EDID Full-HD(1080p@60) - 24bit 3D video & 7.1ch audio
8 - EDID Full-HD(1080p@60) - 24bit 3D video & 2ch audio
9 - EDID Full-HD(1080p@60) - 36bit 2D video & 7.1ch audio
A - EDID Full-HD(1080p@60) - 36bit 2D video & 2ch audio
B- EDID HD(1080p@30)(1080i@60)(720p@60)-24bit 2D video & LPCM7.1ch/Dolby Digital
C - EDID HD(1080p@30)(1080i@60)(720p@60) - 24bit 2D video & 2ch audio
D - Auto EDID analysis learning mode
E - Learn EDID from output1
F - Learn EDID from output2
7. +5V
DC:
Connect to the +5V DC 2A power supply unit
1.
Automatic
EDID
learning
will
detect
all
the
connected
HDMI
equipped
monitors
and
analyze
all
the
content
of
EDID.
The
EDID
with
minimal
resolution
support
will
be
the
reference
EDID
for
incoming
HDMI
source
players.
4
HARDWARE INSTALLATION
Broadcasts HDMI signal to 2 HDMI displays!
1. Switch off all devices, including monitors.
2. Connect to the displays.
3. Connect an HDMI source (such as a Blu-ray Disc player) to the HDMI In.
4. Make sure the rotary switch is NOT at “MODE 0”
5. Plug in 5V DC power supply.
6. Power on the HDMI monitors.
7. Power on the HDMI source.
CONNECTION DIAGRAM


