background image

15

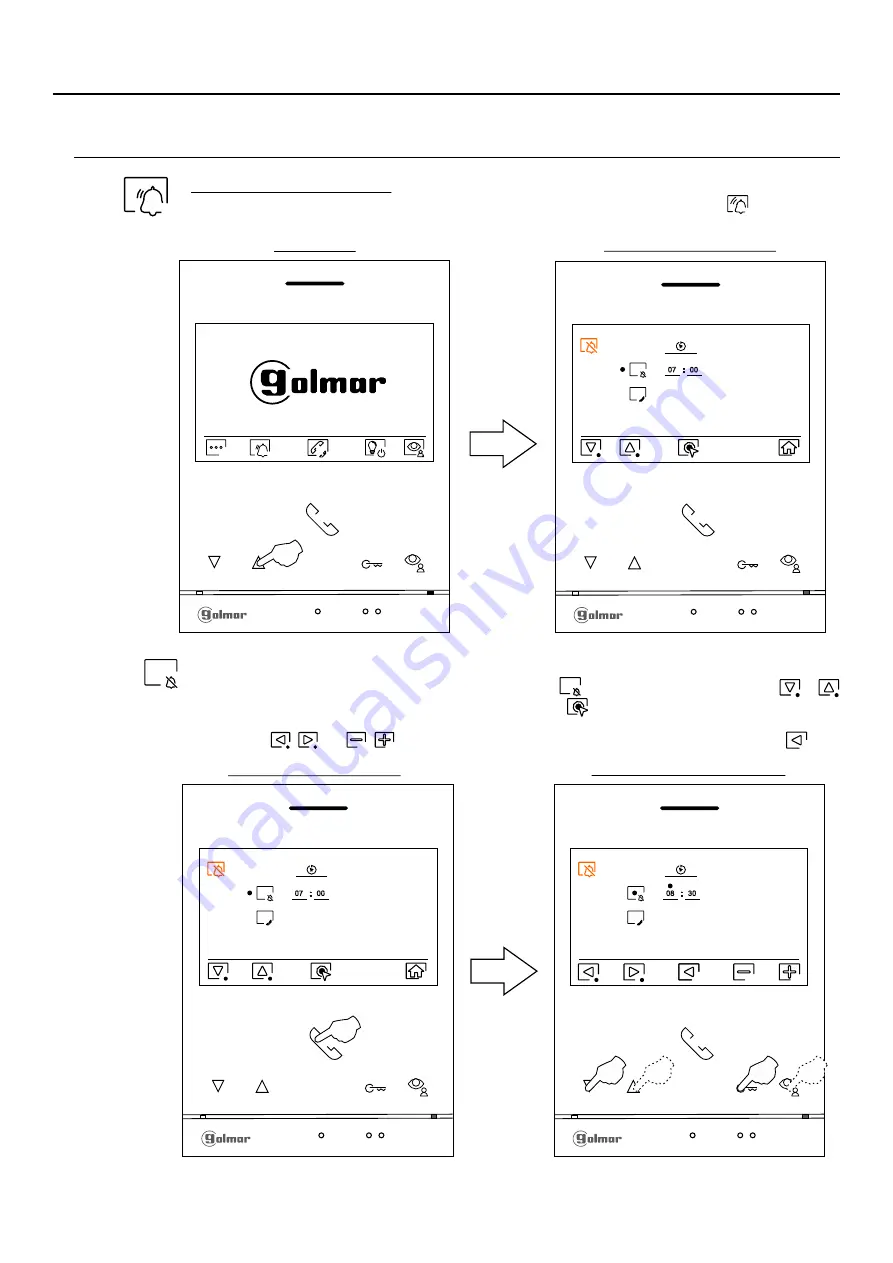
'Do not disturb' mode settings: If the device is in standby (screen switched off), to access the main

menu, press any of the buttons of the monitor. Then press the button below icon

to access the

settings screen.

PERIOD OF TIME FOR 'DO NOT DISTURB' MODE MENÚ

Option selection screen

Main menu

Continued overleaf

To set a period of time for

in which the monitor will not sound when receiving

"Do not disturb" mode

calls (see note "HZ" page 5), go to the option with icon

pressing the button below icon

or

and select the option by pressing the button below icon

Then you can set a period of time

.

(from

00h & 01 minute to 23h & 59 minutes)

'Do not disturb' mode

for

, by pressing corresponding

buttons

/

, validate the changes made by pressing the button below icon

.

and

/

07

00

#

#

07

00

08

30

#

#

Time period setting screen

Option selection screen

ART

/G2+

4

MONITOR

LITE

Note:

New menu available with V.04 of ART 4 LITE G2+ and ART 4H LITE G2+ monitors, with V.05 of ART 4B
LITE G2+ monitor and with V.01 of the ART 4TH LITE G2+ monitor.

Summary of Contents for ART 4 LITE/G2+

Page 1: ... MANUAL TECHNOLOGY Code 50122623 TART G2 E 4 LITE N REV 0122 Art 4 G2 monitor LITE Hands free Handset Art 4 G2 B monitor LITE 2 wire installation Art 4 G2 T monitor H LITE Hands free Art 4 G2 H LITE monitor ...

Page 2: ...rotected location free from the risk of dripping or splashing water Do not place in humid dusty or smoky locations or near sources of heat Before connecting the device to the mains check connections between the door panel power supply distributors monitors U Golmar 2x1mm se the cable RAP GTWIN HF Always follow the instructions contained in this manual SET UP WARNINGS If you have the S5110ART 4 LIT...

Page 3: ...displayed on the screen To open door of the door panel press the corresponding icon during the call or communication processes one press will activate the lock release for seconds and 3 the door panel LED will also turn on for seconds If vocal synthesis is enabled a Door open message will be indicated 3 is on the door panel 6 to 22 Detailed operation of the monitor is described on pp CHARACTERISTI...

Page 4: ...a tivated c D Cable slot ART 4TH LITE G2 monitor E Speaker h communication mode ands free F 4 3 TFTcolour screen G Golmar use H h communication mode ands free Microphone I Communication with hearing aids ART 4H LITE G2 ART 4TH LITE G2 Set the hearing aid switch to the T position see page 2 to 3 J Raised dots for the visually impaired people In call communication Above this raised dot is the Start ...

Page 5: ...pressed will be call tone and activate the output of auxiliary call repeater with standby monitor call process communication process HZ tone with lower audio level intercom process and Do not disturb mode Important Up to 6 monitors apartments with push button HZ activated at the same time with system and monitors in standby ART4 LITE G2 ART 4H LITE G2 monitor with V 04 later ART 4B LITE G2 with V ...

Page 6: ...aster door panel Press the button below icon to make changes to the system settings see pp 7 to 9 Press the button below icon to enable disable the Do for 3 seconds and for 1 second to not disturb function If the monitor is in Do not disturb mode the status LED will illuminate red and the ringtone on the monitor will not sound when a call HZ see note p g 5 a e is received With the Do not disturb m...

Page 7: ...menu ain Press the button below icon to access the settings menu screen Access settings menu screen ART G2 4 MONITOR LITE Note Icon to intercom menu will be placed in if there is a guard monitor Access settings menu screen configured in the building See page 6 Note New menu available with V 04 of ART 4 LITE G2 and ART 4H LITE G2 monitors with V 05 of ART 4B LITE G2 monitor and with V 01 of the ART...

Page 8: ... be restored to factory settings such as melodies call volume etc Press the button below icon to return to the settings menu To restore the monitor to factory settings press the button below icon to access the factory reset menu then press the button below icon to perform this function Press the button below icon to return to the About screen Press the button below icon to return to the settings m...

Page 9: ...ified by pressing the buttons below corresponding icons then press the buttons below corresponding icons to select the melodies and desired call volume Press the button below icon to return to the settings menu 1 05 05 05 02 05 03 01 03 2 3 4 Settings menu screen Press the button below icon to return to the main menu Settings menu screen Main menu ART G2 4 MONITOR LITE Note New menu available with...

Page 10: ...w icon to change the source of the image as long as the system has more than one door panel or has an external camera connected and display has been activated see pp It is possible to make the change during display call and communication processes 23 to 26 Press the button below icon for 3 seconds to access the image and monitor volume in call tone settings menu Select the option to be modified by...

Page 11: ...ing the button below icon see pp 12 to 14 2 1 Press the button below icon staircase light activation SAR G2 SAR 12 24 modules to required Note Displayed on the screen during a call or communication process if the function to change the source of the image is not activated by displaying the icon on the screen instead Press the hidden button below icon to activate the lock release or device connecte...

Page 12: ...Adjust to the desired level by pressing the buttons below icons To access the contrast control press the button below icon To exit the image and communication settings menu press the button below icon Call process screen Communication process screen Screen A Screen B 4 Press for 3 segundos 1 1 2 1 1 2 1 1 Press for 3 segundos ART G2 4 MONITOR LITE Note New menu available with V 04 of ART 4 LITE G2...

Page 13: ...on below icon The following colour control menu will then be displayed Adjust to the desired level by pressing the buttons below icons To access the monitor communication volume control press the button below icon call tone To exit the image and communication settings menu press the button below icon Continued overleaf 1 4 1 4 ART G2 4 MONITOR LITE Note New menu available with V 04 of ART 4 LITE G...

Page 14: ...To return to the brightness control carousel mode press the button below icon Communication screen To exit the image and communication settings menu press the button below icon call Call tone settings volume Communication settings volume Screen A Screen B Communication settings volume Screen B 1 2 1 2 1 2 1 1 2 1 ART G2 4 MONITOR LITE Note New menu available with V 04 of ART 4 LITE G2 and ART 4H L...

Page 15: ...turb mode calls see note HZ page 5 go to the option with icon pressing the button below icon or and select the option by pressing the button below icon Then you can set a period of time from 00h 01 minute to 23h 59 minutes Do not disturb mode for by pressing corresponding buttons validate the changes made by pressing the button below icon and 07 00 07 00 08 30 Time period setting screen Option sel...

Page 16: ... the option with icon by pressing the buttons below corresponding icons Then press the button below icon to enable disable this function See pages 20 to 21 for intercom between apartments This function is disabled by default Main menu Press the button below icon to return to the main menu If the Do not disturb mode is enable see pages 15 to 16 will be shown the icon in the main menu and the m LED ...

Page 17: ... in white color on the monitor 1 Option selection screen To set a period of time for automatic door openning mode after 3 seconds of receiving a call from the door panel go to the option with icon pressing the button below icon or and select the option by pressing the button below icon Then you can set a period of time from 00h 01 minute to 23h 59 minutes Automatic door openning mode and for by pr...

Page 18: ...ation menu From this menu you can contact other monitor s in your apartment internal intercom or in other apartments external intercom For external intercom the monitor s of the apartment making the call and the monitor s of the apartment receiving the call must have the external intercom function activated see page 16 Select the option to perform an external intercom If during the intercom proces...

Page 19: ...low icon to return to the main menu Press the push button below icon to return to the intercom menu The monitor receiving the call will sound a confirmation melody showing on screen the monitor making the call and the time available to answer the call press the push button below icon to establish communication and press the push button below icon to end the communication Note You will find informa...

Page 20: ...he monitor s of the home receiving the call must have the external intercommunication function activated see page 16 Apartment code selection screen 0 0 1 M S2 S1 S3 Intercom menu M S2 S1 S3 Intercom menu Press the button below icon to select the apartment code field to be modified then press the buttons below icons to modify with the apartment code to be called and press the button below icon to ...

Page 21: ...on melody showing on the main monitor screen and slave 1 if it exists the code of the apartment making the call and the time available to answer the call If you wish to establish communication from the secondary monitors S2 or S3 press one of the push buttons on the monitor to display the intercommunication image Press the push button below icon to establish communication and press the push button...

Page 22: ...ard monitor The master and slave monitor s receive the call from the access door panel by pressing button P1 on the sound module The master and slave guard monitor s can be autoswitch on with the access door panel Master slaves monitors receive calls from the apartments by pressing the button below icon on the main menu of the apartment monitor The master and slave guard monitor s can be used to c...

Page 23: ...o select the field to be modified and press the buttons below icons to enter the desired code Once the code has been entered press the button below icon to validate it If the code entered is valid icon will be displayed if it is not icon will be shown Press the button below icon to return to the About screen Special codes screen Continued overleaf Press 5 times FW 0 01 M 2 1 0 About screen 0 4 4 1...

Page 24: ...el s SoulAccess with the master code to factory default 1234 All door panels Door panel 1 Door panel Door panel Door panel 4 2 3 8000 8001 8002 8003 8004 LED lights for night viewing Door panel 1 during a call or communication process Configure only on the master monitor Automatic OFF Always ON Always Factory setting 0450 0451 0452 0450 automatic Activation times of the outputs Door panel 1 Config...

Page 25: ...5 to 5 5 2 00 0 5s 2 19 10s 2 03 2s LED lights for night viewing Door panel during a call or communication process Configure only on the master 4 monitor Automatic OFF Always ON Always Factory setting 3450 3451 3452 3450 automatic Activation times of the outputs Door panel Configure only on the master monitor 4 Factory setting Relay 1 From to 3200 0 5s 3219 10s 3205 3s Rel 3300 0 5s 3319 10s 3305 ...

Page 26: ...0 1111 General door panel 2 1121 1120 1120 General door panel 3 1131 1130 1130 General door panel 4 1151 1150 1150 General m ra 1 1141 1140 1140 ca e General m ra 2 1181 1180 1180 ca e General m ra 3 1171 1170 1170 ca e General m ra 4 1191 1190 1190 ca e Important Only available with EL632 G2 SE video module with V04 or later Note Inner door panel and general door panel must be with V04 version or...

Page 27: ...oducts that contain acids vinegar or abrasive components Use a soft damp lint free cloth with water Always wipe the monitor in the same direction from top to bottom After cleaning the monitor remove any moisture with a soft dry lint free cloth 27 ART G2 4 MONITOR LITE ...

Page 28: ...Electromagnética 20 4 CEE 1 30 This product meets the essentials requirements of applicable European Directives regarding Electromagnetic Compatibility 20 4 ECC 1 30 NOTA El funcionamiento de este equipo está sujeto a las siguientes condiciones 1 Este dispositivo no puede provocar interferencias dañinas y 2 debe aceptar cualquier interferencia recibida incluyendo las que pueden provocar un funcion...

Reviews: