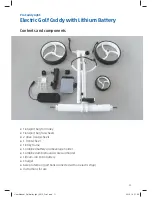
background image

12

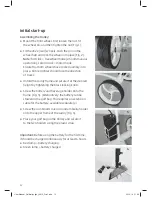
Assembling the trolley:  

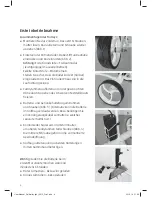
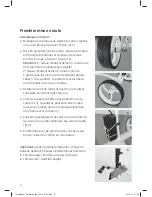
  Mount the front wheel. First loosen the nut, fit  

the wheel on, and then tighten the nut (Fig. 1).

  Fit the drive (rear) wheels. Push the pin on the  

wheel hub and click the wheel into place (Fig. 2).


Note:

 first click = freewheel mode (smooth manual 

operation); second click = motor mode.  
Ensure that both wheels have clicked audibly into 
place. All tire profiles should face the direction  
of travel.

  Unfold the caddy frame and secure it at the desired 

height by tightening the black locking knob. 

  Screw the battery and beverage holder onto the 

frame (Fig. 3). (Alternatively, the battery can be  
stowed in the golf bag. This requires an extension 
cable for the battery, available separately.)

  Screw the combined scorecard and umbrella holder 

onto the upper frame of the caddy (Fig. 4).

  Place your golf bag on the trolley and secure it  

to the two holders using the elastic strap.

Important:

 Before using the battery for the first time,  

it should be charged continuously for at least 6 hours. 

   Red lamp = battery charging

   Green lamp = battery charged

Initial start-up  


1

2

3

4

User Manual_Golftrolley light_2015_Print.indd   12

23.12.14   21:58

Summary of Contents for Pro Caddy Light

Page 1: ...Pro Caddy Light Bedienungsanleitung Manuel d utilisation User manual User Manual_Golftrolley light_2015_Print indd 1 23 12 14 21 58...

Page 2: ...User Manual_Golftrolley light_2015_Print indd 2 23 12 14 21 58...

Page 3: ...che f r R der 2 Antriebsr der Hinterr der 1 Vorderrad Trolleyrahmen Kombinierter Akku und Getr nkehalter Kombinierter Schirm und Scorecardhalter Lithium Ionen Akku 10 Ah Batterie Ladeger t Achsenschut...

Page 4: ...ehen des schwarzen Feststellknaufs fixieren Batterie und Getr nkehalterung am Rahmen anschrauben Abb 3 Alternativ kann die Batterie im Golfbag verstaut werden Dazu ben tigen Sie ein Verl ngerungskabel...

Page 5: ...s mitgelieferte Ladeger t 5 Bedienung Start Knopf A dr cken Der Trolley f hrt in der letztmals gew hlten Geschwindigkeit Achtung Stellen Sie vor dem Start die Geschwin digkeit auf langsam ein Geschwin...

Page 6: ...ckenen Ort auf und vermeiden Sie extreme Temperaturen Bei langer Nichtbenutzung ber 3 Monate unbedingt Zwischenladung vornehmen Halten Sie Ihren Trolley unter Kontrolle Lassen Sie Ihre Hand w hrend de...

Page 7: ...ues 2 roues motrices roues arri re 1 roue avant Cadre du chariot Support de batterie et de boisson combin Support de parapluie et de carte de score combin Batterie lithium ion 10 Ah Chargeur Protectio...

Page 8: ...le cadre du caddy et l ajuster la hauteur souhait e en serrant le bouton noir Visser le support de batterie et de boisson sur le cadre ill 3 La batterie peut aussi tre rang e dans le sac Pr voir alors...

Page 9: ...clusivement le chargeur fourni Utilisation D marrage appuyer sur le bouton A Le chariot avance la vitesse pr c demment s lectionn e Attention avant de d marrer r gler la vitesse sur lent R glage de la...

Page 10: ...t sec l abri des temp ratures extr mes En cas de non utilisation prolong e sup rieure 3 mois proc dez imp rativement une charge interm diaire Veillez toujours garder le contr le de votre chariot garde...

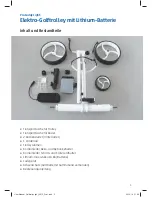
Page 11: ...t bag for wheels 2 drive rear wheels 1 front wheel Trolley frame Combined battery and beverage holder Combined umbrella and scorecard holder Lithium ion 10 Ah battery Charger Axle protection golf ball...

Page 12: ...ht by tightening the black locking knob Screw the battery and beverage holder onto the frame Fig 3 Alternatively the battery can be stowed in the golf bag This requires an extension cable for the batt...

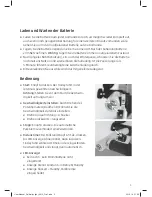
Page 13: ...e charger supplied with the trolley Operating To start Press button A The trolley will run at the last speed selected Important Before starting set the speed to slow Setting the speed Speed can be set...

Page 14: ...a dry location away from extreme temperatures If it is not used for a longer period more than 3 months recharge it during this period Keep your trolley under control always keep your hand on the handl...

Page 15: ...User Manual_Golftrolley light_2015_Print indd 15 23 12 14 21 58...

Page 16: ...Thalwil T 41 43 37799 02 F 41 43 37799 05 info golfomania ch www golfomania ch G ltig ab Valable d s le Valid from 1 1 2015 nderungen vorbehalten Sous r serve de modifications Subject to change User M...

Reviews:

Related manuals for Pro Caddy Light