background image

3

Using the BioCam2.0

TM

Recording Video

Recording Video

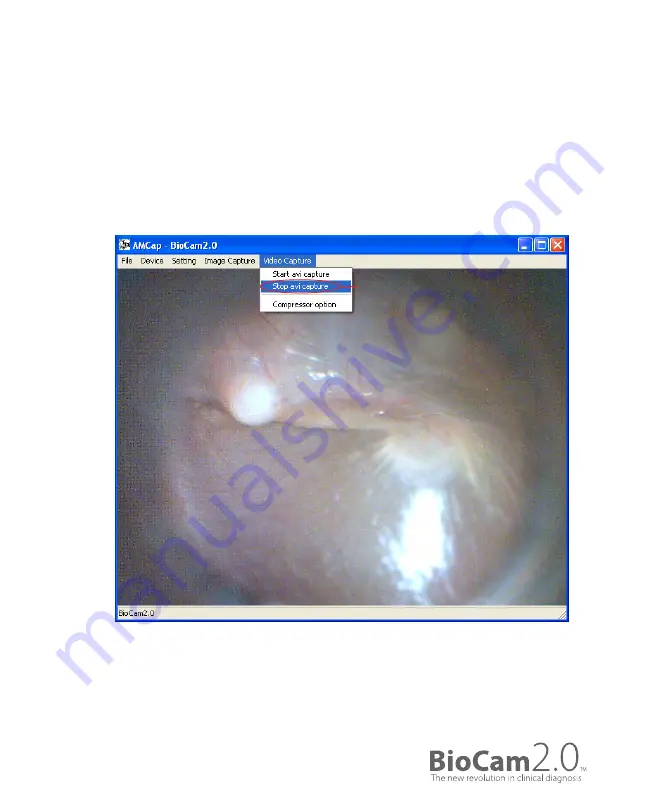
3. When you are finished recording go to 

Video Capture

 again and select 

Stop

AVI Capture. 

You can view your captured video now from the destination folder.

Page 2

 |

   VIDEO O

TOSC
OPE USER M

ANU

AL

To 

End 

video capture 

Summary of Contents for BioCam 2.0

Page 1: ...VIDEO OTOSCOPE USER MANUAL...

Page 2: ...ioCam2 0 Parts Page 8 2 GETTING STARTED How to Install the BioCam2 0 Software Page 9 How to Remove the BioCam2 0 Software Page 15 Connecting and Using the Device Page 16 Using the Freeze Button and th...

Page 3: ...ble designed for easy plug and play operation The BioCam2 0TM is compatible with any type of video display devices with USB 2 0 ports and Windows OS platform The operation of this device is supported...

Page 4: ...M device under the terms of this warranty Goldline will not be responsible for loss associated with the use of any BioCam2 0TM that 1 Has had serial number defaced 2 Has been repaired by anyone other...

Page 5: ...ent required standards for electromagnetic interference and should not present any complications to other equipment or devices Avoid using this device in close proximity of other equipment 5 Do not co...

Page 6: ...ty Information 2 Do not use any other attachments other than the attachments designed by Goldline exclusively for the BioCam2 0TM 3 Use caution when inserting speculum into the ear canal Page 6 VIDEO...

Page 7: ...GA CMOS 660HX507V 334 620 pixel 640Hx480V 307 200 pixel Live capture record focus 3 6 m x 3 6 m Quad VGA XGA SVGA VGA CIF QVGA 1280H x 960V 15fps USB 2 0 only interpolation 1024H x 768V 15fps USB 2 0...

Page 8: ...te This device only accepts BioCam2 0TM speculums from Goldline Focus Dial Power Switch USB 2 0 Freeze button Speculum Nozzle Grip Handle Focus Dial To focus the image or video Power Switch Turn on of...

Page 9: ...tall the BioCam2 0TM Software 1 Insert CD into your computer CD player The windows below will automatically open 2 Double click on the AMCap BioCam2 0 icon to start the installation 3 Click Next Page...

Page 10: ...2 Getting Started How to Install the BioCam2 0TM Software Page 10 VIDEO OTOSCOPE USER MANUAL 4 Choose your destination folder and click Next 5 Click Next...

Page 11: ...2 Getting Started How to Install the BioCam2 0TM Software 6 Click Install 7 Installation in progress Page 11 VIDEO OTOSCOPE USER MANUAL...

Page 12: ...2 Getting Started How to Install the BioCam2 0TM Software Page 12 VIDEO OTOSCOPE USER MANUAL 8 Click Continue Anyway if this window pops up 9 Click Finish...

Page 13: ...inish Your computer will restart now 11 Plug in the BioCam2 0TM after restarting The window below will appear Click Next after choosing Install the software automatically Recommended Page 13 VIDEO OTO...

Page 14: ...2 Getting Started How to Install the BioCam2 0TM Software Page 14 VIDEO OTOSCOPE USER MANUAL 12 Wait until installation complete 13 Click Finish Installation is completed...

Page 15: ...How to Remove the BioCam2 0TM Software Removal of the BioCam2 0TM software is only necessary upon upgrade or reinstallation 1 Open Control Panel 2 Remove AmCap BioCam2 0 and BioCam2 0 Page 15 VIDEO OT...

Page 16: ...nnect the USB cable to the computer system or any compatible viewing monitor The computer gives an audible signal that the connection is complete Attaching Speculums The BioCam2 0TM is compatible with...

Page 17: ...Focus Dial The Focus Dial Rotate dial upwards or downwards to fine tune the image or video The Freeze Button Press and hold the Freeze button for approximately 1 second and the image freezes as a thum...

Page 18: ...n image Image will appear on the AMCap BioCam2 0 window The image will also automatically appear and be saved on the Capture folder and be viewed and retrieved at anytime SAVING YOUR IMAGES ON YOUR SE...

Page 19: ...3 Using the BioCam2 0TM Recording Video Setting up Video Capture Video Capture and choose Compressor Option Page 19 VIDEO OTOSCOPE USER MANUAL...

Page 20: ...Using the BioCam2 0TM Recording Video Page 2 VIDEO OTOSCOPE USER MANUAL 2 Choose Sequence Properties and check Quick Compress Click Apply then click OK to close the window and start using BioCam2 0TM...

Page 21: ...3 Using the BioCam2 0TM Recording Video Recording Video 1 Go to Video Capture and select Start AVI Capture to start recording video Page 21 VIDEO OTOSCOPE USER MANUAL To Start video capture...

Page 22: ...ecording Video Recording Video 2 The Save As window will appear when you select Start Video Capture Choose your destination and click Save to save video The video record will start after this Page 2 V...

Page 23: ...g Video Recording Video 3 When you are finished recording go to Video Capture again and select Stop AVI Capture You can view your captured video now from the destination folder Page 2 VIDEO OTOSCOPE U...

Page 24: ...3 Using the BioCam2 0TM Recording Video Page 2 VIDEO OTOSCOPE USER MANUAL Adjusting Video Image 1 Go to Settings on the menu bar and select Video Filter 2 Adjust video accordingly...

Page 25: ...ier and increased client s compliance If you have any inquiries or questions regarding the BioCam2 0TM please go to our web site at www goldlinebiocam com or contact one of our personnel at info goldl...

Reviews: