background image

Humidified Merchandiser  


Combo


Model No. 5552-00-000 


Page 10 


gmpopcorn.com


Operating Instructions 

Prepare Merchandiser for Operation: 


1.


Fill water pan with hot water to provide humidity as needed (it is highly 
recommended to use distilled water). 

DO NOT

 overfill the pan. 

Do not allow water level to get low during operation or product may dry out. 

2.


Turn the Heat Switch ON. 

3.


Turn the Heat Control to 170°F and preheat unit approximately 2 hours. (Set 
temperature control to 170°F to maintain a 150°F product temperature. The proper 
setting of this control depends on the temperature of the items being placed inside 
and how many times the door is opened.) 

For specific product safe food holding temperature, reference your local code and/or 
instructions from food product manufacturer. 

4.


Load food products when preheat is complete.   

NOTE: 

If loading pizza, place it in pre-heated cabinet straight from the oven. 


5.


Turn the Light Switch ON for cabinet lights and to activate the rotisserie (Flat Rack 
does not rotate).


Prepare Oven for Operation: 

6.


Turn the Oven Heat Switch ON. 

7.


Preheat oven for approximately 1/2 hour, or until the Oven Pilot Light turns OFF. 


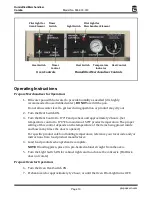
Heat Switch 

Pilot Light for 
Merchandiser Element 

Light Switch 

Temperature 

Indicator 

Humidified Merchandiser Controls 

Oven Controls 

Heat Control 

Heat Switch 

Timer 

Control 

Pilot Light for 
Oven Element 

Timer 
Switch 

Summary of Contents for 5552-00-000

Page 1: ...ducts Co Part No 50004 10700 Medallion Drive Cincinnati Ohio 45241 4807 USA Humidified Merchandiser Combo Model No 5552 00 000 Oven and Humidified Merchandiser Combo Rack and Graphic Kit sold separately Instruction Manual ...

Page 2: ...s shown for reference purposes only 7 Install Rotisserie 7 Apply Sign Graphics 7 Electrical Requirements 8 Before You Plug In Machine 8 OPERATING INSTRUCTIONS 9 Controls and Their Functions 9 Operating Instructions 10 Care and Cleaning 12 MAINTENANCE INSTRUCTIONS 13 ORDERING SPARE PARTS 14 Replacing Broken Glass 15 Cabinet Exterior Parts Breakdown 16 Cabinet Interior Parts Breakdown 18 Safety Labe...

Page 3: ...the warranty and may cause a dangerous condition This appliance is not intended to be operated by means of an external timer or separate remote control system NEVER make alterations to this equipment Read the Installation Operating and Maintenance Instructions thoroughly before installing servicing or operating this equipment 014_020416 WARNING To avoid burns DO NOT touch heated surfaces DO NOT pl...

Page 4: ...ine is NOT to be operated by minors 007_010914 Note Improvements are always being made to Gold Medal s equipment This information may not be the latest available for your purposes It is critical that you call Gold Medal s Technical Service Department at 1 800 543 0862 for any questions about your machine operations replacement parts or any service questions Gold Medal Products Co does not assume a...

Page 5: ...tructions before using this equipment To order copies of the operator s manual go to gmpopcorn com or write to Gold Medal Products Co 10700 Medallion Drive Cincinnati OH 45241 USA 1 800 543 0862 Model Description The Oven and Humidified Merchandiser Combo is a countertop base model unit without graphics Merchandiser cabinet is suitable for holding volatile food products holds precooked product at ...

Page 6: ...andiser Combo all kits sold separately Reference the Spare Parts Section of this manual to order individual item replacement parts 5552 000 Pizza Cabinet Kit for 5552 4 15 Pizza Pans Small Pizza Rotisserie and Graphics 5552 002 Pretzel Cabinet Kit for 5552 Small Pretzel Rotisserie and Graphics 5552 003 Flat Rack Cabinet Kit for 5552 Small Flat Rack no Graphics included ...

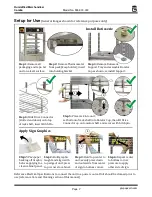
Page 7: ...ve Connector up onto motor shaft and secure with hitch pin Step 1 Remove all packaging and tape Set unit on a level surface Step 3 Remove Rotisserie Support Tray and assemble Rotator Cup as shown reinstall Support Install Rotisserie Step 2 Remove Thermometer from pack keep holder insert into holding bracket Step 4 Repeat center to bottom corner pressure to apply other side of sign Apply Sign Graph...

Page 8: ...s We recommend this equipment be on a dedicated and protected circuit Failure to wire properly will void the warranty and may result in damage to the machine It is Gold Medal Products Co s recommendation that this machine be plugged directly into a wall outlet The use of extension cords is not recommended due to safety concerns and may cause sacrificed and or reduced performance Make sure cord is ...

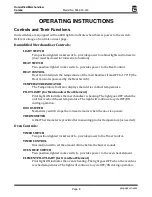
Page 9: ...displays the interior cabinet temperature PILOT LIGHT for Merchandiser Heat Element Pilot Light ON indicates the merchandiser is heating The light goes OFF when the unit has reached the set temperature The light will continue to cycle OFF ON during operation DOOR SWITCH Momentary switch stops the rotisserie motor when the door is opened THERMOMETER A Dial Thermometer is provided for measuring prod...

Page 10: ...of the items being placed inside and how many times the door is opened For specific product safe food holding temperature reference your local code and or instructions from food product manufacturer 4 Load food products when preheat is complete NOTE If loading pizza place it in pre heated cabinet straight from the oven 5 Turn the Light Switch ON for cabinet lights and to activate the rotisserie Fl...

Page 11: ...oad product in oven 9 Set the desired time on the Timer Control dial then turn the Timer Switch ON Buzzer will sound when the allotted time has expired Door Momentary Switch open door to access switch Thermometer store in holding bracket Water Pan Oven Access Door Oven Drip Pan ...

Page 12: ... one of the best ways of advertising your product Follow the directions below to clean and sanitize unit each day after use 1 Turn machine OFF unplug unit and allow it to cool completely before attempting to clean 2 Clean all pans trays accessories racks in order to sanitize them before each use 3 Clean any debris from around element with a clean cloth SLIGHTLY dampened with hot water 4 Clean outs...

Page 13: ...er installation adjustment alteration service or maintenance can cause property damage injury or death Any alterations to this equipment will void the warranty and may cause a dangerous condition This appliance is not intended to be operated by means of an external timer or separate remote control system NEVER make alterations to this equipment Read the Installation Operating and Maintenance Instr...

Page 14: ...ervicing this unit 3 When ordering please include part number part name and quantity needed 4 Please include your model number serial number and date of manufacture located on the machine nameplate data plate with your order 5 Address all parts orders to Parts Department Gold Medal Products Co 10700 Medallion Drive Cincinnati Ohio 45241 4807 or place orders by phone or online Phone 800 543 0862 51...

Page 15: ... pieces of broken glass 3 Slide glass panel up under top ridge then swing bottom of panel out and lower it away from unit see Figures A and B below 4 Carefully remove the rest of the broken glass and clean unit thoroughly 5 Remove all rigid glass channels from around glass to be replaced set channels aside for reuse 6 Slide rigid glass channels over exposed edges of new glass panel 7 Carefully sli...

Page 16: ...2 13 15 For Glass Panels see Replacing Glass section 16 24 25 Cabinet Bottom Cover 17 18 19 20 21 22 23 Foot and Fastener CAUTION If supply cord is damaged it must be replaced by Gold Medal Products Co its service agent or similarly qualified persons in order to avoid a hazard 26 27 Power Cord and Strain Relief 5 3 4 See Rack and Graphics Kit parts section 6 7 8 9 10 11 Dome and Fastener 1 2 ...

Page 17: ...40 10 PILOT LIGHT 125V RED 41033 11 5552 CONTROL LABEL 43293 12 HINGE PIN 42627 13 HINGE 42628 14 DOOR ASSY includes glass 101208 15 GLASS CHAN 18 1 16 cut to length as needed 42651 16 GLASS CHAN 18 15 32 cut to length as needed 42652 17 DRIP PAN 42870 18 OVEN DOOR FRONT WELDMENT 42878 19 OVEN DOOR BACK WELDMENT 42879 20 HANDLE 40807 21 1 4 20 X 1 2 HX HD SCREW fastener for Handle 12382 22 1 4 SPR...

Page 18: ...wn 18 17 16 10 6 8 9 7 11 1 6 2 3 4 5 19 20 13 12 22 23 24 21 Thermostat bulb cap thermostat Oven Element Pizza Cooking Tray Interior Oven Parts General image shown for parts reference only Rack and Graphics Kit sold separately Cabinet Element under Bottom Pan 15 14 Resistor 5K 8 Watt Dome Interior Parts ...

Page 19: ... 1 IN DIAL THERMOMETER 8000 12 POWER SUPPLY 24VDC 20W 55394 13 20W POWER SUPPLY BRACKET 55414 14 BUZZER SIGNAL 46118 15 RESISTOR 5K 8 WATT 48612 16 ROTATOR CUP ASSEMBLY sold separately see Rack and Graphics Kits for reference 101127 17 BOTTOM PAN 43488 18 600 WATT HEAT ELEMENT for Cabinet 43287 19 PAN COVER 42621 20 1 4 X 2 1 2 DP WATER PAN 42614 21 PIZZA COOKING TRAY rack in oven 22 500 WATT HEAT...

Page 20: ...m part number specify quantity needed Pretzel Graphics each PN 101213 Rotator Cup Assembly PN 101127 Drive Connection PN 101130 Hitch Pin each PN 40732 5552 000 Pizza Cabinet Kit Pizza Rotisserie PN 101191 Pizza Pan each 15 Pan PN 50003 Pizza Graphics each PN 101212 5553 002 Pretzel Cabinet Kit Pretzel Rotisserie PN 101192 5552 003 Flat Rack Cabinet Kit Rotator Cup Assembly PN 101127 Drive Connect...

Page 21: ...Humidified Merchandiser Combo Model No 5552 00 000 Page 21 gmpopcorn com Wiring Diagram Model No 5552 00 000 ...

Page 22: ... ON OUR PART INCLUDING THE IMPLIED WARRANTY OF MERCHANTABILITY THERE ARE NO WARRANTIES WHICH EXTEND BEYOND THE DESCRIPTION ON THE FACE HEREOF In no event shall Gold Medal Products Co be liable for special incidental or consequential damages No claim under this warranty will be honored if the equipment covered has been misused neglected damaged in transit or has been tampered with or changed in any...

Reviews: