background image

39

5

    Accessories

5

    Accessories

5.1    Preparation Steps

Before installing the optional modules, please make some preparations as follows.
1.    Turn off the printer :
       Remember to switch off the printer before installing any module.
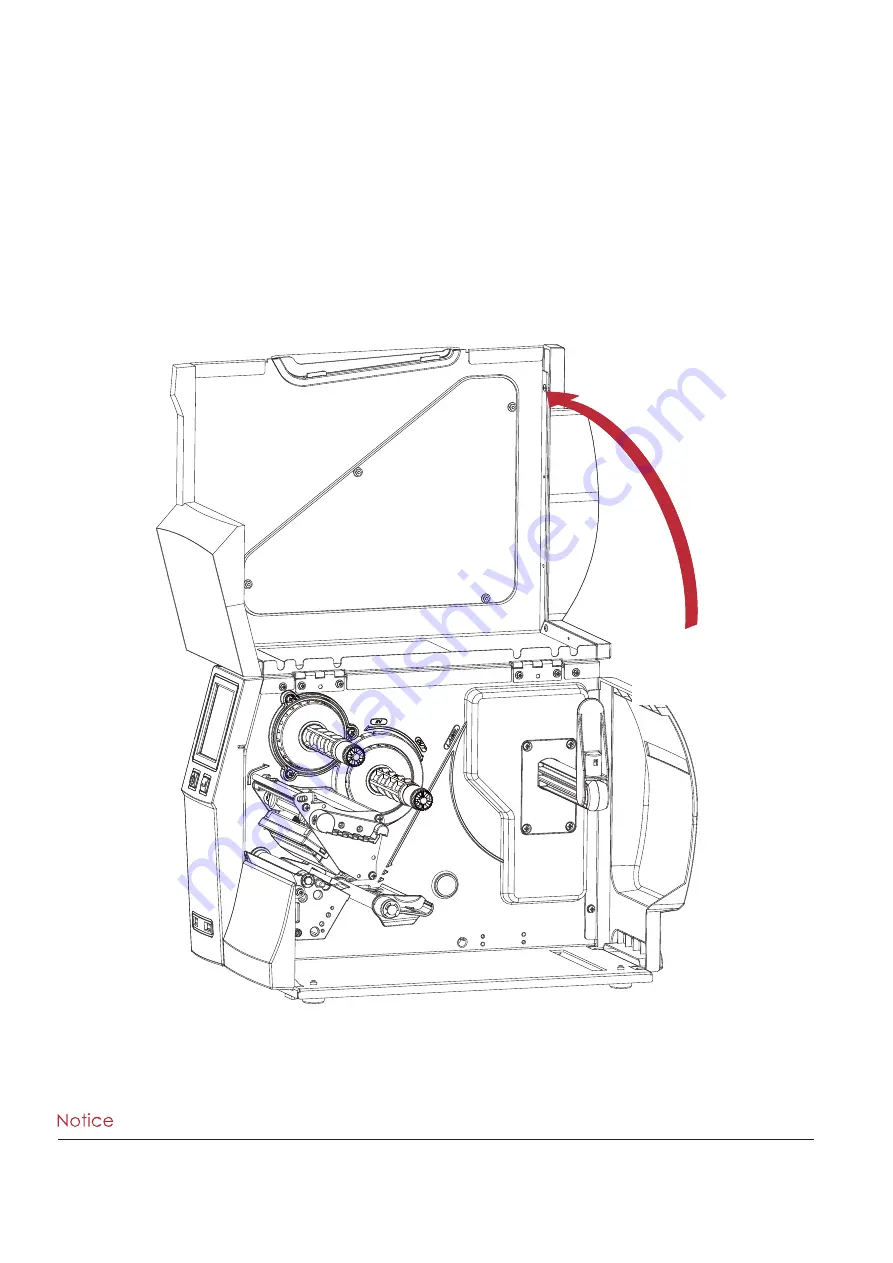
2.    Open the printer cover

*

***

 Remember to switch off the printer before installing the cutter.

**

**

 Do not use to cut adhesive labels! Glue residue will be left on the cutter blade and impair its functioning.

***

*

 Under the ordinary paper application condition, the cutter performs 300000 cuts of a heavy paper with up 

WRǍPWKLFNRUFXWVRIDSODVWLFVKHHWZLWKXSWRǍPWKLFN

Place the printer on a flat surface

and open the printer cove

Summary of Contents for BP1000i Series

Page 1: ...BP1000i Series THERMAL LABEL PRINTER USER MANUAL User Manual Version Issue Date P N BP1000i series Rev 1 1 2017 11 920 016211 00 ...

Page 2: ...rts USB Host 4 NetSetting for Ethernet 4 1 4 2 Installing the NetSetting Software The Interface of NetSetting 5 Accessories 5 1 5 2 Preparation Steps Installing the Cutter 5 3 Option Rewind Ribbon Hub Removing Ribbon 6 Maintenance and Adjustment 6 1 6 2 6 3 6 4 6 5 6 6 6 7 6 8 Installing removing the print head module Adjusting the print line Adjusting ribbon tension Cleaning the thermal print hea...

Page 3: ...r is connected Consult the dealer or an experienced radio TV technician for help This device complies with Part 15 Subpart B of the FCC Rules Operation is subject to the following two conditions 1 This device may not cause harmful interference and 2 this device must accept any interference received including interference that may cause undesired operation FCC Caution Any changes or modifications n...

Page 4: ... avoid electrical shock 6 For safety and warranty reasons ONLY qualified service personnel should open the equipment 7 Do not repair or adjust energized equipment under any circumstances Danger of explosion if battery is incorrectly replaced Replace only with the equivalent type recommended by the manufacturer Dispose of used batteries according to the manufacturer s instructions Only use with des...

Page 5: ...hat all of the following items are included with your printer BP1200i BP1300i BP1600i Barcode Printer CD Including software and user s manual BP1200i BP1300i BP1600i Series 4XLFN XLGH BP1200i Series USB Cable Label Stock Ribbon Power Adapter Power Cord ...

Page 6: ...r View Stylus Pen TOUCH PANEL POWER BUTTON FEED BUTTON LOWER COVER PLATE USB HOST PRINTER COVER VIEWING WINDOW Feed slot for continuous labels Calibration button Ethernet port Serial port DB 9 Applicator Interface OPTION USB port USB Host Parallel port OPTION Power jack On Off switch ...

Page 7: ...l View of Printer Ribbon rewind hub Ribbon supply hub Print mechanism Platen roller Release lever for print head Paper guide Label tension guide Label supply hub Label roll guide Adjustable Sensor RFID module RFID module Paper guide ...

Page 8: ...ting DTP ƝDoes not require a ribbon only thermal paper Please check which printing method you are using and alter the settings accordingly in the printer driver printer menu and or software Turn it anticlockwise to a top right position as shown in the illustration 2 1 Loading the label roll 2 Printer Setup Place the printer on a flat surface and open the printer cove ...

Page 9: ...he label roll on the label supply hub pushing it right up to the printer housing Do not apply too much pressure to avoid damaging the label stock KHQ PRYLQJ WKH ODEHO UROO JXLGH KROG LW RQO E WKH HQG WKDW LV DWWDFKHG WR WKH EUDFNHW QRW E LWV WRS 1RWH 2 Printer Setup ...

Page 10: ...rough the printer as indicated by the red arrows Pass the label stock through the Adjustable Sensor and up to the tear off plate Remember to set the movable sensor to gap black mark or tag hole by changing the position of the sensor with the adjustment wheel 1RWH 2 Printer Setup ...

Page 11: ... 1 The labels pass between the wall of the printer housing and the adjustable paper guide 1 2 Return the print head release lever to its original position Then close the printer cover 2 Printer Setup 1 2 ...

Page 12: ...nter cover Place a new ribbon on the ribbon supply hub The two illustrations as below show you how to install the ribbon depending on the ribbon type ink side in or out Ink side out Ink side in 2 Printer Setup 2 2 Loading Removing the Ribbon Loading Ribbon ...

Page 13: ...9 Do not pass the ribbon under the sensor 1RWH 2 Printer Setup Pass the ribbon under the print head and back up on the other side Attach it to the empty ribbon core ...

Page 14: ...e sure that the printer is switched off 2 Connect the power cord to the AC adapter and connect the adapter to the printer 3 Connect the USB cable to the printer and host computer 4 Switch on the printer The operator panel should now light up BP1200i BP1300i BP1600i BARCODE PRINTER ...

Page 15: ...PDWLFDOO RSHQ WKH ZHE SDJH VHWXS VFUHHQ 6HOHFW WKH PRGHO RX SXUFKDVHG OLFN QVWDOO 3ULQWHU ULYHU 2 OLFNƅI accept the terms in the license agreementƅ FOLFN 1H W 3 OLFN 1H W 4 OLFN LQLVK to step 5 2 Printer Setup 2 4 Wizard CD Standard Installation ...

Page 16: ...drivers and click Next 7 Enter the printer name you can use default then click Next to display as right diagram Click Finish button to start installation 6 With a USB connection search models such as the right diagram printer device Specify your printer model and click Next BP1200i BP1200i BP1200i BP1200i BP1200i ...

Page 17: ...13 8 Driver installation completed 2 Printer Setup BP1200i ...

Page 18: ...n for your media please see Section 3 4 Label Calibration and Self Test PAUSE PRINTING_FEED Button Pressing the FEED button while the printer is in standby mode will set the printer to pause mode In this mode the printer can receive commands but it will only process them when it is reset to standby mode Pressing the FEED button again will reset the printer to standby mode Pressing the FEED button ...

Page 19: ... appears Power on If the printer is on ready to print status the LCD screen should display the message Ready on the screen Use touch gestures to get around the Home screen and other screen for setting Wizard Test Main BP1200 V2 0000 Test Tap the screen with your finger or the stylus pen when you want to select on screen items such as settings icons ...

Page 20: ...0 V2 0000 Main LCD Language Printer Setting Label Setting Device Printer Control Codepage Dump Mode Recall Label 3 Printer Setting and Control On the Ready Page three function mode for setting You can make various setting functions in FUNCTIONAL MODE Tap Main Screen could show more detail of Main Tap Wizard Set up printer of Darkness Speed Tap Test self Test page and Out of Dump Mode for setting ...

Page 21: ...s Auto Select 6 10 Darkness Speed Sensor Select Media Type Main LCD Language Printer Setting Label Setting Device Printer Control Codepage Dump Mode Recall Label Printer Settings Continuous Auto Select 6 10 Darkness Speed Sensor Select Media Type If printer functions locked printer can not receive any commands from GoLabel or any devices UNLOCK LOCK ...

Page 22: ...alone Y N Keyboard Mode Country Code Label Edit Database Setting Codepage Recall Label Clock Setting Preview Label function User can choose any labels which have done in the printer and preview it See Instuctions Wizard Test Main BP1200 V2 0000 Main LCD Language Printer Setting Label Setting Device Printer Control Codepage Dump Mode Recall Label From the Home screen tap to Main Page From the Main ...

Page 23: ...t 001 Recall Label Print Quantity 1 From the Recall Label Page the touch panel shown on all labels Tap up to choose labels Tap down to choose labels Tap Preview Label can see printing label Preview Label Keeping tap to next page 0 5 BP1200i FW V2 000 Print out selected label Using recall label function send commands printer display must be back to Ready Page Wizard Test Main BP1200 V2 0000 ...

Page 24: ...ed darkness Also includes a Printing Wizard for your ease of printing More than 10 languages for printer setting It consists of a table of values that describes the character set for a particular language Setting items for printing label ex Rotation Printing position offset Option modules and connection port settings Self Diagnose functions for printer ex TPH testing self test page printing Recall...

Page 25: ...tting items for options ex Cutter Label Dispenser Applicator Choose ON Printing labels would be back to start position Setting items for Serial Port ex Baud Rate Parity Data Bits Stop Bits Setting items for LAN ex Port NO DHCP Dynamic IP Default Gateway Subnet Mask Setting items for LCD ex Brightness Contrast Power Saving Password Setting items for Clock ex Year Month Day Hour Minute ...

Page 26: ...Gaps Label with Marks Continuous Printing Mode Direct Thermal Thermat Transfer Tear off Position 0 40 Top of Form Apply Cancel LCD Language English Deutsch 丨檻Ḕ㕮 䰈檻Ḕ㕮 Français Español 㗌㜓媅 Italiano PȡȟȟȘȖȗ Türkçe Codepage 850 852 437 860 863 865 857 861 862 855 866 737 851 869 Win 1252 Win 1250 Win 1251 Win 1253 Win 1254 Win 1255 Win 1257 Label Setting Rotation X offset Y offset Start Offset ...

Page 27: ...s 0 0 0 0 Subnet Mask 255 255 255 0 Gatway 192 168 0 254 LCD Setting Brightness 5 Contrast 5 Power Saving 15 Password OFF Clock Setting Year Month day Hour Minute Printer Control Test Sample Pattern Select Memory Clear Memory Calibration Reset to Default Wizard Darkness 2 5 or 7 Speed 0 19 Media Type Label with Gaps Label with Marks Continuous X Offset Y Offset Bluetooth Clear Bind Enable Disable ...

Page 28: ...r screen to show the type of error You can fix the error according the notice WARNING ICON ERROR DESCRIPTION ERROR ICON 7R XSSHU OHYHO SSHDUV RQ WKH 1 9 7 21 21 RI 6HWWLQJ 3DJHV W JXLGHV RX EDFN WR XSSHU OHYHO E WRXFKLQJ GLVSOD XSSHU ULJKW LFRQ 7R PDLQ SDJH SSHDUV RQ WKH 1 9 7 21 21 RI 6HWWLQJ 9DOXH 3DJHV W JXLGHV RX EDFN WR PDLQ SDJH E WRXFKLQJ GLVSOD XSSHU OHIW LFRQ RFN 2Q 6HWWLQJ 9DOXH SDJHV WR...

Page 29: ... test printout are listed below Model Version USB ID setting Serial port setting MAC address of Ethernet port IP protocol setting IP address of Ethernet port Gateway setting Netmask setting Number of DRAM installed Image buffer size Number of forms Number of graphics Number of fonts Number of Asian fonts Number of Databases Number of Scalable fonts Free memory size Speed Density Ref Point Print di...

Page 30: ...t up or change label or ribbon to another type such as change using gap label to continuous or black mark labels Press C button for 2 seconds it will make an auto sensing to calibrate the label and ribbon s parameters Press Press C button is equivalent to the auto sensing command S SENSOR that will cancel on printing job and make the Label Calibration immediately Press CALIBRATION BUTTON ...

Page 31: ...rror 2 x 4 beeps The printing mechanism is not correctly closed Open the print mechanism and close it again Print Head Error None High temperature at the print head Once the print head has cooled down the printer switches to standby mode No ribbon is installed and the printer displays an error Make sure that the printer is set to direct thermal printing mode The ribbon is finished or the label sup...

Page 32: ... the sensor cannot detect a gap or black mark between the labels there is no paper Please reset the sensor The memory is full The printer prints the message File System full Delete unnecessary data or install additional memory Unable to find file The printer prints the message File Name not found Use the X4 command to print all files Then check whether the files exist and whether the names are cor...

Page 33: ...printer Connect the USB Stick plugged in printer to PC via USB Device or Ethernet port and run GoLabel software to download Graphic Font Label Format DBF and Command files to the printer Detail download procedures please refer to GoLabel On line Help Usage of Firmware Update Remove USB memory stick from printer and plug in it to a PC s USB port delete Firmware bin file from LABELDIR FW of USB memo...

Page 34: ...ter Standalone press the Y key on keyboard to entering to the dialog for Keyboard Mode operation Here have six sub dialogs Recall Label Country Code Code Page Clock Setting Database Setting Label Edit is able operating by keyboard as follow definition 1 Press ESC key to exist from Keyboard Mode or back to previous dialog 2 Press F1 it will let the printer from Home Page mode entering into Keyboard...

Page 35: ...ow below steps 5 Click Next to start the installation 6 Once the installation is completed you will see the NetSetting icon on your desktop 1 Insert the product CD in the CD DVD drive of the host computer and open the Ethernet folder on the CD 2 Select the icon for the NetSetting installation file and click it to start the installation 3 Follow the instructions on the screen The Setup Wizard guide...

Page 36: ...nterface which can configure different types of network settings But for the data security reason you need correct password to enter the configuration pages Click the magnifier icon to search the printers which are connected via Ethernet port in you network environment Once a connected Godex printer is detected it will be listed on the start page The default password is 1111 you can change the pas...

Page 37: ...work administrator for related network setting information You can press Set button to apply the settings and ReGet button to refresh the setting values IP Setting The IP Setting tab can change the printer name Port number Gateway setting and the password for configuring the printer You can also set the printer s IP address ether by DHCP or by Static IP ...

Page 38: ...es Alert Path Setting NetSetting will send the alert messages to designated mail account when the error happened on printer The alert messages are sent by SMTP Simple Mail Transfer Protocol or SNMP Simple Network Management Protocol You can set or change the configurations of SMTP and SNMP on this Alert Path Setting tab ...

Page 39: ...the settings and ReGet button to refresh the setting values Alert Message Setting For the alert message notification function you can decide which error cases need to be sent out to the operator Moreover the alert messages can be set to be sent by SMTP SNMP or both ...

Page 40: ...ress Set button to apply the settings and ReGet button to refresh the setting values Printer Configuration Set or change the configurations of connected printer Most of key settings for the printer operation can be done by this setting page ...

Page 41: ...otely User Command The User Command tab provides a communication interface for operator to control the printer Input printer commands in Input Command window and press Send Command button the commands will be sent to the printer For some commands that will return response message the message will be displayed in Output Message window ...

Page 42: ...er configurations back to factory default Firmware Download On Firmware Download tab the current version of printer firmware will be showed on the screen If you need to update the printer firmware just specify the file location of firmware file and press Start Download Firmware button The printer firmware then can be updated remotely ...

Page 43: ... 2 Open the printer cover Remember to switch off the printer before installing the cutter Do not use to cut adhesive labels Glue residue will be left on the cutter blade and impair its functioning Under the ordinary paper application condition the cutter performs 300000 cuts of a heavy paper with up WR ǍP WKLFN RU FXWV RI D SODVWLF VKHHW ZLWK XS WR ǍP WKLFN Place the printer on a flat surface and ...

Page 44: ...crew 5 2 Installing the Cutter The Overview of the Cutter Remove lower cover plate to the a little bit right then can get out Unscrew the screw marked in the illustration on the front of the printer which secures the lower cover plate 2 1 ...

Page 45: ...41 5 Accessories Connect the cutter cable connector to the cutter jack on the printer Be sure the cutter module insert to printer properly see red arrow ...

Page 46: ...cover Check whether the cutter function is enabled in the printer Labels or paper should be at least 30 mm high After installation of the cutter module set the stop position E to 30 Finish the cutter module installed Secure the cutter module on the printer housing using the screws ...

Page 47: ...43 5 Accessories 5 2 Option Rewind Ribbon Hub Removing Ribbon Use tool to cut off the ribbon ...

Page 48: ...44 Pull open the knob ribbon could be easy to remove 5 Accessories ...

Page 49: ... print head counterclockwise to a top right position using a screwdriver or a coin loosen the screw to take out the TPH module Hold the print head module pull out the TPH cable smoothly To install TPH module follow the reverse order Remember to switch off the printer before removing the print head module 1RWH ...

Page 50: ...s A clockwise or counterclockwise as far as possible and be sure to align with the indicator board and indicator line Repeat the adjustment process until printing quality has improved Turn the print head counterclockwise to a top right position using a screwdriver or a coin to loosen the screw indicator line A A indicator board ...

Page 51: ...ribbon supply hub To set the tension press in the knob and turn it clockwise or counterclockwise as required Increasing the tension of the ribbon rewind hub will remove any wrinkling of the ribbon during printing which results from the use of different ribbon materials For details about the wrinkling creasing of ribbons see Section 6 6 If you are using a very narrow ribbon the printer may not move...

Page 52: ...ity and a longer lifespan of the print head Here is how you clean the print head 1 Switch off the printer 2 Open the printer cover 3 Remove the ribbon 4 Release the print head by turning the print head release lever 5 To remove any label residue or other dirt from the print head see Red arrow please use a soft lint free cloth dipped in alcohol to wipe The print head should be cleaned once a week P...

Page 53: ...print head pressure must be readjusted using the TPH spring boxes Move the TPH spring boxes as shown in the illustration to change the print head pressure The wider the label you are using the further apart the TPH spring boxes must be moved away from each other If there is no quality improvement you need to change the pressure on the TPH spring boxes Reset Mark A Turning the screw left increases ...

Page 54: ...your print result looks like the example in b you need to turn ribbon shield screw counterclockwise a b To keep track of the change in print quality you should adjust the screws by half a turn at a time Print a test page If there is no improvement in the print result turn the screw by another half turn Do not turn the adjustment screw more than two full turns 360o I RX DGMXVW WKH VFUHZ E PRUH WKDQ...

Page 55: ...medium should be at least 30 mm long to ensure correct functioning of the cutter 1RWH Switch off the printer before removing the CUTTER remove or install cutter refer to accessories in Section 5 Unscrew the screw at the bottom of cutter Remove the cutter cover Clean and remove jammed paper Reinstall CUTTER back onto printer ...

Page 56: ...ng position has been set correctly i Check the ribbon for wrinkles There is no printed image on part of the label or the image is blurred i Check the thermal print head for dust or other dirt i Use the internal T command to check whether the thermal print head will carry out a complete print job i Check the quality of the print medium The printed image is positioned incorrectly i Check whether the...

Page 57: ...SC CPU BP1200i BP1300i BP1600i Code 39 Code 93 EAN 8 13 add on 2 5 UPC A E add on 2 5 I 2 of 5 I 2 of 5 with Shipping Bearer Bars Codabar Code 128 subset A B C EAN 128 RPS 128 UCC 128 UCC EAN 128 K Mart Random Weight Post NET ITF 14 China Postal Code HIBC MSI Plessey Telepen FIM GS1 DataBar German Post Code Planet 11 13 digit Japanese Postnet I2 of 5 with human readable check digit Standard 2 of 5...

Page 58: ...80 270 rotatable single characters 90 180 270 rotatable Asian Fonts 16x16 24x24 Traditional Chinese BIG 5 Simplified Chinese GB2312 Japanese S JIS Korean KS X1001 90 180 270 rotatable and 8 times expandable in horizontal and vertical directions TTF Fonts TTF Fonts Bold Italic Underline 0 90 180 270 rotatable Barcodes 1 D Bar Codes China Postal Code Codabar Code 11 Code 32 Code 39 Code 93 Code 128 ...

Page 59: ... 500mA Parallel port USER MANUAL APPENDIX Handshaking DSTB is sent to the printer BUSY to the host computer Interface cable Parallel cable compatible with IBM computers Pinout See below Pin No Function Transmitter 1 2 9 10 11 12 13 14 15 16 17 18 19 30 31 32 33 34 35 36 Strobe Data 0 7 Acknowledge Busy Paper empty Select Auto Linefeed N C Signal Gnd Chassis Gnd 5V max 500mA Signal Gnd Initialize E...

Page 60: ...tor Type Type B WKHUQHW 5 PIN NO FUNCTION 1 T 2 T 3 R 4 N C 5 N C 6 R 7 N C 8 N C SSOLFDWRU PIN NO FUNCTION 1 GND 2 5V max 500mA 3 START_PNT 4 SLEW_LABEL 5 PAUSE 6 REPRINT 7 24V max 1 5A 8 GND 9 RIBBON_LOW 10 SERV_REQ 11 END_PRINT 12 MEDIA_OUT 13 RIBBON_OUT 14 DATA_READY 15 OPT_FAULT USER MANUAL APPENDIX INTERFACE ...

Reviews: