background image


Declaration of Conformity


Hereby GOCLEVER Technology declares that the product complies with the essential requirements and 

other provisions of Directive 199/5/WE.   

Environmental Protection


The device is subject to the WEEE Directive 2002/96/EC. The symbol next to mean that the product must 

be disposed of separately and should be shipped to the appropriate collector. This allows you to limit 

pollution and the impact on human health.   

Also like to inform that our company has the obligations under the Act on waste electronic equipment, 

including in his collection, treatment, recovery and recycling is supported by KARAT 

ELECTRO-RECYCLING Ltd. If you have any questions or concerns you can contact Karat call 

056-623-80-91.   

Responsibility


GOCLEVER Technology Company nor any of its licensors shall not be liable for any loss of data or profits, 

as well as for any other consequential or indirect damages resulting from the use of equipment brand, in 

any case and the maximum permitted by law. GOCLEVER Technology is not responsible for any 

problems related to the malfunctioning of the operating system and applications operating under its 

control.   

Changes


GOCLEVER Technology reserves the right to revise this document and the specifications of the device, 

without notice to you. These features and images may vary depending on the services offered by the 

operator and software version of the device.      

Before using


Remember that the battery is not charged. Opening or attempt to disassemble the outer casing of the 

device will void the warranty.   

Google is a registered trademark, and Google Maps is a trademark of Google Inc.. in the United States 

and other countries. YouTube is a trademark of Google Inc..   

GOCLEVER Technology Company is not liable for technical or editorial errors or for omissions contained 

herein is not responsible for incidental or consequential damages resulting from furnishing this material.   

Information is presented in such a state in which you adopt them, and are not covered by any warranty. 

Subject to change without notice. GOCLEVER Technology Company reserves the right to change the 

contents of this document without prior notice. The manual describes basic functions of the device.   

Security   

Please refer to these guidelines. Failure to comply with them may cause danger to life or health or may be 

illegal. For further information, please read the entire manual. Device was designed to operate from 

battery and mains supply with the charger. Using the device in a different way can be dangerous and will 

void the warranty.   

Charging Battery 

The unit should be connected only to a power source in accordance with the parameters set out in the 

specification. In case of doubt as to the type of power source required, consult an authorized service 

provider or local power company. If the product is powered from a battery or other sources, follow the 

instructions supplied with the product.   

The impact of external factors and the electromagnetic field   

The device is not waterproof. Make sure that it was always dry, protect from moisture. The device also 

must be protected against high and low temperatures, dust, sand, do not expose it to shock, throw, as this 

Summary of Contents for TAB A104

Page 1: ...GOCLEVER TAB A104 USER S MANUAL MANUALE DI ISTRUZIONI www goclever com...

Page 2: ...mble the outer casing of the device will void the warranty Google is a registered trademark and Google Maps is a trademark of Google Inc in the United States and other countries YouTube is a trademark...

Page 3: ...ple a hospital petrol station a warehouse of explosives violations of these rules may result in fire or explosion Do not use the device while driving Do not use the device near strong electromagnetic...

Page 4: ...ts 7 1 7 Delete shortcuts from the tablet 8 1 8 Wallpaper 8 1 9 Connected the computer 9 2 Applications 9 2 1 Applications pre installed 9 2 2 Open stop running apps 10 2 3 How to get and install apps...

Page 5: ...ack button 5 Power ON OFF 9 microUSB 2 0 Host 2 Volume 6 Audio out 10 Reset 3 Volume 7 miniHDMI 11 DC in port 4 Camera 8 microUSB 2 0 OTG 12 microSD slot 1 1 Boot up Press power button for several sec...

Page 6: ...ps Notifications Quick Settings Apps Tray touch it to show all the apps installed in the tablet 1 4 Notifications Quick Settings Notification field is located in the right bottom corner showing time W...

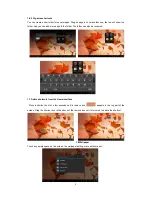
Page 7: ...face Click the WIDGETS next to APPS to show all the widgets Press any of them to make a shortcut on the Home interface 1 6 Create and organize shortcuts 1 6 1 Create a new shortcut on Home interface C...

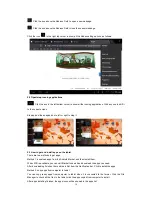
Page 8: ...folder The folder can also be renamed 1 7 Delete shortcuts from the Home interface Press a shortcut icon for a few seconds until a remove icon appears in the top part of the screen Drag the shortcut i...

Page 9: ...will go back to the chargeing mode 2 Applications This chapter shows detailed usages to download install and uninstall applications 2 1 Applications pre installed click the icon of Apps Tray to show...

Page 10: ...How to get and install apps on the tablet There are two methods to get apps Method 1 download apps from the Android Market and then install them When WiFi is available you can visit Market to search...

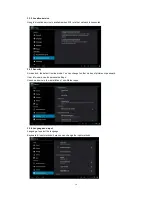
Page 11: ...he right bottom corner or the Setting icon 3 1 WiFi and Network 3 1 1 WiFi Click the button ON near WiFi to open it The tablet can detect all the available WiFi hotspots around you and they will be li...

Page 12: ...n the Default coordinate system and Special coordinate system to support some other games Screen adaptation used to adjust size of some games display screen 3 2 3 Storage Internal storage the space fo...

Page 13: ...d in the tablet You can uninstall applications and clear all the data of installed applications from the tablet 3 3 Personal 3 3 1 Account sync This setting option is only available for some applicati...

Page 14: ...ecurity Screen lock the default is slide mode You can change to other modes of pictures or password User info users can do personal settings Unknown source allow installation of non Market apps 3 3 4...

Page 15: ...is will erase all data from your tablet s internal storage 3 4 System 3 4 1 Date time Here to do settings about date and time 3 4 2 Accessibility This setting option shows default info 3 4 3 Developer...

Page 16: ...r or files are being copied 3 4 4 About tablet Here shows the status and legal information of the tablet such as model number Android version Baseband version Kernel version and build number 4 Camera...

Page 17: ...tart Save pictures Shift between the front and the back cameras Setting There are three detailed setting options as follows 4 2 Record videos Button introduction it shows the status of the camera Clic...

Page 18: ...ausati dal malfunzionamento del sistema operativo e le applicazioni che operano sotto il suo controllo Modifiche GOCLEVER Technology si riserva il diritto di modificare questo documento e le specifich...

Page 19: ...arsi che sia sempre asciutto proteggerlo dall umidit Il dispositivo inoltre deve essere protetto contro le alte e basse temperature polvere sabbia non esporlo a urti lanciare in quanto ci potrebbe dan...

Page 20: ...ganizzare collegamenti 24 1 7 Eliminazione dei collegamenti dal tablet 25 1 8 Sfondo 25 1 9 Collegato il computer 26 2 Applicazioni 26 2 1 Applicazioni preinstallate 26 2 2 Aprire fermare apps in esec...

Page 21: ...le e modalit di funzionamento di android 4 0 1 Pulsante Indietro 5 Power ON OFF 9 microUSB 2 0 Host 2 Volume 6 Uscita audio 10 Reset 3 Volume 7 miniHDMI 11 Presa di corrente 4 Macchina fotografica 8 m...

Page 22: ...ipale L immagine qui sotto mostra l aspetto della finestra principale quando si sblocca lo schermo 1 3 introduzione ai tasti ed alle icone principali Indietro toccare per tornare all ultimo step Casa...

Page 23: ...ssione Wi Fi lo stato della batteria e la notifica supplementare Toccare la notifica per visualizzare altre opzioni per accedere alle impostazioni di base 1 5 Apps Widgets 1 5 1 interfaccia Apps Clicc...

Page 24: ...ic su qualsiasi icona su App o interfaccia Widget per 2 3 secondi l icona di collegamento apparir l interfaccia principale 1 6 2 Organizzare i collegamenti possibile creare una cartella in cui inserir...

Page 25: ...o per eliminarlo e rimuovere il collegamento dalla finestra principale 1 8 Sfondo Toccare e tenere premuto nella finestra principale in qualsiasi punto appare una nuova finestra in cui possibile selez...

Page 26: ...oni ci sar un elenco di tutte le applicazioni installate sul tablet Toccando l icona dell applicazione si avvier l applicazione Ad esempio lettore Super HD visualizzatore di foto e video in una singol...

Page 27: ...droid Market Se il tablet collegato a una rete Wi Fi e l accesso a Internet navigare applicazioni nel Market di Android quindi toccare Installa La barra di notifica viene visualizzato lo stato del dow...

Page 28: ...o l icona Impostazione 3 1 Rete Wi Fi 3 1 1 Wi Fi Toccare il pulsante di accensione vicino a Wi Fi per attivare la scheda Wi Fi A destra sul tablet verr visualizzato un elenco di reti Wi Fi disponibi...

Page 29: ...t va in stand by Dimensione carattere regolare le dimensioni dei sottotitoli per soddisfare le vostre esigenze Sistema di coordinate Accelerometro possibile selezionare il sistema di coordinate di def...

Page 30: ...nte al tablet utilizzando il cavo OTG On The Go 3 2 4 Batteria Informazioni sullo stato della batteria e il tempo di funzionamento a batteria del tablet 3 2 5 Apps Un elenco delle applicazioni install...

Page 31: ...in funzione quando siamo collegati a una rete Wi Fi o cellulare 3 3 3 Sicurezza Blocca schermo l impostazione predefinita in modalit slide possibile modificare la modalit il PIN o la password Fonti s...

Page 32: ...metodo di inserimento predefinito 3 3 5 Backup e ripristino Ripristino dati di fabbrica elimina le nostre impostazioni e le applicazioni installate sul dispositivo per tornare alle impostazioni prede...

Page 33: ...ioni di programmazione Debug USB Disabilitato di default NOTA necessario disattivare questa funzione in modo da evitare problemi durante la copia dei file 3 4 4 Informazioni Qui mostrato il nome del m...

Page 34: ...santi mostra lo stato della fotocamera Toccare il pulsante per passare da scattare foto a registrare video Scattare Salvare l immagine passaggio tra la fotocamera di fronte alla telecamera e dietro Op...

Page 35: ...a Toccare il pulsante per passare da scattare foto a registrare video Scattare Salvare l immagine passaggio tra la videocamera di fronte alla telecamera e dietro Opzionale Impostazioni Ci sono tre tip...

Page 36: ...ompromettere la sua funzionalit se stato osservato quanto riportato nel manuale di istruzioni fornito con la conclusione del contratto 2 La presente garanzia valida solo per prodotti acquistati sul te...

Page 37: ...segnalato entro e non oltre 14 giorni dal suo verificarsi 11 Il cliente tenuto a consegnare il prodotto nella confezione originale con tutti gli accessori al centro di assistenza autorizzato 12 il Pro...

Page 38: ...sui prodotti GOCLEVER Il cliente potr utilizzare una delle seguenti opzioni rivolgersi al servizio telefonico help line al numero 035 0795364 per informazioni e richieste di assistenza inviare richie...

Reviews: