background image

T X 6 1 5 5   /  T X 6 8 5  

I N S T R U C T I O N   M A N UA L  

PA G E   1 3

Using the Menu

To access the Menu, press and hold the 

MENU

 key until the radio beeps. Menu options will appear 

in the order listed above. 

NOTE: 

The Duplex menu option will only appear when channels 1 – 8 or 41 – 48 are selected.  

CTCSS/DCS and transmit power settings are inhibited on channels 5/35 (emergency channel).

To step to the next Menu item press the 

MENU

 key again. To change the options in the selected 

Menu press the   or   keys. To store your selection and exit the Menu press the 

PTT

.

Duplex Mode Selection

The Duplex option only appears in the Menu if a repeater channel (1 – 8 or 41 – 48) was selected 
prior to entering the menu. To enable duplex on the selected repeater channel;

1.  Select the required repeater channel 1 – 8 or 41 – 48 using the   or   keys. 

2.  Press and hold the 

MENU

 key until the radio beeps. The 

 icon will flash.

3.  Press the   or   keys to toggle ‘on’ (duplex enabled) or ‘oF’ (duplex disabled) on the display.

4. Press the 

PTT

 to store your setting and exit the Menu.

When Duplex is enabled on a repeater channel, the 

 icon will be displayed whenever that 

channel is selected.

CTCSS and DCS Code Selection

The radio is fitted with both CTCSS and DCS systems. There are 50 CTCSS tones and 104 DCS codes. 

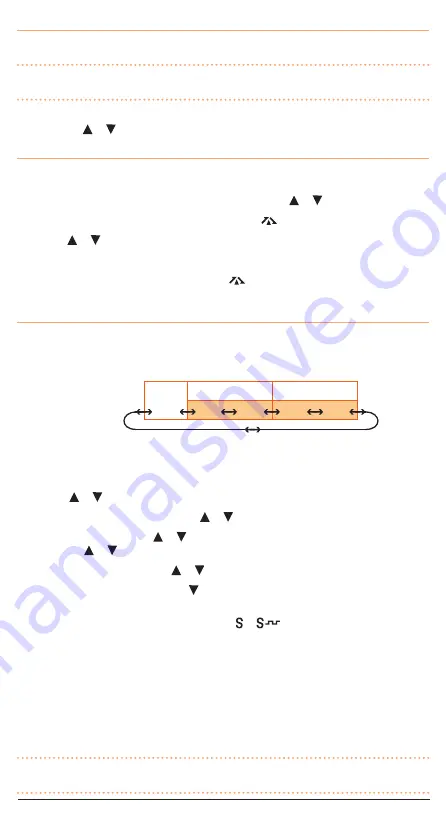
The DCS codes and the CTCSS tones are accessed through the same menu (see table below). When 
CTCSS tones are being selected ‘CT’ is displayed. To access DCS codes scroll past CTCSS tone 50 
until ‘DT’ is displayed. 

To Select a CTCSS or DCS Code

1.   Press and hold the 

MENU

 key until the radio beeps. ‘CT’ (for CTCSS) or ‘DT’ (for DCS) will be 

displayed.

2.   Press  the   or   keys to select the required tone/code. 

3.   To select CTCSS tones 01 to 50 press the   or   keys while ‘CT’ is displayed. 

4.   To select DCS codes, hold the   or   key to scroll past the CTCSS tones until ‘DT’ is displayed. 

Now use the   or   keys to select the required DCS code 001 to 104. 

5.   To return to CTCSS tones hold the   or   key until ‘CT’ is displayed again.

6.   To turn CTCSS/DCS tones off, hold the   key to step to the end of the code list until ‘oF’ is 

displayed.

7.   Press  the 

PTT

 to confirm and store your selection.   or 

 is now displayed to confirm the 

code system you have selected. 

To Enable Silent Mode on a Channel

1.  Select the required channel. 

2.   Press and hold the 

SQL

 key for about 2 seconds. The selected code number will be displayed on 

that channel.

3.   The selected channel will now remain silent unless a signal is received containing the chosen 

tone/code.

NOTE: 

Silent mode will only be enabled on channels you select. Other channels will remain open to 

all incoming signals.

OFF

CT (CTCSS)

DT (DCS)

01         50

001         104

Summary of Contents for TX685

Page 1: ...3 and 5 watt compact UHF CB radios I N S T R U C T I O N M A N U A L...

Page 2: ...icle Lighter 12V DC Lead BCV007 Belt Clip MB045 Instruction Manual SAFETY INFORMATION 2 ACCESSORIES SUPPLIED 2 IMPORTANT INFORMATION CONCERNING UHF CB RADIO 3 IMPORTANT ADVICE 4 FEATURES 4 CONTROLS 5...

Page 3: ...djust your radio volume for best performance When an older wideband radio receives a signal from a new narrowband radio the speech may sound quiet simply adjust your radio volume for best performance...

Page 4: ...ogy CTCSS DCS A built in Continuous Tone Coded Squelch System and a Digital Coded Squelch option provide quiet channel operation PHYSICAL PROPERTIES Water Dust proof IP67 Provides protection against d...

Page 5: ...X685 INSTRUCTION MANUAL PAGE 5 CONTROLS Antenna Indicator LED PTT Button Squelch Button Menu Function Key Channel Down Volume On Off Belt Clip Speaker Accessory Jack Microphone LCD Display Channel Up...

Page 6: ...ing CTCSS Low Power Icon Appears when Low TX power is selected Function Icon Appears when the function F key is pressed to activate secondary functions Scan Icon Flashes when radio is scanning Battery...

Page 7: ...charger The use of other types may be dangerous and will void the warranty To Fit the Battery Pack 1 Ensure that your radio is switched off 2 Align the slots in the battery pack with the battery guide...

Page 8: ...with the battery attached The LED will light Red to indicate the battery is charging 2 When the battery has charged the LED will change to GREEN The fully charged battery can be left on the charger u...

Page 9: ...ximum battery life e g a remote site where there is no convenient recharging facility nearby the following hints can greatly reduce the amount of power drawn from the battery pack Standby Mode The rad...

Page 10: ...nd speak into the built in microphone While the PTT switch is pressed the LED indicator on the upper edge of the radio will light RED and the icon will appear on the LCD When you have finished speakin...

Page 11: ...channel 1 but will transmit on channel 31 Duplex can be enabled or disabled separately on individual channels When Duplex is enabled on the selected channel is displayed The Duplex Mode is set throug...

Page 12: ...emain closed to all other signals Note that CTCSS and DCS codes do not prevent others from hearing your transmission CTCSS DCS tones are switched off by default To use CTCSS DCS you must first enable...

Page 13: ...ms There are 50 CTCSS tones and 104 DCS codes The DCS codes and the CTCSS tones are accessed through the same menu see table below When CTCSS tones are being selected CT is displayed To access DCS cod...

Page 14: ...Disable the Scrambler 1 Press and hold the MENU key until the radio beeps 2 Briefly press the MENU key repeatedly until SR is displayed The icon will be flashing 3 Press the or keys to select on or o...

Page 15: ...your selection Button Beep The Button beep allows the radio to sound a confirmation beep whenever the keys are pressed To Turn the Button Beep On or Off 1 Press and hold the MENU key until the radio...

Page 16: ...l Watch channel To Set the Dual Watch Mode 1 Use the or keys to select the current channel 2 Press and hold the MENU key until the radio beeps 3 Press the MENU key repeatedly until du is displayed The...

Page 17: ...8125 76 477 3125 17 476 825 37 477 325 57 476 8375 77 477 3375 18 476 850 38 477 350 58 476 8625 78 477 3625 19 476 875 39 477 375 59 476 8875 79 477 3875 20 476 900 40 477 400 60 476 9125 80 477 4125...

Page 18: ...d Consumer Act 2010 Australia or any other mandatory protection laws that may apply 2 2 We warrant our goods to be free from defects in materials and workmanship for the warranty period see warranty t...

Page 19: ...to supply those services again at no extra charge to you 2 6 To make a warranty claim you must before the end of the applicable warranty period see warranty table at your own cost return the goods yo...

Page 20: ...r 48266 1 A division of Standard Communications Pty Ltd Head Office PO Box 96 Winston Hills NSW 2153 Australia New Zealand PO Box 58446 Botany Auckland 2163 NZ T 09 274 0955 All other international en...

Reviews: