background image

8

Emptying the drum

WARNING.


Take care, the tank 

may be heavier than you think.
1.  Switch off the unit and unplug 

from the power point.

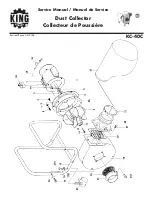
2.  Remove the lid (5) of the 

vacuum by pulling outward 

on the release clips (3) on 

each side of the vacuum.  

Lift off the lid.

3.  Empty the drum contents  into an appropriate waste 

disposal container.

4.  Replace the lid, ensuring that both retaining clips are 

fastened, plug in and continue as before.

Replacing the filter 

WARNING.


Always ensure that 

the tool is switched off and 

the plug is removed from the 

power point before making any 

adjustments or maintenance 

procedures. 
Your filter should be cleaned 

often to maintain peak 

performance. 
1.  Squeeze the filter bag clip 

(6b) in on itself.

2.  Remove the filter bag (6a) 

from the filter cage.  

3.  To clean the filter bag (6a), 

gently brush away small dirt 

particles that may have stuck 

to the material. 

4.  After cleaning check the 

filter thoroughly for tears or 

small holes. Do not use a 

filter with tears or holes in it. 

Even a small hole can cause 

a lot of dust to come out 

of your vacuum. Replace it 

immediately. 

5.  Before installing the filter on 

the vacuum clean the area 

of the lid so that the filter bag 

clip (6b) will seal the bag 

against the lid and stop small 

particles from bypassing the 

filter bag. 

6.  Squeeze the filter bag clip 

in on itself and place the 

replacement filter bag on the 

filter cage until the open end  

touches the bottom of the lid. 

Note.


To avoid damage to the blower wheel and motor, 

always reinstall the filter before using the vacuum. 

Note.


Clean the filter in an open area, cleaning should be 

done outdoors. 

WARNING.


Do not remove the filter cage. It is fitted to keep 

the shape of the filter bag during operation.

Summary of Contents for RDC8LA

Page 1: ...600W8LITRE PORTABLEDUST EXTRACTIONSYSTEM WITHACCESSORIES RDC8LA INSTRUCTION MANUAL Black Cyan Magenta Yellow Code RDC8LA Date 070806 Edition 03 Op DCR...

Page 2: ...o does not cover any bonus items or included accessories Only the power tool is covered under this warranty With continuing product development changes may have occurred which render the product recei...

Page 3: ...Quality Standards to meet superior performance criteria You will find your new tool easy and safe to operate and with proper care it will give you many years of dependable service CAUTION Carefully r...

Page 4: ...ools or attachments to do the job best handled by a heavier duty tool Never use a tool for a purpose for which it was not intended 7 Dress correctly Do not wear loose clothing or jewellery They can be...

Page 5: ...ch as coal or grain Never pick up asbestos or asbestos dust Wood dust and chips in a confined area can give rise to fire or an explosion Guard against possible ignition sources Do not pick up anything...

Page 6: ...ng dust wood shavings etc from machines and the floor of the working area It is not to be used for the suction of liquids 1 Shoulder Strap 2 Vacuum port 3 Release clips 4 Power cord not shown 5 Lid 6a...

Page 7: ...rvals to maintain peak vacuum performance Use as a Vacuum Vacuuming tips For crevices corners etc use the crevice nozzle 11 For upholstered furniture use the upholstery nozzle 13 For curtains lightwei...

Page 8: ...ilter cage 3 To clean the filter bag 6a gently brush away small dirt particles that may have stuck to the material 4 After cleaning check the filter thoroughly for tears or small holes Do not use a fi...

Page 9: ...itched off and the plug is removed from the power point before making any adjustments or maintenance procedures 1 Keep the tool s air vents unclogged and clean at all times 2 Regularly check to see if...

Page 10: ...10...

Page 11: ...11...

Page 12: ...w Zealand 7am 7pm 7days a week AEST Please note that if repair or replacement is required you must provide a valid original purchase receipt You will need the following details at hand to log your ser...

Reviews: