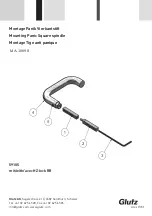


• Unscrew both square parts (1,2) by means of an Allan key (3) SW 3.
• Install the lock case.
• Insert the square part (1) into the follower from the outside of the door.
• Insert the square part (2) into the follower from the inside of the door.
• Caution:
the grooves of the square parts (1,2) must look against the door frame.
• Screw both square parts (1+2) tightly together with the allan key (3) up to the stop.
• Assemble handle and rose.
• Caution:
Because of the high load on split spindles, use only Glutz easy fix fixed mobile solutions.
•
Fix tight the Heso screw (5) of the handle (4). The cylindrical part of the screw anchor into the grooves of the square
spindle
Fixing instructions
•
Die beiden 4-Kt.-Teile (1,2) mit einem Inbusschlüssel (3) SW 3 mm auseinander schrauben.
• Schloss montieren.
•
4-Kt.-Teil (1) von der Aussenseite der Tür in die Schlossnuss stecken.
•
4-Kt.-Teil (2) von der Innenseite der Tür in die Schlossnuss stecken.
• Achtung:
Die Schlitze der 4-Kt.-Teile (1,2) müssen beide gegen den Türspalt zeigen.
•
Mit Imbusschlüssel (3) die beiden 4-Kt.-Teile (1+2) bis auf Anschlag satt zusammenschrauben.
•
Beschlag und Drücker (4) montieren.
• Achtung:
Wegen der hohen Belastung auf geteilte Dorne, sind nur Beschläge mit drehbarfesten Glutz easy fix Ver-
bindungen einzusetzen.
•
Die Heso-Schrauben (5) der Drücker (4) fest anziehen. Der zylindrische Ansatz der Schrauben verankert sich dabei
in den Schlitzen der 4-Kt.-Dorne
Montageanleitung
Glutz AG, Segetzstrasse 13, 4502 Solothurn, Schweiz
Tel. +41 32 625 65 20, Fax +41 32 625 65 35,
[email protected], www.glutz.com


