14
221785B
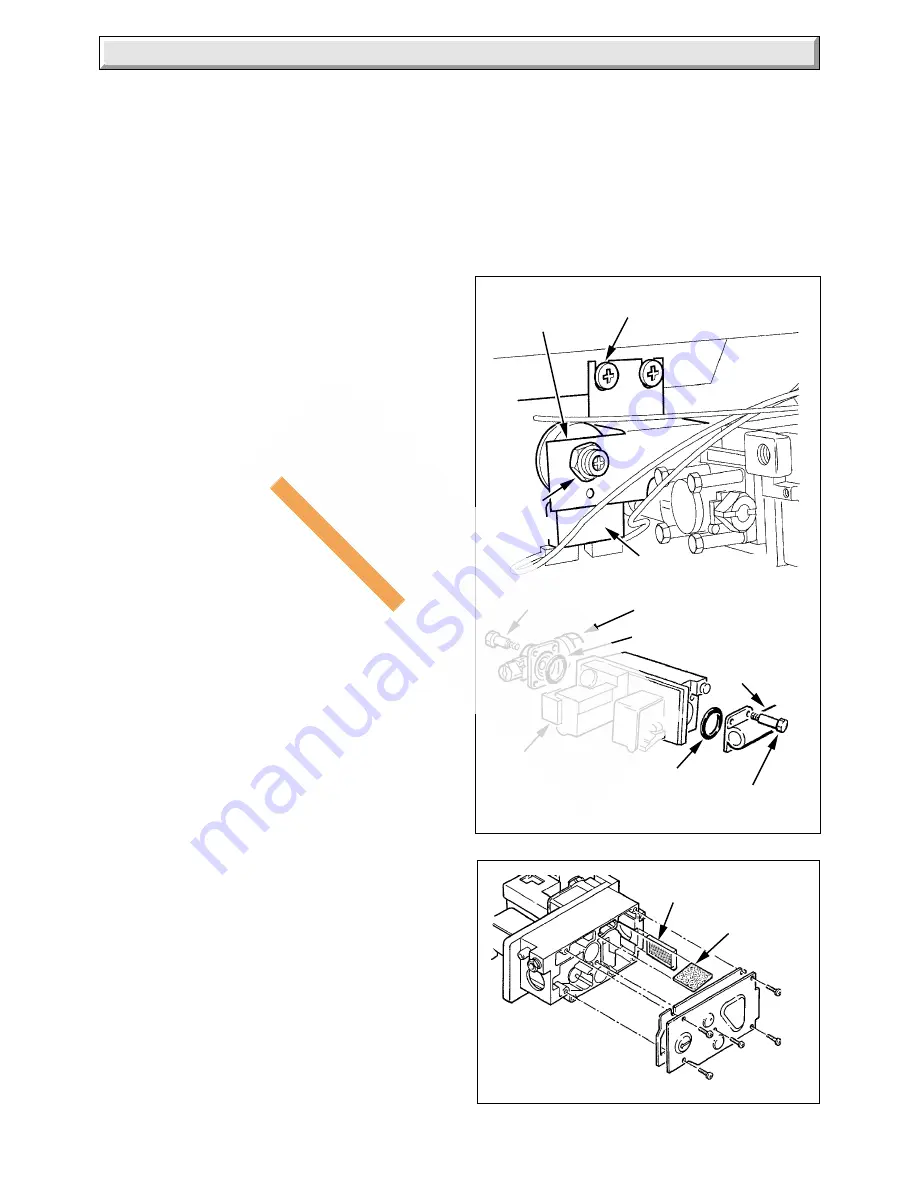
Diagram 8.2
MULTI-FUNCTIONAL
CONTROL FILTERS
2142
FINE INLET
SCREEN
PILOT
FILTER
Diagram 8.1
MULTI-FUNCTIONAL
CONTROL CONNECTIONS
5313
HEX SCREW (4)
'O' RING
GAS
SERVICE COCK
BURNER
SUPPLY
PIPE
MULTI-FUNCTIONAL
CONTROL
'O' RING
HEX
SCREW (4)
SECURING
SCREW (2)
SAFETY
DEVICE
LOCKNUT
FLUE BLOCKAGE
SAFETY DEVICE
SUPPORT
BRACKET
8 Servicing and Replacement of Parts
8.1 Access
Refer to diagram 4.1 and 6.1.
Slide the controls cover off. Undo the screws and remove the
outer case.
Lift the combustion chamber shield clear of the lugs and
remove.
8.2 Main Burner
Refer to diagram 6.1.
Remove the main burner. Lift the left hand end of the burner to
disengage the locating pin.
Slide the burner off the injector by moving it to the left, take care
not to damage the pilot burner and electrode assembly. Bring
the right-hand end of the burner through the opening first.
Service note: Clean the burner thoroughly, making sure that all
the flame ports are clear.
8.3 Boiler Flueway Cleaning
Gain access as Section 8.1. Remove burner as Section 8.2.
Refer to diagram 4.6 and 8.6.
Release split pin. Remove retaining angle and thermostat
phial.
Undo the screws and remove the flue cleaning door.
Remove flueway baffle.
Place a sheet of paper in the combustion chamber, covering the
electrode/pilot assembly, to catch the flue debris.
Clean the boiler flueways and fins thoroughly with a suitable stiff
brush.
Re-assembly note: When replacing the flue cleaning door and
flueway baffle ensure they are fitted as shown in diagram 4.6.
8.4 Multifunctional Control - Servicing/
Replacement
Gain access as Section 8.1.
Refer to diagram 6.4 and 8.1.
Remove multifunctional control cover securing screw.
Disconnect the electrical leads, thermocouple and pilot supply
tube at the multifunctional control.
Remove the flue blockage safety device securing locknut and
release from bracket, taking care not to strain the capillary.
Remove the two securing screws from the support bracket.
Undo the four screws each side of the multifunctional control to
release the gas service cock and burner supply tube, take care
not to damage the “O” rings.
Reassembly note 1: When refitting the gas valve take care not
to damage the “O” rings.
Reassembly note 2: When fitting a replacement gas valve
remove the bracket and fit to new one.
Refer to diagram 8.2.
To inspect the inlet screen and replace the pilot filter remove the
base of the multifunctional control by releasing the five screws.
When reassembling take care not to damage the screen.
Remake the electrical connections.
NOTE. Do not tighten the thermocouple nut more than one
quarter turn beyond finger tight.
It will be necessary to purge the pipework and multifunctional
control before relighting, refer to Commissioning.
8.5 Multifunctional Control/Solenoid
Replacement
Refer to diagram 8.3.
Remove the multifunctional control cover as described in Section
8.4.
Disconnect electrical leads, remove the solenoid retaining clip
and solenoid.


