background image

MiraBox User Guide 

–page

4

 / 

29


2. Optional package contents 


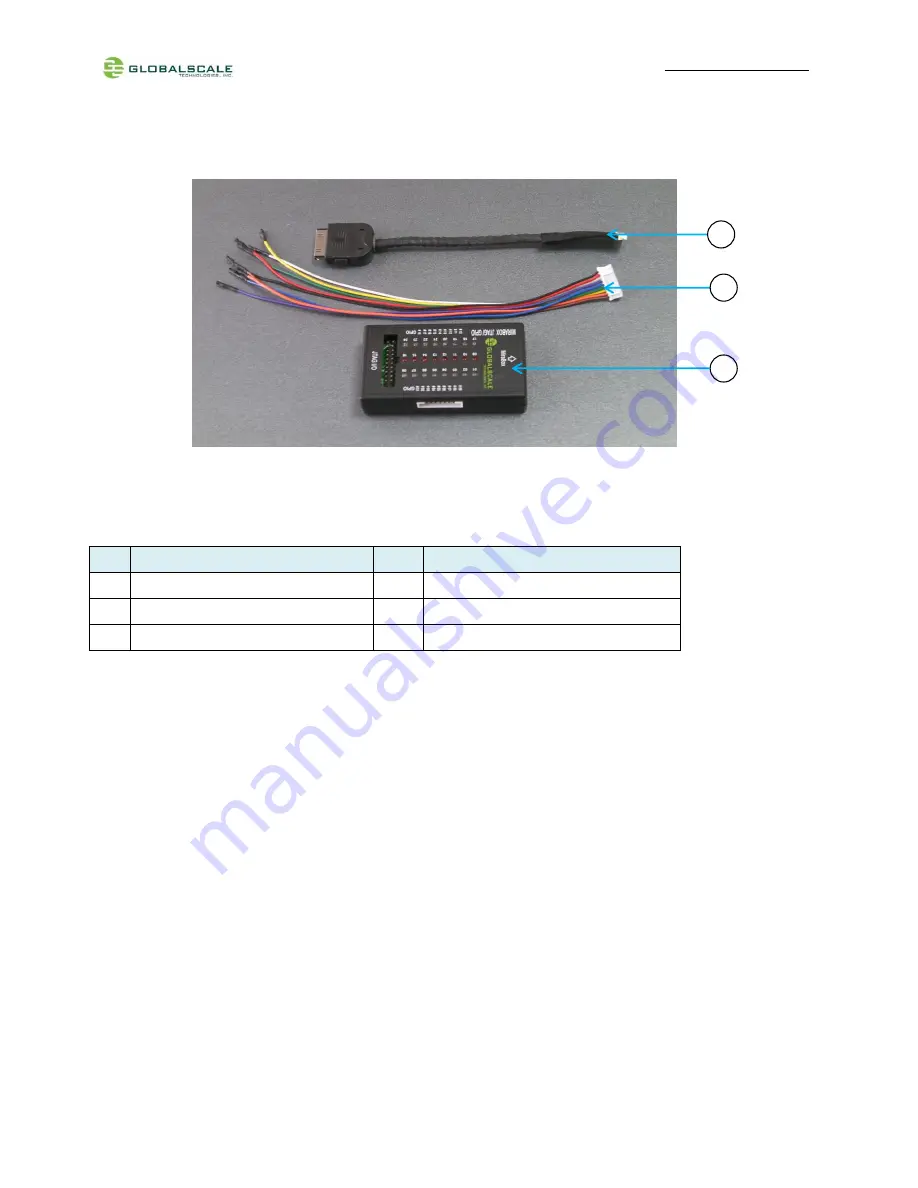
MiraBox Optional contents List 


Multi I/O Cable 

1 pc 

Connect from MiraBox to JTAG/GPIO box 

GPIO Cable 

1 pc 

For GPIO port connection   

10 

MiraBox JTAG/GPIO box 

1 pc 

External JTAG/GPIO box for debugging 


10 

Summary of Contents for MiraBox

Page 1: ...ecting ports 5 C LED indication 7 D System console and debugging 8 1 Driver and tool installation 8 2 Go into debugging console 11 3 WiFi AP mode testing 12 4 WIFI Client mode testing 14 5 Bluetooth testing 17 6 Gigabit ethernet ports 18 7 USB 3 0 port 19 8 Multi IO port 20 9 Reset 28 10 Download sites 29 Sep18 2012 ...

Page 2: ...MiraBox User Guide page2 29 A Package contents 1 Standard package contents 1 2 4 3 ...

Page 3: ...aBox 1 unit Mirabox main unit 2 AC DC Power Adapter 1 pc Input 90 240VAC output 5V 3A DC 3 Ethernet Cable 1 pc Cat 5e 4 Mini USB Cable 1 pc For debug console use 5 Quick reference card 1 pc Not shown in the above picture 6 Warranty card 1 pc Not shown in the above picture ...

Page 4: ...ptional package contents MiraBox Optional contents List 8 Multi I O Cable 1 pc Connect from MiraBox to JTAG GPIO box 9 GPIO Cable 1 pc For GPIO port connection 10 MiraBox JTAG GPIO box 1 pc External JTAG GPIO box for debugging 10 8 9 ...

Page 5: ...MiraBox User Guide page5 29 B MiraBox appearance and connecting ports 1 2 3 6 4 5 ...

Page 6: ...gabit Ethernet port2 4 USB 3 0 port 1 USB 3 0 high speed host 5 USB 3 0 port 2 USB 3 0 high speed host 6 Mini USB console port Debug console Connect to PC USB port 7 Multi I O port JTAG and GPIO port Connect to external JTAG GPIO box for system development 8 Micro SD slot External Micro SD slot 9 Reset button hole System reset button Reset through GPIO 9 8 7 ...

Page 7: ...cription 1 Power on LED Solid green Upon power on this LED lights up 2 WiFi AP Blinking blue Indicate WiFi AP mode is activated as default after boot up Off WiFi AP mode is not activated 3 WiFi client Blinking green WiFi client mode is activated Off WiFi client mode is not activated 3 1 2 ...

Page 8: ...KXPVDock exe for Prolific USB to Serial Comm Port at our Website http www globalscaletechnologies com t downloads aspx 4 Install driver on your PC only for the first time 4 1 Connect Mirabox to your Windows PC 4 2 The first time when you connect Mirabox to the Windows computer you will be asked to install the driver Connect Mini USB cable here The other end connects to computer s USB port ...

Page 9: ...2KXPVDock exe and the driver will be installed to the PATH C cabs 2KXPVDock 5 Find out the com port of your debugger on your windows PC 5 1 Right click My Computer Properties Hardware Device Manager Click Next to complete the installation ...

Page 10: ...s COM3 for example 6 Run putty exe and configure as below on your Windows PC The Serial line should be configured the same as the COM port in Device Manager Give it a name and Save for easy execution next time Give it a name and Save for easy execution next time Click Open ...

Page 11: ...otdelay timer is counting down After entering the uboot prompt you can also change the uboot environment variables such as bootdelay time Ipaddr serverip and so on 3 If no key was pressed to interrupt the uboot it will continue running to the login screen where it prompts you to input the login name and password here is the default login information Login root Password nosoup4u ...

Page 12: ...client or AP mode but only one at a time The default mode is AP mode every time when it powers on and the indication light D6 is blinking blue Here are steps for testing 1 Enter command and you will see message for uap0 device ifconfig 2 Prepare one computer installed with a Wi Fi Lan card here we use a computer with a Windows XP operating system for example 3 Go to Network Connections as shown be...

Page 13: ...r Guide page13 29 3 Choose name with mira uAP 6344 here digits 6344 is the last four digits of MAC address for the MiraBox WiFi Then click Connect 4 Successfully connected 2 Select View Available Wireless Networks ...

Page 14: ...14 29 4 WIFI Client mode testing 1 Switch to WiFi client mode by entering command as following wlan sh When done successfully the LED D7 is blinking green and mlan0 is activated 2 To check mlan0 with ifconfig command ifconfig ...

Page 15: ...MiraBox User Guide page15 29 3 Scan for WiFi AP nearby iwlist mlan0 scan ...

Page 16: ... screenshot is an example for how to connect a mlan device If you can see IP address for example 192 168 1 102 that means you have already connected and got an IP 5 Switch back to WiFi AP mode There are two useful script files client_ap sh switch from wifi client mode to wifi AP mode wlan sh switch from wifi AP mode to wifi client mode ...

Page 17: ...as your mobile phone BT earphone or laptop computer then put it into to be discovered mode b Entering command as following on your Mirabox hciconfig hcitool i hci0 scan flush Normally the Bluetooth devices nearby will be searched and shown as below sdptool browse This command shows the protocol of Bluetooth device found If you see the message like this it means your Bluetooth is up and running Thi...

Page 18: ... the two Gigabit Ethernet ports to a Gigabit switch by network cables Normally it will get an IP address assigned by DHCP Enter command as below to check ifconfig 2 Test the speed of Gigabit Ethernet ports ethtool eth0 Normally you will see the information as below ...

Page 19: ... flash disk to the USB port then you can see some driver messages as below of this device 2 View the usb3 0 hard disk fdisk l You will see below messages of the usb3 0 device which is usually shown as dev sdb dev sdc 3 Test the access speed of the usb3 0 ports hdparm t dev sdc1 ...

Page 20: ...Multi IO cable 9 Multi IO port JTAG interface Please connect the debugger to the 20 pin JTAG slot as shown in the picture here we use the Marvell BlackStone debugger and XDB Marvell eXtreme Debugger 5 1 software on Windows PC for example MiraBox JTAG GPIO box Multi I O Cable Multi I O port Multi I O port ...

Page 21: ...MiraBox User Guide page21 29 Debugger connection Run XDB on Windows PC MiraBox JTAG GPIO Marvell BlackStone debugger MiraBox ...

Page 22: ...mmand as below ledtest1 This will light up all the LEDs 2 Write a simple program to control the LED In this GPIO box we use NXP PCA9505 I O port expansion IC to provide 40 bit parallel input output GPIOs Please download the datasheet to get the detailed description for this chip GPIO port 1 GPIO port 2 GPIO port 3 GPIO port 4 GPIO port 0 ...

Page 23: ... globalscaletechnologies com b Install and configure the tool chain Copy arm marvell linux gnueabi vfp tar bz2 to directory opt cd opt tar jxf arm marvell linux gnueabi vfp tar bz2 ls vim root bashrc Add export PATH PATH opt arm marvell linux gnueabi vfp bin to the last line as below then save and exit To enable the PATH by entering source root bash_profile c Write a program Here is the sample pro...

Page 24: ...e I2C_M_REV_DIR_ADDR 0x2000 if I2C_FUNC_PROTOCOL_MANGLING define I2C_M_IGNORE_NAK0x1000 if I2C_FUNC_PROTOCOL_MANGLING define I2C_M_NO_RD_ACK 0x0800 if I2C_FUNC_PROTOCOL_MANGLING define I2C_M_RECV_LEN 0x0400 length will be first received byte define struct i2c_rdwr_ioctl_data and struct i2c_msg they must be consistent to kernel struct i2c_msg unsigned short addr unsigned short flags define I2C_M_TE...

Page 25: ...ta to e2prom e2prom_data nmsgs 1 e2prom_data msgs 0 len 2 e2prom_data msgs 0 addr 0x25 e2prom device address e2prom_data msgs 0 flags 0 write e2prom_data msgs 0 buf unsigned char malloc 2 control the GPIO OP 0 e2prom_data msgs 0 buf 0 0x18 e2prom write address e2prom_data msgs 0 buf 1 0x0 the data to write ret ioctl fd I2C_RDWR unsigned long e2prom_data if ret 0 perror ioctl error2 control the GPI...

Page 26: ..._data msgs 0 buf 1 0xFF the data to write ret ioctl fd I2C_RDWR unsigned long e2prom_data if ret 0 perror ioctl error3 control the GPIO OP 3 turn on LED sleep 1 e2prom_data msgs 0 buf 0 0x1b e2prom write address e2prom_data msgs 0 buf 1 0x0 the data to write ret ioctl fd I2C_RDWR unsigned long e2prom_data if ret 0 perror ioctl error4 turn off LED sleep 1 e2prom_data msgs 0 buf 0 0x1b e2prom write ...

Page 27: ...ourself control the GPIO OP 4 turn on LED sleep 1 e2prom_data msgs 0 buf 0 0x1c e2prom write address e2prom_data msgs 0 buf 1 0x0 the data to write ret ioctl fd I2C_RDWR unsigned long e2prom_data if ret 0 perror ioctl error5 turn off LED sleep 1 e2prom_data msgs 0 buf 0 0x1c e2prom write address e2prom_data msgs 0 buf 1 0xFF the data to write ret ioctl fd I2C_RDWR unsigned long e2prom_data if ret ...

Page 28: ...es attention of CPU Then CPU asserts the master reset low signal to start the system reset session Below is the reboot screen after reset Note Since this reset function is controlled by software so it has no effect during boot up session 2 More push button functions System developer can program this button to have more functions by different press then release delay time 6 GPIO reset button hole ...

Page 29: ...2 Download sites To download the files for MiraBox server please visit http www globalscaletechnologies com t downloads aspx Other useful resource links are http www plugcomputer org http plugcomputer org plugwiki index php GuruPlug ...

Reviews: