background image

31

EN

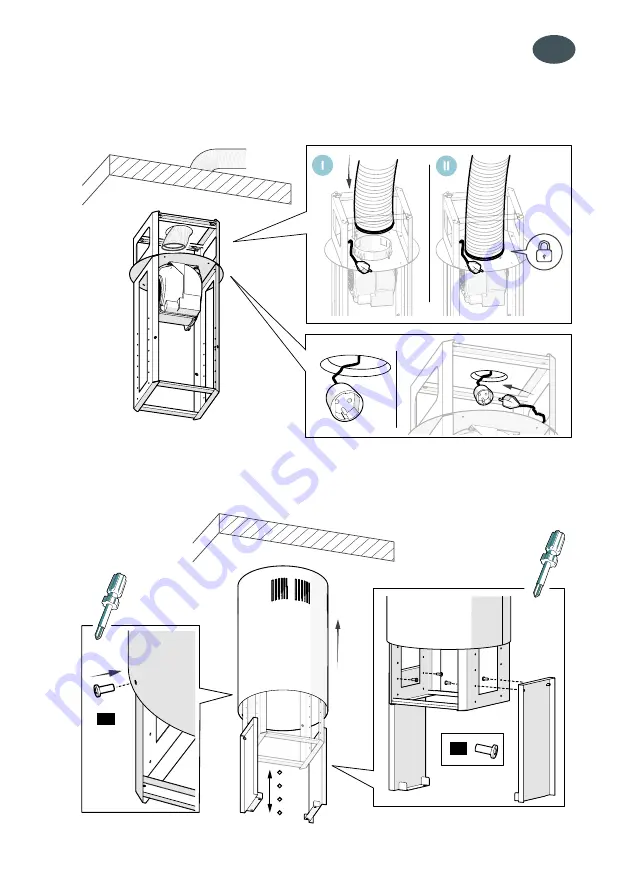
3. Connect an air extraction pipe to the suspended hood body. Then connect the power cable to 

the power supply.

4. Fit and screw on the previously dismantled top tube. In order to determine the total height of 

the hood, screw the mounting plates at the given height onto the hood rack.

Fig. 10

Fig. 9

x4

x4

Adju/-300mm

Summary of Contents for ASTERIO ISOLA 39

Page 1: ...Instrukcja monta u i u ytkowania EN Operating and installation instructions DE Gebrauchs und Montageanleitung PL okap kuchenny wyspowy EN Island range hood DE Inselhaube ASTERIO ISOLA ASTERIO ISOLA 3...

Page 2: ...IEM LUB ZAMKNI TYM OBIEGIEM POWIETRZA PRZYGOTOWANIA PRZED INSTALACJ OKAPU INSTALACJA OKAPU FILTR W GLOWY WYMIANA AR WEK LED POD CZENIE ELEKTRYCZNE CZYSZCZENIE I KONSERWACJA FILTR PRZECIWT USZCZOWY STE...

Page 3: ...jej zachowanie aby m c z niej skorzysta w ka dej chwili Zesp GLOBALO Dla zapewnienia Pa stwu maksymalnego bezpiecze stwa w u ytkowaniu zakupionego urz dze nia najwa niejsze tre ci niniejszej instrukcj...

Page 4: ...wo zapali Zasysane powietrze przez okap nie mo e by odprowadzane do kana u kominowego s u cego do odprowadzania spalin z urz dze spalaj cych gaz lub inne paliwo nie dotyczy to okap w z obiegiem zamkni...

Page 5: ...ektrycznego i elektronicznego oraz baterii Prowadz cy punkty zbi rki w tym lokalne punkty zbi rki sklepy oraz gminne jednostki tworz odpowiedni system umo liwiaj cy oddanie tego sprz tu oraz baterii j...

Page 6: ...ZAGI K TY ZAGI NIE POWINNY BY WI K SZE NI 90 STOPNI NIE ZALECA SI STOSOWANIA ZMIAN PRZEKROJU PRZEWODU WI KSZEGO NA MNIEJSZY NP WYLOT POWIETRZA 15 CM NA WYLOT POWIETRZA 12 CM ZADBAJ ABY W POMIESZCZENI...

Page 7: ...strukcji obs ugi urz dzenia grzewczego podana jest wi ksza od leg o ni wskazana powy ej dostosuj si do takich wskaza Monta okapu przedstawiony jest na rysunkach Rys 7 Rys 14 W trakcie jego przeprowa d...

Page 8: ...rzez system wyci gu Przy trybie z obiegiem zamkni tym powietrza opary zostaj uwolnione od drobinek t uszczu oraz zapach w i ponownie wydmuchiwane do kuchni Rys 5 Aby zapachy by y poch aniane przez oka...

Page 9: ...w pobli u strefy montowania okapu znajduje si gniazdko wtykowe i czy mo na pod czy okap do przewodu wentylacyjnego odprowadzaj cego opary na zewn trz Sprawd czy w miejscach w kt rych b d wykonane wie...

Page 10: ...a o y stela fasolkami na wkr ty i przekr ci tak aby by wkr t w przesun y si na w sz cz fasolki dzi ki temu stela zostanie podwieszony i mo na przyst pi do przykr cania kolejnych dw ch wkr t w Na ko cu...

Page 11: ...powietrza Nast pnie pod czy kabel sieciowy do pr du 4 Na o y i przykr ci wcze niej zdemontowan rur g rn Nast pnie w celu ustalenia ca kowitej wysoko ci okapu nale y przykr ci blachy monta owe na danej...

Page 12: ...12 PL Rys 11 5 Nasun doln cz okapu Otworzy pokryw i przykr ci 4 ruby monta owe x4...

Page 13: ...13 PL 6 Wymontowa filtr przeciwt uszczowy z okapu Nast pnie nale y po czy ko c wki sterowania okapu A oraz o wietlenia okapu B Rys 12 Rys 13 A B 7 Po czone przewody umie ci w puszce wewn trz okapu...

Page 14: ...r przeciwt uszczowy i zamkn jego os on Rys 14 Rys 15 FILTR W GLOWY Okap mo e by wyposa ony w filtr w glowy Zastosuj go wy cznie wtedy kiedy okap nie jest pod czony do przewodu wentylacyjnego Umie filt...

Page 15: ...ub co 35 godzin pracy okapu Do mycia okapu w adnym wypadku NIE U YWAJ RODK W NA BAZIE ALKOHOLU Elementy satynowe inox wyczy specjalnymi preparatami przeznaczonymi do tego celu np BERNER WYMIANA AR WEK...

Page 16: ...rbiny Naci ni cie klawisza plus spowoduje zwi kszenie pr dko ci turbiny W czanie i wy czanie silnika okapu naci ni cie klawisza w cza silnik naci ni cie klawisza minus wy czy silnik po wcze niejszym z...

Page 17: ...wierdzamy wybrany czas wciskaj c ponownie przycisk timer Na wy wietlaczu pojawi si pulsuj ca kropka Dezaktywacja Aby dezaktywowa uruchomion funkcj timer nale y nacisn przycisk timer W czanie i wy czan...

Page 18: ...energetyczna s u y jedynie jako przyk ad W ka dym innym mode lu rzeczywiste dane mog si r ni od powy szych SPOSOBY ZMNIEJSZENIA WP YWU PROCESU GOTOWANIA NA RODOWISKO W celu zmniejszenia zu ycia energ...

Page 19: ...tu Model ___________________ Numer serii ___________________ Te informacje mo na znale na tabliczce znamionowej Znajduje si ona wewn trz okapu i jest widoczna po zdj ciu metalowych filtr w Powy ej zil...

Page 20: ...ina okapu wy cza si po 15min pracy na wy wietlaczu pulsuje np 1 numer aktualnego biegu i kropka w prawym dolnym rogu wy wietlacza Zosta aktywowany automatyczny wy cz nik czasowy panelu sterowania Aby...

Page 21: ...api cia elektrycznego zalanie wod zat kanie przewodu wentylacyjnego Powstanie widocznych uszkodze mechanicznych po monta u urz dzenia UWAGA TOWAR POSIADAJ CY USZKODZENIA MECHANICZNE KT RY MIMO TO ZOST...

Page 22: ...D AIR CIRCULATION PREPARATION BEFORE HOOD INSTALLATION HOOD INSTALLATION CARBON FILTER LED BULB REPLACEMENT POWER SUPPLY CONNECTION CLEANING AND MAINTENANCE ANTI GREASE FILTER SETTINGS IN CASE OF PROB...

Page 23: ...ly accessible place so that you can consult it at any time GLOBALO team In order to ensure the maximum safety of the device the most important information has been marked with the following symbol THE...

Page 24: ...eep frying overheated fat can easily ignite The air sucked in by the hood must not be discharged into a flue pipe used for exhaust fumes from appliances burning gas or other fuels this does not apply...

Page 25: ...ectrical and electronic equipment and batteries if any to special collection points for such items Operators of collection facilities including local collection points shops and municipal units must h...

Page 26: ...ING OF THE DUCT SHOULD BE LIMITED TO MINIMUM THE ANGLES SHOULD NOT EXCEED 90 COMBINING DUCTS WITH DIFFERENT CROSS SECTIONS IS NOT RECOMMENDED E G 15 CM WITH 12 CM ENSURE THAT THE SIZE OF THE SUCTION O...

Page 27: ...e cooker manual indicates a greater distance than specified above follow the instructions in the cooker manual Installation of the product is shown in Figures 7 14 During installation follow the gener...

Page 28: ...lation duct by means of the extraction system With the air recirculation mode the vapours are freed from grease particles and odours and blown back into the kitchen Fig 5 In order for odors to be abso...

Page 29: ...hether there is a socket near the hood installation space and whether it is possible to connect the hood to a ventilation duct for fume extraction Make sure there are no lines of electric and plumbing...

Page 30: ...e frame with the beans on the screws and twist so that the heads of the screws move to the narrower part of the beans this will suspend the frame and you can proceed to screw in another two screws Fin...

Page 31: ...body Then connect the power cable to the power supply 4 Fit and screw on the previously dismantled top tube In order to determine the total height of the hood screw the mounting plates at the given h...

Page 32: ...32 EN Fig 11 5 Slide on the lower part of the hood Open the cover and tighten the 4 mounting screws x4...

Page 33: ...EN 6 Remove the grease filter from the hood Then connect the control terminals of the hood A and the light terminal of the hood B 7 Place the connected cables in a box inside the hood Fig 12 A B FIg...

Page 34: ...Rys 15 CARBON FILTER The hood can be equipped with a carbon filter Install it only when the hood is not connected to the ventilation duct Place the filter on the grease filter as shown in Fig 15 Repla...

Page 35: ...leaned at least once a month or every 35 hours of operation DO NOT USE ALCOHOL BASED CLEANING AGENTS Inox parts should be cleaned with special product e g BERNER ANTI GREASE FILTER The hood is equippe...

Page 36: ...will increase the turbine speed Switching the hood motor on and off pressing the key switches the motor on pressing the minus key will switch the motor off having previously reduced the speed to 1 The...

Page 37: ...the metal filters are clean Replace the active carbon filter if it is older than 6 months only in recirculation mode Check whether the amount of air extracted from the kitchen is balanced by sufficie...

Page 38: ...cy class Grease filtration efficiency class Noise level ENERGY LABEL 4 66 dB 56 XXXX REDUCING THE IMPACT OF COOKING ON THE ENVIRONMENT In order to reduce energy consumption cover pots and pans with li...

Page 39: ...take down the following details of your device Type ___________________ Seria Nr ___________________ You can find this information on the identification plate The plate is located inside the hood and...

Page 40: ...us sign for about 10 seconds or switch off the device Number 4 on the display is blinking and after 5 min the speed level changes to 3 The hood is equipped with a turbo mode which automatically change...

Page 41: ...Circumstances beyond the control of the manufacturer including without limitation uncon trolled power surge flooding obstruction of the ventilation duct Apparent mechanical damage after installation o...

Page 42: ...BE INSTALLATION DER DUNSTABZUGSHAUBE KOHLEFILTER AUSTAUSCH DER LED LAMPE ELEKTRISCHER ANSCHLUSS REINIGUNG UND WARTUNG FETTFILTER STEUERUNG DER DUNSTABZUGSHAUBE WAS IST BEI PROBLEMEN ZU TUN ENERGIEETIK...

Page 43: ...diese Gebrauchs und Montageanleitung gut aufzubewahren damit Sie jederzeit auf sie zugreifen k nnen GLOBALO Team Um Ihnen maximale Sicherheit bei Gebrauch des von Ihnen gekauften Ger tes zu gew hrlei...

Page 44: ...gshaube angesaugte Luft darf nicht in die Abgasleitung ber die bei der Verbrennung von Gas oder anderen Brennstoffen erzeugte Abgase abgeleitet werden eingeleitet dies gilt nicht f r Dunstabzugshauben...

Page 45: ...rische und elektronische Ger te und Batterien zu bergeben Die Betreiber von Abfallssammelstellen darunter auch von lokalen Abfallssammelstellen Gesch ften und kommunalen Abfallssammelstellen bilden ei...

Page 46: ...D BETRAGEN ES WIRD NICHT EMPFOHLEN VON EINEM LEITUNGSDURCHMESSER IN EINEN ANDEREN ZU WECH SELN VON EINEM H HEREN DURCHMESSER IN EINEN GERINGEREN DURCHMESSER Z B VON EINEM LUFTAUSLAUF 15 CM IN EINEN LU...

Page 47: ...in der Gebrauchsanleitung des jeweiligen Herdes ein Abstand angegeben der h her als der hier genannter Abstand ist ber cksichtigen Sie solche Vorgaben Die Dunstabzugshaubemontage ist auf den Abbildun...

Page 48: ...eim Umluftbetrieb werden die Kochd nste von Fettpartikeln und Ger chen befreit und dem K chenraum wieder zugef hrt Abb 5 Damit die Ger che durch die Dunstabzugshaube absor biert werden ist obligatoris...

Page 49: ...Pr fen Sie ob in der N he der Dunstabzugshaubemontagezone eine Steckdose vorhanden ist und ob die Dunstabzugshaube an eine L ftungsleitung die D nste nach au en ableitet ange schlossen werden kann Pr...

Page 50: ...mit seinen Langl chern auf die Schrauben auflegen und so drehen dass die Schraubenk pfe in den schmalen Langlochteil gleiten dadurch h ngt der Rahmen vorl ufig und die zwei weiteren Schrauben k nnen...

Page 51: ...haube anbringen Den Stromkabel ans Netz anschlie en 4 Das vorher entfernte obere Rohr aufsetzen und festschrauben Die Montagebleche in der gegebenen H he an den Rahmen anschrauben um die Gesamth he de...

Page 52: ...52 DE Abb 11 5 Den unteren Teil der Abzugshaube draufschieben Die Klappe ffnen und die 4 Montageschrauben anziehen x4...

Page 53: ...ter aus der Dunstabzugshaube herausnehmen Die Konnektoren f r die Dunstab zugshaubensteuerung A und Beleuchtung B anschlie en 7 Die angeschlossenen Leitungen im Kabelkasten im Geh use der Dunstabzugsh...

Page 54: ...aube kann mit einem Aktivkohlefilter ausgestattet sein Dieser darf nur ver wendet werden wenn die Dunstabzugshaube an keine Abluftleitung angeschlossen ist Den Filter auf dem Fettfilter platzieren wie...

Page 55: ...Dunstabzugshaube VERWENDEN SIE AUF KEINEN FALL REINIGUNGSMITTEL AUF ALKOHLOBASIS Die Satinteile Inox reinigen Sie mit den zu diesem Zweck vorgesehenen Pr paraten wie z B BERNER FETTFILTER Die Dunstabz...

Page 56: ...d die Arbeitsgeschwindigkeit der Turbine h hergeschaltet Ein und Ausschalten des Abzugshaubenmotors Durch Dr cken der Plus Taste wird der Motor eingeschaltet Durch Dr cken der Minus Taste wird der Mot...

Page 57: ...h dass der Netzstecker in der Steckdose steckt Ziehen Sie den Netzstecker heraus um das Ger t neu zu starten und somit den Ausgangs zustand wieder zu erreichen Warten Sie ca 15 20 Sekunden ab dann ste...

Page 58: ...chlichen Daten von den oben genannten abweichen METHODEN ZUR REDUZIERUNG DER UMWELTEINWIRKUNG DES KOCHPROZESSES Um den Energieverbrauch zu reduzieren kochen Sie immer in abgedecktem Geschirr Halten Si...

Page 59: ...nn zur Reparatur mit einem Formular auf der Webpage https globalo pl serwis angemeldet werden Modell ASTERIO ISOLA 39 Motorleistung 275 W Beleuchtungsleistung 4x2 W Gesamtleistung 283 W Spannung Frequ...

Page 60: ...altfl che mit einem Plussymbol zu bet tigen und dann ca 10 Sekunden lang gedr ckt zu halten oder die Dunstabzugshaube ist auszuschalten Bei der vierten Drehgeschwindig keitsstufe blinkt die Ziffer 4 a...

Page 61: ...n Gastronomieeinrichtungen Anwendung des Ger tes in einem anderen Ort als ein Haushalt Anwendung des Ger tes nicht gem der Gebrauchsanleitung oder nicht bestimmungsgem Im Falle von Zufallsereignissen...

Page 62: ......

Page 63: ......

Page 64: ...a GLOBALO ul Mak w 10 38 500 Sanok Polska Poland Polen Tel 48 13 49 27 560 https globalo pl e mail biuro globalo pl Serwis Service Kundendienst Tel 48 13 49 27 560 wew 3 Kom 48 609 055 660 e mail serw...

Reviews: