background image

Let’s start assembling your Skylark  ebike!

(Please read this entire assembly manual before assembly as it will save 

you a lot of time!)

Step One:Unpack the ebike.

1.Pull the frame and all parts (charger, seat, tookit, keys & fuse, manual, 

steer stem and pedals) out of cardboard box. Separate bike from foam 

padding. Cut off all zip ties with scissors while being extra careful as not 

to damage the paint or cut any wires or cables. 

Notice: 

The fuse is not 

used for assembly. Keep it in a safe place that it will be used for the 

replacement if the original fuse were damaged.

Ensure all the following pieces are included with the  Skylark.

Assembly Instructions: Skylark

Tools included: 

Screwdriver, Phillips & Slotted 2 in 1

               Double open-end wrench, 13mm/15mm

Allen wrench, 5mm

Allen wrench, 6mm

Tools needed: 

Scissor        

Bike pump

Summary of Contents for Skylark EB-X6

Page 1: ...EB X6 Skylark ...

Page 2: ...Fully Assembled Skylark Black Skylark Yellow Skylark Red Skylark White Skylark Black Skylark Yellow Skylark Red Skylark White ...

Page 3: ...ing Cut off all zip ties with scissors while being extra careful as not to damage the paint or cut any wires or cables Notice The fuse is not used for assembly Keep it in a safe place that it will be used for the replacement if the original fuse were damaged Ensure all the following pieces are included with the Skylark Assembly Instructions Skylark Tools included Screwdriver Phillips Slotted 2 in 1...

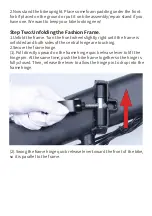
Page 4: ...t wheel slightly right until the frame is unfolded and both sides of the central hinge are touching 2 Secure the frame hinge 1 Pull directly upward on the frame hinge quick release lever to lift the hinge pin At the same time push the bike frame together so the hinge is fully closed Then release the lever to allow the hinge pin to drop into the frame hinge 2 Swing the frame hinge quick release lev...

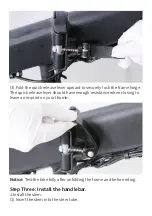
Page 5: ...hinge The quick release lever should have enough resistance when closing to leave an imprint on your thumb Notice Test the bike fully after unfolding the frame and before riding Step Three Install the handlebar 1 Install the stem 1 Insert the stem into the steer tube ...

Page 6: ... 2 Turn the plastic clasp anticlockwise to unlock the quick release lever 3 Unfold the quick release lever downward to open the stem ...

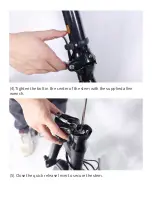
Page 7: ... 5 Close the quick release lever to secure the stem 4 Tighten the bolt in the center of the stem with the supplied allen wrench ...

Page 8: ...2 Install the handlebar onto the stem 1 Open the quick release lever by hinging it open fully 6 Turn the plastic clasp clockwise to secure the quick release lever ...

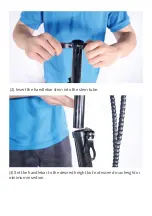
Page 9: ... 3 Set the handlebar to the desired height but not exceed max height or minimum insertion 2 Insert the handlebar stem into the stem tube ...

Page 10: ... 5 Close the quick release lever to secure the handlebar 4 Align the stem so the handlebar is perpendicular to the front wheel ...

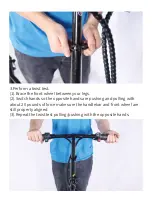
Page 11: ...heel between your legs 2 Switch hands so the opposite hands are pushing and pulling with about 20 pounds of force make sure the handlebar and front wheel are still properly aligned 3 Repeat the twist test pulling pushing with the opposite hands ...

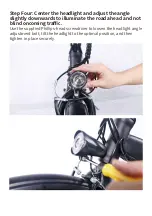
Page 12: ...ngle slightly downwards to illuminate the road ahead and not blind oncoming traffic Use the supplied Phillips head screwdriver to loosen the headlight angle adjustment bolt tilt the headlight to the optimal position and then tighten in place securely ...

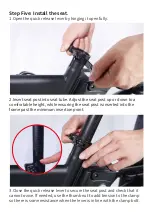
Page 13: ...up or down to a comfortable height while ensuring the seat post is inserted into the frame past the minimum insertion point 3 Close the quick release lever to secure the seat post and check that it cannot move If needed use the thumb nut to add tension to the clamp so there is some resistance when the lever is in line with the clamp bolt ...

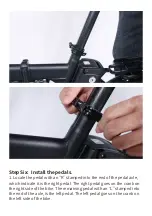
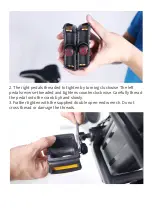
Page 14: ... the end of the pedal axle which indicate it is the right pedal The right pedal goes on the crank on the right side of the bike The remaining pedal with an L stamped into the end of the axle is the left pedal The left pedal goes on the crank on the left side of the bike ...

Page 15: ...by turning clockwise The left pedals reverse threaded and tightens counterclockwise Carefully thread the pedal onto the crank by hand slowly 3 Further tighten with the supplied double open end wrench Do not cross thread or damage the threads ...

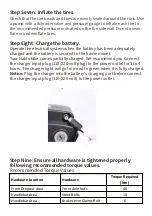
Page 16: ...e mount Your Nakto bike comes partially charged We recommend you Connect the charger input plug 110 220 volt plug to the power outlet for 3 to 4 hours The charger light will go from red to green when it is fully charged Notice Plug the charger into the battery s charging port before connect the charger input plug 110 220 volt to the power outlet Step Nine Ensure all hardware is tightened properly ...

Page 17: ... Caliper Clamp 6 Fenders All Fender Moun ng Bolts and Hardware 6 Headlight Headlight Angle Adjustment Bolt 6 Seatpost Area Seat Angle Adjustment Bolt 20 Rear Dropout Area Rear Axle Nuts 40 Rear Dropout Area Rear Torque Arm Bolt 5 Rear Dropout Area Kickstand Moun ng Bolts 8 Bo om Bracket and Crank Area Bo om Bracket and Lockring 60 Bo om Bracket and Crank Area Crank Arm Bolt into Bo om Bracket Spin...

Page 18: ...The throttle is located on the right side of the handlebar The rider can use it with a twist of the throttle grip to propel the bike forward without pedaling Warning The throttle is active whenever the bike is turned on Do not use the throttle unless you are on the bike Start Up Procedure 1 Turn on the battery with the key Insert the key and turn clockwise to position 1 Battery Key Positions Key P...

Page 19: ...al assistance system Press the red button on the right side of the handlebar 4 Turn on the headlight if needed or desired Turn on the headlight by sliding the light button to right Turn on the headlight by sliding the light button to left ...

Page 20: ... assist You may also use the throttle to accelerate and maintain your desired speed 6 The throttle is used by slowly and carefully rotating the throttle back ward toward the rider The more you twist the more powerfully the throttle will propel the bike forward The throttle is active whenever the bike is turned on Do not use the throttle unless you are on the bike ...

Page 21: ...anytime you are moving the bike while dismounted ensure the bike is powered off to prevent accidental applica tion of the throttle 7 Brake Brake the bike by squeezing the brake lever Notice as a safety feature applying either front or rear brake will disengage the motor 8 Deactivate the pedal assistance system Press the red button on the right handlebar again ...

Page 22: ...t to the power outlet Before riding always carry out a through safety check each time We highly recommend that you read the instruction manual before your very first ride It is the user s responsibility to ensure a potential passenger on the Nakto eblike is adequately experienced and healthy enough to ride safely as a passenger Serious injury or death can occur if passengers are inexperi enced or i...

Page 23: ...Glare Technology USA Inc Phone 951 521 1888 E mail info glaretechusa com Website www RideGlareWheel com Adress 30898 Wealth St Murrieta CA 92563 ...

Reviews: