background image


Page | 17 


11


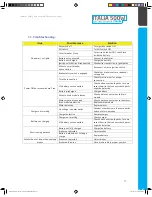
Troubleshooting: 


Issue 

Possible cause 

Solution 

No power / no lights 

Key switch off 

Turn ignition switch ON 

Kill switch 

Turn kill switch ON 

Circuit breaker / fuse 

Turn circuit breaker ON / check fuse 

inside the battery 

Battery not connected 

Connect the batteries 

Battery not charged 

Charge the battery 

Ignition switch wires disconnected 

Check wires connection to ignition set 

Wires to circuit breaker 

disconnected 

Reconnect wires to ignition switch 

Power ON but scooter doesn’t run


Brakes safety switch is engaged 

Check that brake levers are released 


not applied. 

Throttle connection 

Check throttle wires for proper 

connection 

SLA battery not connected 

Check and connect both packs. In some 

cases the wire that connects both packs 

might be defective. 

Battery discharged 

Charge battery 

Wires to brain module loosen 

Check and reconnect wires to brain 

module 

Motor wires disconnected 

Check and reconnect wires to the motor 

Brain module defective 

Replace brain module 

Motor defective 

Replace motor 

Charger not working 

No voltage in power outlet 

Connect other device in the same outlet 

and check for operation 

Charger defective 

Replace charger 

Battery not charging 

Charger not working 

Check charger 

SLA battery not connected 

Check and connect both packs. In some 

cases the wire that connects both packs 

might be defective. 

Short running distance 

Battery not fully charged 

Charge the battery 

Brakes not adjusted 

Adjust brakes 

Battery is old and not holding a 

charge 

Replace battery 

Scooter doesn’t stop when applying 

brakes 

Brakes not adjusted 

Adjust brakes 

Brake cable loosen 

Place brake cable in proper position 


17

Operator, Safety, And General Maintenance Manual

MANUAL

Italia 500w Electric Scooter Owner Manual.indd   17

2/5/2014   10:36:14 PM

Summary of Contents for Italia 500W

Page 1: ...Operator Safety And General Maintenance Manual MANUAL Italia 500w Electric Scooter Owner Manual indd 1 2 5 2014 10 36 12 PM ...

Page 2: ...Italia 500w Electric Scooter Owner Manual indd 2 2 5 2014 10 36 12 PM ...

Page 3: ...ombine both front and rear brake levers to stop 5 For safety when charging please have both the charger and bike in a well ventilated area 6 Avoid disassembling entire bike or wiring without proper knowledge 7 Please be responsible and dispose of all old batteries through a local battery recycler 8 Please consult your local dealer with any other questions Illustrations may not be exact appearance ...

Page 4: ...ffects of Temperature 9 7 2 Charging 9 8 Initial and ongoing adjustments 10 8 1 Brakes adjustment 10 8 1 1 Drum Brakes 10 8 1 2 Tires Pressure 10 8 1 3 Adjustable Rear Shocks 10 9 Operating controls and security features 11 9 1 Ignition switch 11 9 2 Handle bar controls 12 9 3 Circuit breaker fuse 12 9 4 Throttle 13 9 5 Brakes 13 9 6 Lights and turn signals 13 9 7 LCD Display 14 9 8 Kick stand and...

Page 5: ...ock 16 10 General wiring schematic for GIO Electric scooters 16 11 Troubleshooting 17 12 Purchase record 18 12 1 VIN Serial number location on GIO Electric scooters 18 13 Notes 19 3 Operator Safety And General Maintenance Manual MANUAL Italia 500w Electric Scooter Owner Manual indd 3 2 5 2014 10 36 12 PM ...

Page 6: ...ts parts brakes drive chain etc Always follow the inspection and maintenance procedures described in this manual Always maintain proper tire pressure as described in this manual Type of tire and inflation can affect scooter handling Do not operate near flammable liquids or materials Never attempt to repair when power is ON DO NOT MAKE ANY ALTERATIONS OR MODIFICATIONS TO THE GIO E Scooter OR ADD AN...

Page 7: ...n do in order to ensure your GIO will serve you for a long time In the long run it will save you money and a lot of time waiting for the scooter to be repaired Ideally you should clean your GIO after each ride But it really depends on your riding style and on how much you ride A good rule of thumb is that if you ride more than twice or three times a week clean your scooter weekly Clean the scooter...

Page 8: ...er which conditions Recreational riders need far less maintenance then off road riders The harder you ride the more you have to take care of your scooter if you want it to last There are various time intervals for proper maintenance Quick maintenance should be done before after every ride And then every couple of months a more serious maintenance steps should be taken 2 4 Battery All batteries are...

Page 9: ... procedure After making sure that the master power key switch is off connect the output plug from the charger to the charging receptacle on the scooter battery Then plug the charger into the correct voltage power outlet and the light should turn red which would indicate that it is charging Once the battery fully charged the light will turn green It is normal for the charger to get warm and always ...

Page 10: ...le by regulating the power going to the motor and to protect it against either too much or too little voltage On some models this is also augmented by the EABS Electrically Assisted Braking System which actually recharges the batteries under braking 6 Stopping in an emergency Always check front and rear brakes before operating and never operate an electric scooter without doing so first If they ar...

Page 11: ...that is designed to work with your batteries Recharging your e bike batteries on a monthly basis should take no longer than a few hours until charger light turns green 7 1 Effects of Temperature Temperature plays a critical role in the battery performance and life cycle At higher temperatures battery capacity generally increases as the temperature drops so does the capacity This is why riding your...

Page 12: ...ess than the recommended amount of pressure a decrease in battery usage time poor handling and damage to the tires and rims may occur 8 1 3 Adjustable Rear Shocks Some models have adjustable rear shock absorbers If so they may have up to 5 detents on the lower coil spring retainer that can be rotated to either stiffen or soften the suspension This is to allow for the most appropriate spring rate d...

Page 13: ...ontrols and security features 9 1 Ignition switch OFF Scooter is off key can be pulled out ON Scooter is on key can t be pulled out LCD display turns on LOCK Push the key inside and turn it counterclockwise to lock position turn steering all the way to the left steering locked Shock adjuster input 11 Operator Safety And General Maintenance Manual MANUAL Italia 500w Electric Scooter Owner Manual in...

Page 14: ...utton instead of switch high speed applies when the button pushed in low speed governor applies when the button pulled out 9 3 Circuit breaker fuse All 500W models have emergency switch circuit breaker located under the seat The breaker cut the power in case of emergency when there s electrical failure In some cases the scooter arrives while the breaker is OFF In order to use the scooter make sure...

Page 15: ...zing the levers that located on both sides of the handle bar Please take extra care to balance between the brakes in slippery or whet condition It is recommended to use rear brakes first while going down or uphill Brake cut out switch located inside both brake levers and shuts off the power to the motor whenever either front or rear brakes applied 9 6 Lights and turn signals The main headlight swi...

Page 16: ...bars indicate full charge 9 8 Kick stand and foot rests operating All scooters have 2 kick stands side kick stand that used for parking on a flat road and main kick stand that used for parking on hills or and windy weather conditions and for rear suspension maintenance Side kick stand located at the middle of a scooter on a left side at the bottom approx under the seat level In order to apply side...

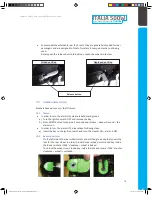
Page 17: ... will sound the alarm is on In order to turn the alarm OFF please take following steps a Insert the key to the ignition switch and turn the scooter ON alarm is OFF 9 9 2 Rear wheel lock On the left side of the rear wheel motor you will find green cap that covers the lock for the rear wheel In order to lock the rear wheel insert round key inside the lock ant rotate it 360 clockwise wheel is locked ...

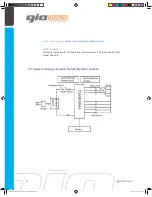
Page 18: ...n switch section 9 9 5 U Lock All scooters arrive with U shape lock as free accessory The lock used for front wheel lock only 10 General wiring schematic for GIO Electric scooters 16 Italia 500w Electric Scooter Owner Manual indd 16 2 5 2014 10 36 14 PM ...

Page 19: ...ged Charge battery Wires to brain module loosen Check and reconnect wires to brain module Motor wires disconnected Check and reconnect wires to the motor Brain module defective Replace brain module Motor defective Replace motor Charger not working No voltage in power outlet Connect other device in the same outlet and check for operation Charger defective Replace charger Battery not charging Charge...

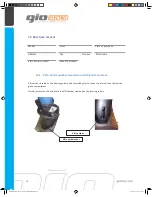
Page 20: ...l number location on GIO Electric scooters VIN number located on the steering column and covered by plastic cap on the internal cover below the glove compartment Simply remove the cap and locate the VIN number stamped on the steering column VIN number cover VIN number 18 Italia 500w Electric Scooter Owner Manual indd 18 2 5 2014 10 36 15 PM ...

Page 21: ...Page 19 13 Notes 19 Operator Safety And General Maintenance Manual MANUAL Italia 500w Electric Scooter Owner Manual indd 19 2 5 2014 10 36 15 PM ...

Page 22: ...Operator Safety And General Maintenance Manual MANUAL Italia 500w Electric Scooter Owner Manual indd 20 2 5 2014 10 36 18 PM ...

Reviews: