


Installation to Access Steps
3
4
1.Draw the position of 2 bracket screw holes point to the wall, punch holes at the position by
drill, then insert anchorings to fix the bracket on the wall. The bracket can also be installed at
the existing mounting box(86*86mm) by screws. After the bracket fixed, take the gateway to
seize the bracket and to be fixed.
2. Insert a SIM card and fix it(GW-9324).
The SIM card must be GSM standard, able to
dialing and answer calls, and with SMS text function.
3. Plug the matching 12V power adapter into power port.
4. Slide the power switch to ON position, gateway enter into"Access Point" mode.
5. Download and install the APP "ZGinger Mini" into your smart terminal. Android user can
get it on "Google Play", Apple user can get it on "APP Store", Windows user please download
it at our website
http://www.gingerway.com/En_Gingerway_Download2.html
6. Connect your smart terminal to "Smart Center (gateway hotspot)", default Wi-Fi password is
"enjoylife123".
7. Scan the QR code on the back of gateway or manually enter gateway default IP address
"192.168.1.1", to add this gateway into APP. Use the "admin" account (default password is
123456) to login this gateway via "Local".
8. Enter into "Edit" - "Network" interface, change the device role of gateway to "Station",
input your SSID name, security mode and password. Go back, the gateway will automatically
restart then connect to the Wi-Fi you have just set. Connecting succeed, then you can login this
gateway via "Cloud" through extranet and remote control it on APP. If setting failed, you can
long press "RESET" key for 10 seconds, the gateway will reenter into "Access Point" mode.
Restore factory settings
: Slide the power switch to OFF position, then slide it to ON
position. When the screen is on, long press RESET key for 10 seconds, the gateway will
be restored to factory settings (all data will be deleted except backup data ).
The keys on the left and right columns of gateway panel are 1st to 8th scene of gateway.
Press "Arm Scene" key, gateway will execute "Arm" scene, all the alarm sensors which in this
gateway will get into arm state. If "Arm" scene executed successfully, the gateway will make a
long tone of "Di", and arm indicator is on;
Press "Disarm Scene" key, input "user" account password (default password is 123456) then
press "Enter" key, gateway will execute "Disarm" scene, all the alarm sensors which in this
gateway (except 24-hour armed sensors) will get into disarm state. If "Disarm" scene executed
successfully, the gateway will make 2 short tone of "Di", and disarm indicator is on;
At disarm state, press the rest 6 scene keys (3-8) can start the relevant gateway scenes.
Note: Operating on gateway panel, only the gateway under disarm state can the rest 6
scenes be executed. If you want to start these scenes, please disarm the gateway firstly.
Operations on Gateway Panel
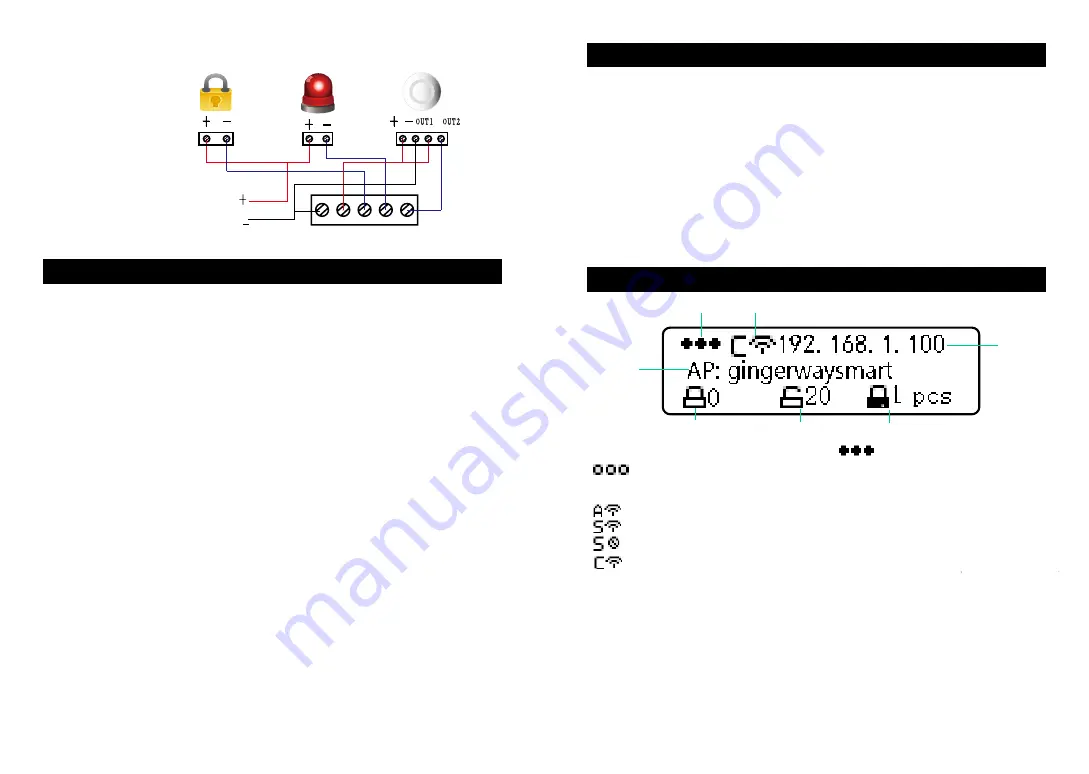
The Contents and Meanings of LCD Screen
①
②
③
④
⑤
⑥
⑦
①:
SIM card signal
.
SIM card detected shows , no SIM card detected shows
.
②:
Current network mode of gateway
:
Access Point (AP) mode
:
Station mode, AP has been connected
:
Station mode, AP hasn't been connected
:
Station mode, cloud server has been connected
③:
Current gateway IP address
④:
Displayed information as AP mode or alarm information
"AP:gingerwaysmart." : Indicates the Wi-Fi which gateway currently connected is
"gingerwaysmart"
⑤:
The quantity of alarm sensors which at arm state
⑥:
The quantity of alarm sensors which at disarm state
⑦:
The quantity of
24-hour armed sensors
External 12V DC power supply
Connection example of terminals:
COM +12V PUSH SPK IN1


