background image

20


Do not continue pumping for more than 5 minutes at a time if you do not succeed 

in expressing any milk.

Use bottle holder to prevent the bottle from tipping over. Do not fill the bottle too full to 

o prevent overfilling and spillage.

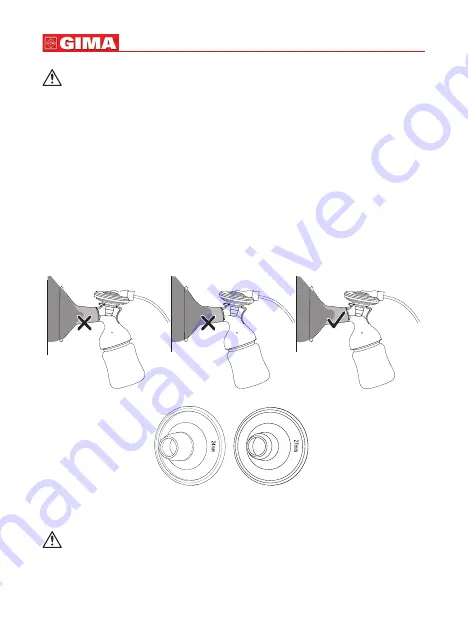
Size of Breastshield

Make sure that your nipple fits correctly in the breast shield. Not too tight, it is 

important that the nipple can move freely, while expressing breast milk.

The breastshield should not be too large, because this can cause pain or less ef-

fective expression. Two breast shield sizes are available: 24mm and 27mm. There’s 

one size breast shield come with the product.


24mm  

27mm


If there is any pain or discomfort during pumping, please consider to choose a 

larger or smaller size.

ENGLISH

Summary of Contents for 41700

Page 1: ...No 365 Wuzhou Road Yuhang Economic Development Zone Hangzhou city 311100 Zhejiang China Made in China 41700 LD 101 Shanghai International Holding Corp GmbH Europe Eiffestrasse 80 20537 Hamburg German...

Page 2: ...rezza 3 Illustrazione dell unit 4 Istruzioni per l installazione 5 Montaggio del prodotto 5 Pompaggio 8 Misura della coppa per il seno 9 Pulizia 10 Risoluzione dei problemi 11 Smaltimento dei rifiuti...

Page 3: ...ad attaccarsi pi facilmente 3 Nel caso in cui siate lontane dal bambino e desideriate continuare ad allattare al seno al momento del ricongiungimento necessario estrarre regolarmente il latte per sti...

Page 4: ...1 x Portabottiglie 2 1 x Stelo 8 1 x Corpo della pompa 13 1 x Tappo a cupola 3 1 x Maniglia 9 2 x Valvole 14 1 x Nipplo 4 1 x Sede della guarnizione 10 4 x Membrane bianche 15 1 x Anello a vite 5 4 x...

Page 5: ...isinfettato le parti giuste del tiralatte Dopo la pulizia seguire queste fasi per il montaggio dell unit Fase 1 Inserire la coppa per il seno nella sezione a imbuto del corpo della pompa Sono disponib...

Page 6: ...in modo regolare Assicurarsi che la membrana bianca non si arricci Fase 3 Inserire la valvola nel corpo della pompa dal basso Spingere la valvola all interno il pi pos sibile Fase 4 Avvitare il corpo...

Page 7: ...della sede della guarnizione aderi scano bene In caso di assenza dell anello di tenuta a forma di O sul tappo nella parte inferiore della sede della guarnizione si prega di inserirlo Figura 5 1 Figur...

Page 8: ...l indice Sostenere il seno con il palmo della mano Iniziare a premere delicatamente la maniglia Nota Non preoccuparsi se il latte non esce immediatamen te Rilassarsi e continuare a pompare Riposiziona...

Page 9: ...erisca correttamente nella coppa per il seno Non stringerlo troppo importante che il capezzolo possa muoversi libera mente durante l estrazione del latte materno La coppa del seno dovrebbe non essere...

Page 10: ...ciar raffreddare l acqua e togliere le parti dall acqua con delicatezza Prestare attenzione a non scottarsi 5 Mettere le parti in modo ordinato su un tovagliolo di carta pulito o su uno stendino pulit...

Page 11: ...sto prodotto privo di sostanze pericolose Manutenzione 1 Evitare di far cadere urtare o scagliare l unit 2 Evitare temperature estreme Non esporre l unit alla luce diretta del sole 3 Non utilizzare l...

Page 12: ...x 186 x 90 mm L x P x A Condizioni operative Temperatura 5 C 40 C 41 F 104 F Umidit 15 93 RH Pressione 700hPa 1060hPa Condizioni di Conservazione Temperatura 20 C 55 C 4 F 131 F Umidit 15 93 RH Attenz...

Page 13: ...ty Notice 14 Unit Illustration 15 Installation Instructions 16 Product Assembly 16 Pumping 19 Size of Breastshield 20 Cleaning 21 Trouble Shooting 22 Waste Treatment 22 Maintenance 22 Specifications 2...

Page 14: ...aby latch on more easily 3 If you are separated from your baby and wish to continue to breastfeed when you are reunited you should express your milk regularly to stimulate your milk supply Safety Noti...

Page 15: ...aphragm 7 1 Breastshield 13 1 Dome cap 2 1 Stem 8 1 Pump body 14 1 Nipple 3 1 Handle 9 2 Valves 15 1 Screw ring 4 1 Seal seat 10 4 White membranes 16 2 Lids 5 4 Seal hoops 11 2 Breastmilk bottles 6 1...

Page 16: ...the appropriate parts of the breast pump After cleaning follow these steps to assemble your collection units Step 1 Insert the breastshield into the funnel shaped section of the pump body Two breastsh...

Page 17: ...n valve smoothly Make sure the white membrane won t curl up Step 3 Insert the valve into the pump body from un derneath Push the valve in as far as possible Step 4 Screw the pump body clockwise onto t...

Page 18: ...e the diagh ragm edge and seal seat edge close fitting If there s no O shaped sealing ring on the plug at the bottom of the sealing seat please put in on Figure 5 1 Figure 5 2 Figure 5 3 Step 6 Attach...

Page 19: ...mb and index finger Support your breast with the palm of your hand Gently start to press down the handle Note Do not worry if your milk does not flow immediately Relax and continue pumping Repositioni...

Page 20: ...hat your nipple fits correctly in the breast shield Not too tight it is important that the nipple can move freely while expressing breast milk The breastshield should not be too large because this can...

Page 21: ...inutes 4 Allow water to cool and gently remove the parts from the water Be careful and don t scald your skin 5 Place the parts neatly on a clean paper towel or in a clean drying rack and allow them to...

Page 22: ...t This product is free of hazardous materials Maintenance 1 Avoid dropping slamming or throwing the unit 2 Avoid extreme temperatures Do not expose unit directly under sunshine 3 Do not use the unit f...

Page 23: ...it Dimensions 205 x 186 x 90mm L x W x H Operating Environment Temperature 5 C 40 C 41 F 104 F Humidity 15 93 RH Pressure 700hPa 1060hPa Storage Environment Temperature 20 C 55 C 4 F 131 F Humidity 15...

Page 24: ...e s curit 25 Illustration de l appareil 26 Mise en route 27 Assemblage du produit 27 Pompage 30 Taille de l embout t terelle 31 Nettoyage 32 D pannage 33 Traitement des d chets 33 Entretien 33 Fiche t...

Page 25: ...b b et souhaitez continuer allaiter lorsque vous le retrouvez il est pr f rable de tirer votre lait r guli rement pour stimuler votre pro duction de lait Consignes de s curit Mise en garde 1 N utilise...

Page 26: ...elle 12 1 Porte bib ron 2 1 Tige 8 1 Corps de tire lait 13 1 Capuchon 3 1 Poign e 9 2 Vannes 14 1 Mamelon 4 1 Joint de si ge 10 4 Membranes blanches 15 1 Bague vis 5 4 Joints d tanch it 6 1 Amortisseu...

Page 27: ...pri es du tire lait Apr s le nettoyage proc dez comme suit pour assembler votre appareil tape 1 Ins rez l embout t terelle dans la partie en forme d entonnoir du corps de la pompe Deux tailles d embou...

Page 28: ...la membrane blanche ne s enroule pas tape 3 Ins rez la valve dans le corps de la pompe par le dessous Poussez la valve aussi loin que possible tape 4 Vissez le corps de la pompe du tire lait dans le...

Page 29: ...diaphragme et le bord du joint de si ge sont bien ajust s S il n y a pas de joint torique en forme de O sur le bouchon au bas du si ge d tanch it veuillez le mettre Figura 5 1 Figura 5 2 Figura 5 3 ta...

Page 30: ...sein avec la paume de votre main Commencez doucement ap puyer sur la poign e Remarque Ne vous inqui tez pas si votre lait ne coule pas imm diatement D tendez vous et continuez pom per Repositionnez l...

Page 31: ...la t terelle Il ne doit pas tre trop serr car il est important que le mamelon puisse bouger librement tout en tirant le lait maternel L embout t terelle ne doit pas tre trop grande car cela peut cause...

Page 32: ...suffisamment d eau potable du robinet ou en bouteille pour couvrir toutes les pi ces 3 Portez l eau bullition Placez les pi ces dans de l eau bouillante pendant 5 mi nutes 4 Laissez l eau refroidir e...

Page 33: ...t article peut tre limin dans un centre de recyclage respectueux de l environnement Les utilisateurs professionnels doivent contacter leur fournisseur et v rifier les termes et conditions de l accord...

Page 34: ...l embout t terelle 24 mm Poids de l appareil Environ 159 g 5 61 oz Dimensions de l appareil 205 x 186 x 90 mm L x L x H Conditions de fonctionnement Temp rature 5 C 40 C 41 F 104 F Humidit 15 93 RH Pr...

Page 35: ...36 Ilustraci n de la unidad 37 Instrucciones de instalaci n 38 Montaje del producto 38 Bombeo 41 Tama o de la copa 42 Limpieza 43 Soluci n de problemas 44 Tratamiento de los desechos 44 Mantenimiento...

Page 36: ...as tiempo separada de tu beb y deseas continuar la lactancia debes extraer tu leche con regularidad para estimular el suministro Informaci n de Seguridad Precauci n 1 Utiliza el producto solo para el...

Page 37: ...para la botella 2 1 x Base de apoyo 9 2 x V lvulas 13 1 x Cubierta 3 1 x Mango 4 1 x Asiento de sellado 10 4 x Membranas blancas 14 1 x Tetina 15 1 x Anillo enroscable 5 4 x Aros de sellado 6 1 x Disc...

Page 38: ...las partes apropiadas del sacaleches Despu s de la limpieza sigue estos pasos para montar tus unidades de recogida Paso 1 Inserta la copa en la secci n con forma de embudo del cuerpo de la bomba Se en...

Page 39: ...e de que la membrana blanca no se enrolle Paso 3 Inserta la v lvula en el cuerpo de la bomba desde abajo Empuja la v lvula lo m s que puedas Paso 4 Atornilla el cuerpo de la bomba en el sentido de las...

Page 40: ...del diafragma y el borde del asiento de sellado est n ajustados Si no hay un anillo de sellado en forma de O en el tap n en la parte inferior del asiento de sellado col calo Figure 5 1 Figure 5 2 Figu...

Page 41: ...edos pulgar e ndice Sujeta tu seno con la palma de tu mano Empieza a presionar suavemente el mango Nota No te preocupes si tu leche no sale inmediatamente Rel jate y contin a bombeando Volver a coloca...

Page 42: ...pez n se ajuste correctamente en la copa No debe estar de masiado apretado es importante que el pez n pueda moverse libremente mien tras se extrae la leche materna La copa no debe ser demasiado grand...

Page 43: ...las partes del agua Manipula con cuidado y no calientes tu piel 5 Coloca las piezas cuidadosamente sobre una toalla de papel limpia o en una rejilla de secado limpia y deja que se sequen al aire Evit...

Page 44: ...producto no contiene materiales peligrosos Mantenimiento 1 Evita lanzar golpear o tirar la unidad 2 Evita temperaturas extremas No expongas la unidad bajo la luz solar directa 3 No utilices la unidad...

Page 45: ...es de la Unidad 205 x 186 x 90mm A x A x P Entorno operativo Temperatura 5 C 40 C 41 F 104 F Humedad 15 93 RH Presi n 700hPa 1060hPa Entorno de almacena miento Temperatura 20 C 55 C 4 F 131 F Humedad...

Page 46: ...47 Ilustra o da unidade 48 Instru es de instala o 49 Montagem do produto 49 Bombeamento 52 Tamanho do protetor de seios 53 Limpeza 54 Resolu o de problemas 55 Tratamento de res duos 55 Manuten o 55 E...

Page 47: ...te 3 Quando n o estiver com o seu beb e desejar continuar a amamentar quando voltar a estar com ele deve extrair o seu leite regularmente para estimular a sua produ o de leite Aviso de seguran a Cuida...

Page 48: ...poio de biber o 2 1 x C nula 8 1 x Corpo da bomba 13 1 x Tampa do bico 3 1 x Man pulo 9 2 x V lvulas 14 1 x Tetina 4 1 x Encaixe do vedante 10 4 x Membranas brancas 15 1 x Anel roscado 5 4 x Argolas d...

Page 49: ...as da bomba tira leite Ap s a limpeza siga estes passos para montar as suas unidades de recolha Passo 1 Insira o protetor de seios na sec o do corpo da bomba em forma de funil Os protetores de seios e...

Page 50: ...la Certifique se de que a membrana branca n o se ir enrolar Passo 3 Insira a v lvula no corpo da bomba pela parte de baixo Empurre a v lvula o mais para dentro poss vel Passo 4 Enrosque o corpo da bom...

Page 51: ...borda do diafragma e a borda do vedante est o bem ajustadas Se n o houver um anel de veda o em forma de O no fundo do encaixe do vedante coloque o Figura 5 1 Figura 5 2 Figura 5 3 Passo 6 Prenda o ma...

Page 52: ...r e o in dicador Apoie o seu seio com a palma da sua m o Com cuidado comece a pressionar o ma n pulo Nota N o se preocupe se o seu leite n o fluir imediatamen te Relaxe e continue o bombeamento Reposi...

Page 53: ...cabe na perfei o no protetor de seios N o de masiado apertado importante que o mamilo possa mover se livremente en quanto extrai o leite O protetor de seios n o deve ser demasiado grande porque isso p...

Page 54: ...retire delicadamente as pe as da gua Tenha cuidado e n o escalde a sua pele 5 Coloque as pe as ordenadamente numa toalha de papel limpa ou num tabuleiro de secagem limpo e deixe secar ao ar Evite uti...

Page 55: ...de compra Este produto est livre de materiais perigosos Manuten o 1 Evite derrubar bater ou atirar a unidade 2 Evite temperaturas extremas N o exponha a unidade diretamente ao sol 3 N o utilize a unid...

Page 56: ...mens es da unidade 205 x 186 x 90 mm C x L x A Ambiente de funcionamento Temperatura 5 C 40 C 41 F 104 F Humidade 15 93 RH Press o 700hPa 1060hPa Ambiente de armazenamento Temperatura 20 C 55 C 4 F 13...

Page 57: ...hinweis 58 Abbildung der Einheit 59 Installationsanweisungen 60 Produktzusammenbau 60 Pumpvorgang 63 Abmessungen der Brusthaube 64 Reinigung 65 Fehlerbehebung 66 Abfallbehandlung 66 Wartung 66 Spezifi...

Page 58: ...leichtern 3 Wenn Sie von Ihrem Baby getrennt sind und nach der Wiedervereinigung weiter stillen m chten sollten Sie Ihre Milch regelm ssig abpumpen um Ihre Milchver sorgung anzuregen Sicherheitshinwei...

Page 59: ...12 1 x Flaschenst nder 2 1 x Schaft 8 1 x Pumpengeh use 13 1 x Abdeckkappe 3 1 x Griff 9 2 x Ventile 14 1 x Nippel 4 1 x Dichtungsitz 10 4 x Weisse Membrane 15 1 x Schraubring 5 4 x Dichtungsringe 6...

Page 60: ...optional desinfiziert haben F hren Sie nach der Reinigung die folgenden Schritte aus um Ihre Sammelein heiten zusammenzustellen Schritt 1 F hren Sie die Brusthaube in den trichterf rmigen Abschnitt d...

Page 61: ...Sie darauf dass sich die wei e Memb ran nicht aufrollen kann Schritt 3 Setzen Sie das Ventil von unten in das Pum pengeh use ein Schieben Sie das Ventil so weit wie m glich ein Schritt 4 Schrauben Si...

Page 62: ...uf dass die Membranenkante und die Dich tungssitzkante eng anliegen Falls kein O Romg am Stecker an der Unterseite des Dichtsitzes vorhanden ist bitte aufsetzen Abbildung 5 1 Abbildung 5 2 Abbildung 5...

Page 63: ...t mit der Handfl che ab Beginnen Sie vorsichtig den Griff nach unten zu dr cken Hinweis Machen Sie sich keine Sorgen wenn Ihre Milch nicht sofort flie t Entspannen Sie sich und pumpen Sie weiter Wenn...

Page 64: ...Ihre Brustwarze richtig in die Brusthaube passt Nicht zu fest es ist wichtig dass sich die Brustwarze w hrend des Abpressens der Mutter milch frei bewegen kann Die Brusthaube sollte nicht zu gross se...

Page 65: ...sser oder Flaschenwasser in Trinkqualit t dass alle Teile bedeckt sind 3 Bringen Sie das Wasser zum Kochen Legen Sie die Teile f r 5 Minuten in kochendes Wasser 4 Lassen Sie das Wasser abk hlen und ne...

Page 66: ...fahren wie dieser Artikel in einem umweltvertr glichen Recycling Center entsorgt werden kann Unternehmen sollten sich an ihren Lieferanten wenden und die Bedingungen der Kaufvereinbarung berpr fen Die...

Page 67: ...pe Modell LD 101 Vakuum ca Ca 250mmHg Brusthaubengr e 24mm Einheitsgewicht ca 159g 5 61oz Einheitsabmessungen 205 x 186 x 90mm L x B x H Betriebsumgebung Temperatur 5 C 40 C 41 F 104 F Feuchtigkeit 15...

Page 68: ......

Reviews:

Related manuals for 41700