


2
ENGLISH
Manufacturer
Keep in a cool, dry place
Consult instructions
for use
Keep away from sunlight
Product code
Medical Device compliant with
Regulation (EU) 2017/745
Lot number
Caution: read instructions
(warnings) carefully
Medical Device
GIMA WARRANTY TERMS
The Gima 12-month standard B2B warranty applies.
All serious accidents concerning the medical device supplied by us must
be reported to the manufacturer and competent authority of the member
state where your registered office is located.
INTRODUCTION
This manual provides the instructions for a correct use of our patient aid or an
assistant / carer.
INTENDED USE
The rollator is designed to be used inside buildings by patients with an impairment
to legs.
The devices are intended to provide a support to the body. This aid allow patient
mobility making it easy to walk. They must be used with two arms in order to
guarantee safe operation.
WARNING! The rollator is built for indoor use and only on flat surfaces. If it is
necessary to employ the devices outside we advise to follow the road rules like
any pedestrian.
MAINTENANCE
The rollator do not require special care for their ordinary maintenance. We advise
to regularly perform the following checks:
- verify the reliability of different components
- check the correct fixing of screws and nuts
- test moving parts, apply lubricant if needed
- clean parts with mild detergents (do not use corrosive or harmful chemicals),
put it in dry and ventilated environment.
WARNING!
Do not use the equipment in case it is damaged or any component is missing.
Do not use the patient aids for purposes not mentioned in this user manual.
Do not cross obstacles or use the patient aids on uneven surfaces, or wet
and slippery. The use of the device is not recommended for people with poor
functionality in the hands and arms.
Max load 100kg
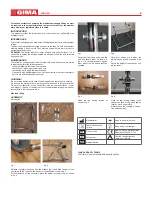
ASSEMBLY
Kit supplied
fig. 1
fig. 2
Release the lateral supports from the wheels (fig.1) and slide the part of the
structure with the rods until the device is in the position shown in fig. 2.
For convenience, during assembly, place the walker on the ground, as shown
in fig. 2.
fig 3
fig 4
fig. 5
fig. 6
Take the screw, the washer and the
bolt and secure them as shown in
fig. 3. It is recommended to tighten
them well using the Allen wrenches
supplied.
Once both screws are in place, the
walker can be turned as shown in fig.
4.
Adjust the height of the knobs by slid-
ing the tubes.
Open the two locking screws, as
shown in fig. 5.
Place the two locking screws in the
stoppers as shown in fig. 6 and tighten
them as much as possible.
Always check the stability of the de-
vice before using it.


