Page 3
Gilson Company, Inc.
SS-3 Gilson Performer III
Figure 5
Figure 7
Figure 6
Unpacking and Assembly
Carefully inspect the Performer lll as soon as it
arrives and check all package contents. If there
is damage or if parts are missing, contact Gilson
Customer Service immediately at 800-444-1508
or 740-548-7298 for instructions. Save all packing
materials for inspection by the freight claims ad-
juster if damage is reported.
The Performer III is packaged in two pieces to min-
imize potential damage during shipping.
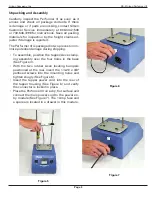
• To assemble, position the tapper/sieve clamp-
ing assembly over the four holes in the base
(See Figure 4).
• With the two rubber sieve locating bumpers
positioned at the rear, insert the 1/4-20 x 3/8"
panhead screws into the mounting holes and
tighten snugly (See Figure 5).
• Insert the tapper power cord into the rear of
the tapper housing (See Figure 6) and verify
the connector is locked in place.
• Place the Performer III on a dry, flat surface and
connect the main power cord to the power en-
try module (See Figure 7). The 1 Amp fuse and
a spare are located in a drawer in this module.

