Table of contents
EN - iii
E
ngl
is
h
Table of contents
Key features . . . . . . . . . . . . . . . . . . . . . . . . . . . . . . . . . . . . . . . 1
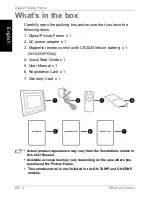
What’s in the box . . . . . . . . . . . . . . . . . . . . . . . . . . . . . . . . . . . 2
Overview . . . . . . . . . . . . . . . . . . . . . . . . . . . . . . . . . . . . . . . . . . 3
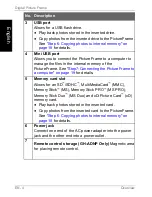
Right view . . . . . . . . . . . . . . . . . . . . . . . . . . . . . . . . . . . . . . . . 3
Rear view . . . . . . . . . . . . . . . . . . . . . . . . . . . . . . . . . . . . . . . . 5
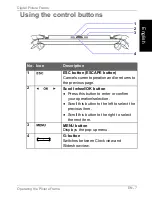
Using the control buttons . . . . . . . . . . . . . . . . . . . . . . . . . . . . 7
Getting started . . . . . . . . . . . . . . . . . . . . . . . . . . . . . . . . . . . . 11
Step 1: Using the adjustable back stand . . . . . . . . . . . . . . . 11
Step 2: Connecting to power . . . . . . . . . . . . . . . . . . . . . . . . 13
Step 3: First usage . . . . . . . . . . . . . . . . . . . . . . . . . . . . . . . . 14
Step 4: Basic setup . . . . . . . . . . . . . . . . . . . . . . . . . . . . . . . 14
Selecting a language . . . . . . . . . . . . . . . . . . . . . . . . . . . . 14
Setting the date and time . . . . . . . . . . . . . . . . . . . . . . . . . 15
Step 5: Inserting a memory card/USB flash drive . . . . . . . . 16
Compatible memory card formats . . . . . . . . . . . . . . . . . . 17
Step 6: Copying photos to internal memory . . . . . . . . . . . . . 18
Step 8: Replacing the paper mat . . . . . . . . . . . . . . . . . . . . . 20
Using the main menu . . . . . . . . . . . . . . . . . . . . . . . . . . . . . . . 22
Managing photos . . . . . . . . . . . . . . . . . . . . . . . . . . . . . . . . . . 24
Manually copying photos to the internal memory . . . . . . . . . 24
Tagging photos to an album . . . . . . . . . . . . . . . . . . . . . . . . . 26
Removing photos from an album . . . . . . . . . . . . . . . . . . . 29
Managing photos by using the TIMELINE album. . . . . . . 30
Creating a new album . . . . . . . . . . . . . . . . . . . . . . . . . . . . . 31
Philips_Photo_Only_UM_en.book Page iii Tuesday, August 3, 2010 4:15 PM
Using the remote control (GH-ANDP only)
. . . . . . . . . . . . . 8
.
Replacing the remote control battery
. . . . . . . . . . . . . . . . 10
. .
Digital Picture Frame
Operating the Picture Frame . . . . . . . . . . . . . . . . . . . . . . . . . . 6
Step 7: Connecting the Picture Frame to a computer . . . . . 19
Summary of Contents for GH-7AWP
Page 2: ......
Page 63: ...Appendix EN 57 English Memo Digital Picture Frame...
Page 67: ...Consignes de s curit FR iv Fran ais Note de service Cadre photo num rique Picture Frame...
Page 128: ...Annexe FR 59 Fran ais Note de service Cadre photo num rique Picture Frame...
Page 192: ......
Page 193: ...2010 GiiNii International All rights reserved D 03 08 10 P N TY 4J580 002...


