Gigatrend Technology Axper XP-K7V400 User Manual Download Page 8

 8

English

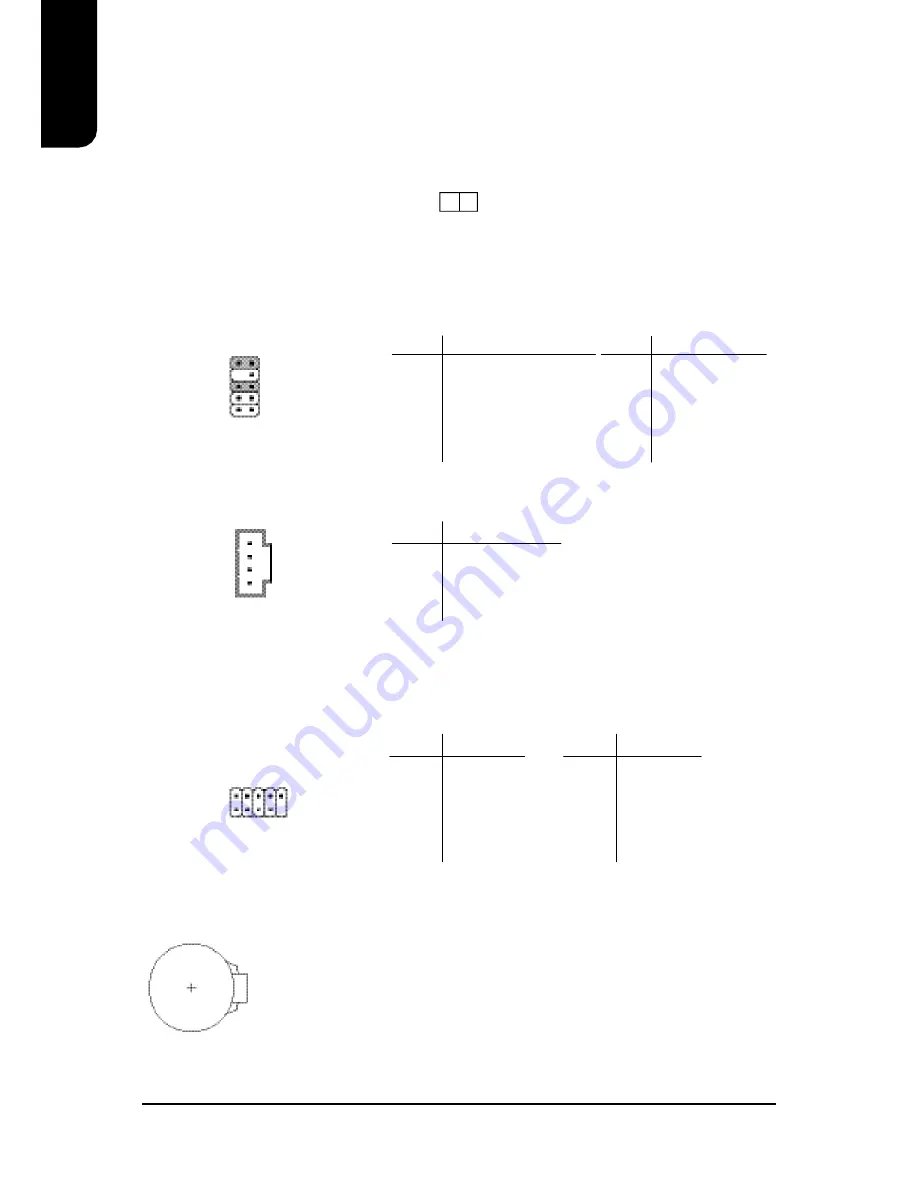
F_AUDIO (Front Audio Connector)

Connects to the audio connector located on the front panel of the system casing (dependent

on case design). When use of the front panel audio connector is required, please remove the

5-6 pin, 9-10pin jumper. Please note that use of only the front panel audio connector or the

rear panel audio connector is permitted.

CD_IN (Optical Drive Audio Connector)

Connects CD-ROM or DVD-ROM audio connector.

PIN

SIGNAL

1

CD_L

2

GND

3

GND

4

CD_R

RAM_LED

When the RAM_LED is lit, please do not remove the memory since there is still power being

supplied to the component. Short circuiting or hardware damage may occur if memory is

removed with the RAM_LED is still lit. Please remove the power plug before removing the

memory.

+

_

1

10

9

2

1

PIN

SIGNAL

1

MIC

2

GND

3

MIC_BIAS

4

POWER

5

Front Audio (R)

PIN

SIGNAL

6

Rear Audio (R)

7

Reserved

8

NO PIN

9

Front Audio (L)

10

Rear Audio (L)

F_USB1 (Front USB Connector)

Connects to the USB connector located on the front panel of the system casing (dependent on

case design). Note: Please make sure that each USB connection matches its designated

position. If connections are made incorrectly, the result can lead to inability to use the function

or even damage.

PIN

SIGNAL

6

USB Dy+

7

GND

8

GND

9

NO PIN

10

NC

PIN

SIGNAL

1

POWER

2

POWER

3

USB Dx-

4

USB Dy-

5

USB Dx+

2

10

1

9

The improper removal of the battery can result in harm. When replacing a
battery, please make sure you use one that is of similar brand and model
number.
For information related to battery specifications and precautions, please
refer to the manufacturer instructions.
If you wish to delete the data stored in the CMOS, please follow the steps
below:
1.

Please turn off your computer and unplug the power.

2.

Remove the battery from the motherboard.

3.

Wait 30 seconds and then replace the battery onto the motherboard.

4.

Plug in the power supply and turn on your system.

BATTERY (Battery)

Summary of Contents for Axper XP-K7V400

Page 1: ...M 040502 XP K7V400 AMD Socket A Processor Motherboard User s Manual...

Page 2: ...his document The content of this document are subject to change without prior notice Gigatrend Technology may make improvements and or changes in the product described in this publication at any time...

Page 3: ...Memory 10 2 3 Installation of the Graphics Card 10 3 BIOS Setup 11 3 1 Setup Screen Features BIOS version E2 11 3 2 Standard CMOS Features 12 3 3 Advanced BIOS Features 14 3 4 Integrated Peripherals 1...

Page 4: ...PT GAME PORT USB LAN F_AUDIO LINE_OUT LINE_IN MIC_IN XP K7V400 SOCKET A CPU_FAN ATX CD_IN VIA KT400A BIOS AGP COMB FDD F_USB1 BATTERY IT8705F IDE1 VIA 8235 PCI1 IDE2 PCI2 PCI3 PCI4 F_PANEL PWR_LED DDR...

Page 5: ...rmal EPP ECP mode 2 Serial port COMA COMB 4 USB 2 0 1 1 ports 2 x Rear 2 x Front by cable 1 Front Audio connector 1 PS 2 Keyboard 1 PS 2 Mouse On Board LAN Builit in RTL8100BL chipset 1 RJ45 port On B...

Page 6: ...the USB section of the user manual LAN RJ45 LAN Port Internet connection with speed of up to10 100Mbps Parallel port LPT Connects to printer COMA COMB Serial port Connects to serial based mouse or da...

Page 7: ...GND 2 12V 3 Sense PIN SIGNAL 1 3 3V 2 3 3V 3 GND 4 VCC 5 GND 6 VCC 7 GND 8 Power Good 9 5VSB stand by 5V 10 12V PIN SIGNAL 11 3 3V 12 12V 13 GND 14 PS_ON soft on off 15 GND 16 GND 17 GND 18 5V 19 VCC...

Page 8: ...served 8 NO PIN 9 Front Audio L 10 Rear Audio L F_USB1 Front USB Connector Connects to the USB connector located on the front panel of the system casing dependent on case design Note Please make sure...

Page 9: ...eat sink paste is added between the CPU and the fan sink 4 Please do not turn on the power prior to installing the fan sink Doing so can result in overheating and lead to permanent damage to the CPU 5...

Page 10: ...he memory module is correctly inserted the clips will automatically refasten If the memory mod ule is positioned in the wrong direction it will not insert If this occurs please switch directions 2 3 I...

Page 11: ...BIOS without entering the operating system Instructions Enter Movement in all four directions to highlight a desired option pressing Enter will select the option and take you to its appropriate scree...

Page 12: ...ring POST default None Select this if no IDE devices are used and the system will skip the automatic detection step and allow for faster system start up Manual User can manually input the correct sett...

Page 13: ...boot Options No Errors Never halt when an error is detected All Errors Halt whenever an error is detected All But Keyboard Halt whenever an error is detected with the exception of the keyboard All But...

Page 14: ...Exit F1 General Help F5 Previous Values F6 Fail Save Default F7 Optimized Defaults n First Second Third Boot Device The user can select the order in which the system will boot Options Floppy LS120 HD...

Page 15: ...n Onboard LAN Boot ROM Allows user to enable or disable booting from a network drive default Disabled 3 4 Integrated Peripherals This menu allows you to control the various ports of the computer such...

Page 16: ...able or disable the onboard parallel port Options 378 IRQ7 278 IRQ5 3BC IRQ7 Disabled default 378 IRQ7 n Parallel Mode Use this to select the operation mode for the parallel port Options SPP normal EP...

Page 17: ...r On Suspend or S3 STR Suspend To RAM default S1 POS n USB Device Wakeup From S3 Allows user to use a USB device to wakeup system from S3 default Disabled n Power LED in S1 state Allows user to select...

Page 18: ...RQ Assignment Auto PCI4 IRQ Assignment Auto Item Help Menu Level Device s using this INT USB 1 1 Host Cntrlr Bus 0 Dev 16 Func 1 higf Move Enter Select PU PD Value F10 Save ESC Exit F1 General Help F5...

Page 19: ...abled Disabled default Disabled n Current CPU Temperature Automatically checks CPU temperature CMOS Setup Utility Copyright C 1984 2004 Award Software PC Health Status Vcore 1 548V DDR Vtt 1 280V 3 3V...

Page 20: ...e is disabled the currently CPU frequency will be displayed The CPU Host Clock can be input between 100MHz to 132MHz n PCI AGP Frequency MHz The PCI AGP frequency is based on the CPU Host Frequency Mh...

Page 21: ...ve the entry blank and then select Enter BIOS will then display PASSWORD DISABLED Once you have completed the password setting you will need to go to Advanced BIOS Features and select Password Check f...

Page 22: ...or automatic installation Customize Installation Allows specific choice of drivers for installation axper Utilities Displays axper s unique utilities Software Displays the required software 3 12 Save...

Reviews: