background image


7

Gigaset Maxwell C / LHSG IM - IE-UK-International en / A31008-N4007-R101-1-X119 / user_guide_operating_steps.fm / 4/26/

Te

mplat

e

 G

o

, V

e

rs

ion 1

, 01.

07

.2

014

 / M

odu

leV

e

rs

ion 1

.0

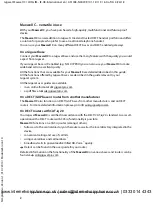
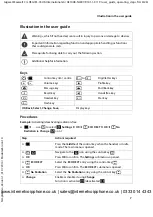
Illustration in the user guide

Illustration in the user guide

Keys 

Procedures

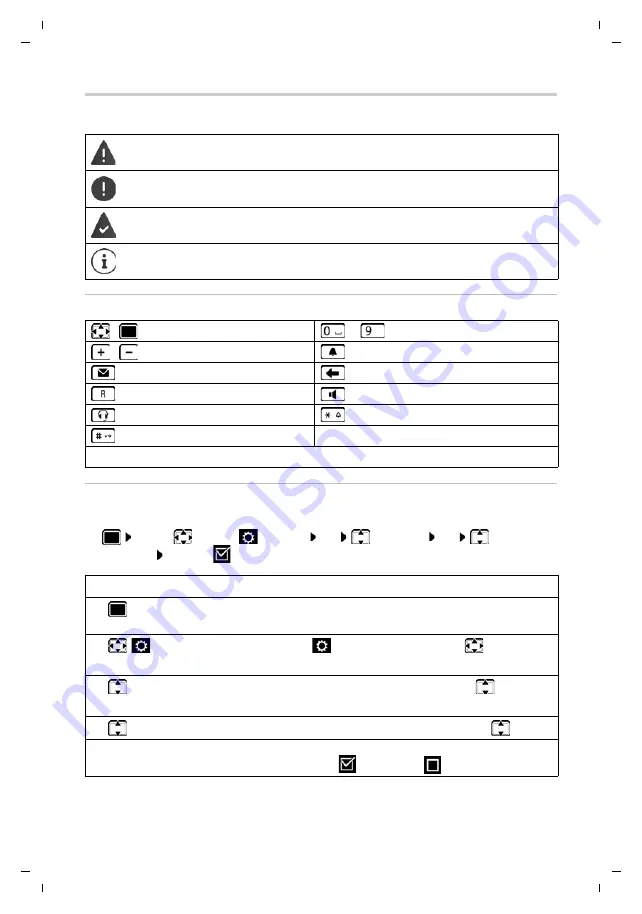
Example: 

Activating/deactivating radiation-free

Warnings, which if not heeded, can result in injury to persons or damage to devices.

Important information regarding function and appropriate handling or functions 
that could generate costs.

Prerequisite for being able to carry out the following action.

Additional helpful information.

 / 

Control key rim / centre 

 to 


Digit/letter keys

 / 

Volume keys

Profile key 

Message key 

End/Back key

Recall key

Handsfree key

Headset key

Star key

Hash key

OK

,

 Back

,

 Select

Change

Save, 

 . . . 

Display keys

¤


  . . . use


to select


Settings


    OK     

 ECO DECT     OK     

 No 

Radiation     Change 

(


=  on)

Step

Actions required

¤

Press the 

middle 

of the control key when the handset is in idle 

mode. The main menu is opened.

¤


¤

OK

Navigate to the 

 icon using the control key 

.

Press 

OK

 to confirm. The 

Settings

 submenu is opened.

¤

 ECO DECT

¤

OK

Select the 

ECO DECT

 entry using the control key 

.

Press 

OK

 to confirm. The 

ECO DECT

 submenu is opened.

¤


No Radiation

Select the 

No Radiation

 entry using the control key 

.

¤

Change

Enable or disable it using 

Change


Function is activated 

 /deactivated 

.

www.internetvoipphone.co.uk | [email protected] | 0333 014 4343

Summary of Contents for Pro Maxwell C

Page 1: ...Gigaset Maxwell C LHSG IM IE UK International en A31008 N4007 R101 1 X119 Cover_front_PRO fm 4 26 18 ...

Page 2: ...set system All the Gigaset user guides are available in an online format at gigasetpro com as pdf files at wiki gigasetpro com On a DECT GAP base or router from another manufacturer The Maxwell C also functions on DECT GAP bases from other manufacturers and on DECT routers For more detailed information please go to wiki gigasetpro com On DECT routers with CAT iq 2 0 Your Gigaset Maxwell C is certi...

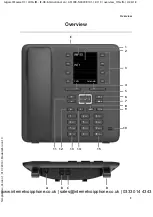
Page 3: ...1008 N4007 R101 1 X119 overview_HSG fm 4 26 18 Template Go Version 1 01 07 2014 ModuleVersion 1 0 Overview Overview 2 3 5 12 1 INT 1 Calls Calendar 6 10 9 4 11 13 14 15 7 8 E A B C D www internetvoipphone co uk sales internetvoipphone co uk 0333 014 4343 ...

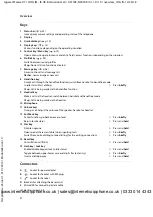
Page 4: ...l is being made via the handsfree function 9 Headset key Make a call via the headset switch between handset and handsfree mode lit up Call is being made via the headset 10 Microphone 11 Volume keys During a call Adjust the volume of the speaker handset or headset 12 End Back key Cancel function go back one menu level Press briefly Return to idle status Press and hold 13 Star key Disable ringtone P...

Page 5: ...8 Additional functions using the PC interface 40 Setting the handset 42 Appendix 50 Customer Service Help 50 Manufacturer s advice 50 Technical data 52 Display icons 54 Index 56 From a technical point of view Gigaset Maxwell C is a DECT handset In order to be able to make calls with it it requires a connection to a DECT base station e g to a router with CAT iq functionality or a Gigaset base Once ...

Page 6: ...xwell C LHSG IM IE UK International en A31008 N4007 R101 1 X119 LHSG_IVZ fm 4 26 18 Additional information You can obtain all Gigaset user guides in PDF format online wiki gigasetpro com gigasetpro com www internetvoipphone co uk sales internetvoipphone co uk 0333 014 4343 ...

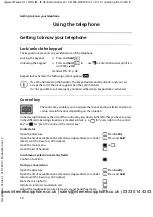
Page 7: ... key rim centre to Digit letter keys Volume keys Profile key Message key End Back key Recall key Handsfree key Headset key Star key Hash key OK Back Select Change Save Display keys use to select Settings OK ECO DECT OK No Radiation Change on Step Actions required Press the middle of the control key when the handset is in idle mode The main menu is opened OK Navigate to the icon using the control k...

Page 8: ...y lock is activated Do not use the devices in environments with a potential explosion hazard e g paint shops The devices are not splashproof For this reason do not install them in a damp environ ment such as bathrooms or shower rooms Use only the power adapter indicated on the device Remove faulty devices from use or have them repaired by our Service team as these could interfere with other wirele...

Page 9: ...el 1 x power adapter 1 x user guide The device is designed for use in enclosed dry rooms within a temperature range of 5 C to 45 C The device s feet do not usually leave any marks on surfaces However due to the mul titude of different varnishes and polishes used on furniture contact marks on the sur faces cannot be completely ruled out Never expose the telephone to heat sources direct sunlight or ...

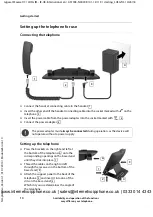
Page 10: ...he socket marked with Connect the power adapter Setting up the telephone Press the brackets on the right and left at the bottom of the telephone onto the corresponding openings on the base stand until they click into place Thread the cables on the right or left through the recesses on the bottom of the base stand Attach the support panel to the back of the telephone and insert it into one of the s...

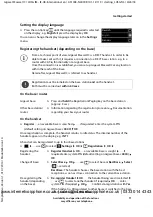
Page 11: ...t any location within the reach of the base Hereinafter Gigaset Maxwell C is referred to as handset Registration must be initiated on the base station and on the handset Both must be carried out within 60 secs Gigaset base Press and hold the Registration Paging key on the base station approx 3 sec Other base station router Information regarding the registration procedure Documentation regarding yo...

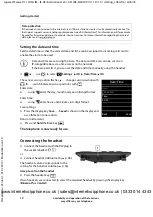
Page 12: ...cting the headset Connect the headset with the RJ9 plug to the socket labelled or Connect headset via Bluetooth p 38 The headset volume corresponds to the setting for the handset volume p 44 Accept a call on the headset Press the headset key If two headsets are connected select the required headset by pressing the display key Bluetooth or Corded Data protection If the product is connected to the I...

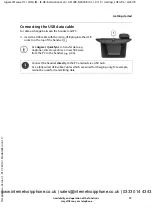
Page 13: ...between the handset and PC Insert the USB cable with the micro USB plug into the USB socket on the top of the handset Use Gigaset QuickSync to transfer data e g ringtones directory entries or new firmware from the PC to the handset p 40 1 1 Connect the handset directly to the PC and not via a USB hub Use a fully wired USB cable Cables which are wired for charging only for example cannot be used fo...

Page 14: ...dset pin if it is not 0000 OK Handset PIN p 48 If a call is indicated on the handset the keypad automatically unlocks and you can accept the call It then locks again when the call is finished It is not possible to call emergency numbers either when keypad lock is activated The control key enables you to navigate the menus and input fields and also to call up certain functions depending on the situ...

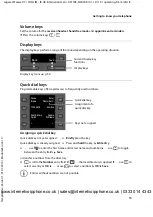
Page 15: ...quick dial key use to enter the first name and or last name and number use to toggle between the entry fields Save or transfer a number from the directory scroll to the Number entry field the local directory is opened use to select an entry OK or use to select a number OK Save Quick dial key not yet assigned Briefly press the key Quick dial key is already assigned Press and hold the key Edit entry...

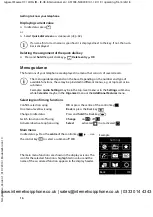
Page 16: ...n is highlighted in colour and the name of the associated function appears in the display header If a name first or last name is specified it is displayed next to the key If not the num ber is displayed The menu guidance depends on the base Depending on the number and type of available functions these may be provided in different menus e g at top level or in a submenu Examples Audio Settings may b...

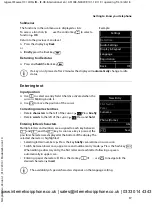
Page 17: ...rs characters Multiple letters and numbers are assigned to each key between and and the key As soon as a key is pressed the possible characters are displayed at the bottom of the display The selected character is highlighted Selecting letters numbers Press the key briefly several times in succession Switch between lower case upper case and number entry mode Press the hash key When editing a direct...

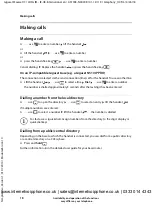
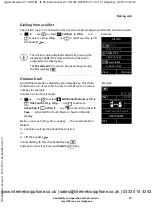
Page 18: ... use to enter a number the number is dialled approximately 3 seconds after the last digit has been entered Dialling a number from the local directory use to open the directory use to select an entry lift the handset If multiple numbers are entered use to select a number lift the handset the number is dialled Dialling from a public central directory Depending on the base to which the handset is con...

Page 19: ...ll mode Make a one touch call Press any key the saved number is dialled Conduct a call over the handsfree function or Lift the handset Cancel dialling Press the handsfree key End one touch call Press and hold the key The call lists can be displayed directly by pressing the display key Calls if the relevant function has been assigned to the display key The Missed calls list can also be opened by pr...

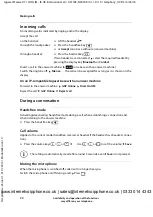
Page 20: ...en establishing a connection and when listening to the answer machine Press the handsfree key Call volume Applies to the current mode handsfree receiver or headset if the handset has a headset connec tion Muting the microphone When the microphone is switched off callers will no longer hear you Switch the microphone on off during a call Press on the handset Lift the handset through the loudspeaker ...

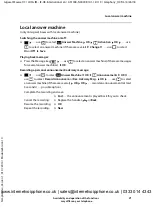
Page 21: ... On or Off Save Playing back messages Press the Message key use to select an answer machine if there are messages for several answer machines OK Recording a personal announcement advisory message use to select Answer Machine OK Announcements OK use to select Record Announcem or Rec Advisory Msg OK use to select an answer machine if there are several OK OK record an announcement at least 3 seconds ...

Page 22: ...to enter a number Anniversary use to activate deactivate Anniversary use to enter date and time use to select type of alert Visual only or a ringtone Caller Melody VIP use to select the ringtone that will indicate a call from the participant if a Caller Melody VIP has been assigned the entry will appear in the directory with the icon Save entry Save Information on online directories e g on on a Gi...

Page 23: ...use to select the field to be changed Edit or use to select an entry Options Edit entry OK Deleting entries Delete the selected entry use to select an entry Options Delete entry OK Delete all entries Options Delete all OK Yes Setting the order of the directory entries Directory entries can be sorted by first name or surname Options Sort by Surname Sort by First Name If no name was entered the defa...

Page 24: ...d Copy the next entry after successful transfer Press Yes or No Copying the entire directory Options Copy all OK to Internal OK use to select the receiving handset OK the entries are copied one after the other The sending and receiving handset must both be registered to the same base station The other handset and the base station are able to send and receive directory entries An external call inte...

Page 25: ...tooth If a device in the Known Devices list sends a vCard to your handset a directory entry is automatically created and a message is shown in the display If the sending device is not in the list use to enter the PIN of the sending Bluetooth device OK the copied vCard is available as a directory entry Synchronising the phonebook with the PC address book Gigaset QuickSync Bluetooth mode is activate...

Page 26: ...d alarms list Display messages Press the Message key Messages lists that contain messages are displayed Mailbox is always displayed An entry is marked in bold new messages are available The number of new messages is shown in brackets An entry is not marked in bold no new messages The number of old messages is shown in brackets use to select a list OK the calls or messages are listed Network mailbo...

Page 27: ...ion Date and time of call if set Opening the call list Calling back a caller from the call list use to select Call Lists OK use to select list OK use to select entry Lift the handset Additional options use to select Call Lists OK use to select list OK possible options The base router to which the handset is registered provides information on call numbers Detailed information can be found at wiki g...

Page 28: ...he functions actually available on your telephone and how they are operated depends on the base router to which the handset is registered The following description applies to a Gigaset N510 IP PRO The procedure required for your telephone may differ from the procedures described here Additional information You can obtain all Gigaset user guides in PDF format wiki gigasetpro com online gigasetpro c...

Page 29: ...t messages are blocked Exceptions Appointments alarm clock and anniversaries Sound profiles The profiles are set as follows by default Activate alert tone for an incoming call for Profile Silent after switching to Profile Silent press the display key Beep the icon appears in the status bar An incoming call occupies a line even if it is not signalled If all the lines on the base are occupied calls ...

Page 30: ...ff Activation use to select On or Off Enter date Date the selected day has been pre set use to enter new date Enter time Time use to enter hours and minutes of the appointment Set name Text use to enter a description of the appointment e g evening meal meeting Set alarm tone Signal use to select the melody of the reminder alarm or deactivate the acoustic signal Enter information for the appointmen...

Page 31: ... Message key Missed Alarms OK use to browse through the list of any appointments or Each entry is displayed with the number or name date and time The most recent entry appears at the top of the list Delete an appointment anniversary Delete Displaying changing deleting stored appointments use to select Organizer OK Calendar OK use to select day OK the appointment list is displayed use to select dat...

Page 32: ...tition the alarm call is deactivated for 24 hours Switching off repeating the alarm after an interval snooze mode Deactivate the alarm OFF Repeat the alarm snooze mode Press Snooze or any key the alarm is switched off and repeated after 5 minutes Date and time have been set Switch on off Activation use to select On or Off Setting the wake up time Time use to enter hours and minutes Set days Occurr...

Page 33: ...room monitor mode is suspended for the duration of the call but the function remains activated Activating and setting the room monitor use to select Additional Features OK Room Monitor OK then The destination number is displayed in idle display when the room monitor is activated The range of the room monitor is max 2 meters in the direction in which the micro phone is facing The room monitor is ac...

Page 34: ...ndset via a low wireless signal During a call the transmission power automatically adapts to the distance between the base station and handset The smaller the distance to the base the lower the radiation To reduce the radiation further Reducing radiation by up to 80 Deactivating radiation in idle status Deactivate room monitor In idle status press the display key OFF Cancel the alarm During an ala...

Page 35: ... feature If the setting No Radiation is activated and a handset is registered to the base that does not support this feature No Radiation is automatically deactivated As soon as this handset is de registered No Radiation will automatically be re activated The wireless connection will only be established for an incoming or outgoing call and the connection will be delayed by about 2 seconds When No ...

Page 36: ...on mode use to select Settings OK Telephony OK Black List Edit Protection Mode OK use to select desired protection Save settings Save use to select Settings OK Telephony OK Anonymous Calls Edit on use to select Protection Mode No Protection Anonymous calls are indicated in the same way as identified numbers Silent Call The telephone will not ring and the incoming call will only appear in the displ...

Page 37: ...e memory for screensavers and CLIP pictures use to select Additional Features OK Resource Directory OK Capacity OK the percentage of available memory is displayed Type Format Sound Ringtones Monophonic Polyphonic Imported sounds Internal Internal Internal WMA MP3 WAV Picture CLIP picture Screensaver BMP JPG GIF 240 x 172 pixels 240 x 320 pixels View CLIP picture Caller Pictures OK use to select pi...

Page 38: ... the local area code is still not saved use to enter local area code OK When in idle status the activated Bluetooth mode is indicated on the handset by the icon Registering Bluetooth devices The distance between the handset in Bluetooth mode and the active Bluetooth device headset or data device should not exceed 10 m Bluetooth is activated and the devices have been registered to the handset The h...

Page 39: ...ons Repeat Search OK Cancel search Cancel use to select Bluetooth OK Known Devices OK the known devices are listed an icon indicates the type of device Bluetooth headset Bluetooth data device use to select Bluetooth OK Known Devices OK use to select entry possible options View an entry View the device name and device address are displayed Press OK to go back De register a Bluetooth device Options ...

Page 40: ...ls are ignored Carrying out a firmware update Connect the telephone and the PC using a USB data cable Launch Gigaset QuickSync Establish connection to the handset Start firmware update in Gigaset QuickSync Information about this can be found in Gigaset QuickSync help feature The update process may take up to 10 minutes not including download time The data are first downloaded from the online updat...

Page 41: ...m the telephone Detach the power cable from the device Re insert the power cable Carry out the firmware update again as described above If the update procedure fails more than once or itis no longer possible toconnecttothe PC carry out the Emergency Update End the Gigaset QuickSync program on the PC Remove the USB data cable from the telephone Detach the power cable from the device Press and hold ...

Page 42: ...vices and a range of pictures can be selected to be displayed as a screensaver when in idle status You can also display the assignment of the quick dial keys in idle status use to select Settings OK Display Keypad OK Screensaver Edit on then The screensaver is activated approx 10 seconds after the display has changed to idle status End screensaver Press the Back key the display changes to idle sta...

Page 43: ...are abbreviated if necessary use to select Settings OK Display Keypad OK Large Font Change on Colour scheme You can choose from a range of colour combinations for the display use to select Settings OK Display Keypad OK Colour Schemes OK use to select the desired colour scheme Select selected Activating deactivating automatic keypad lock Automatically lock the keypad when the handset has been in id...

Page 44: ...to the surroundings Check which is the most comfortable profile for you use to select Audio Settings OK Earpiece Profiles OK use to select Profile High or Low Select selected Ringtones Ringtone volume use to select Audio Settings OK Ringtones Handset OK Volume OK use to select For internal calls and alarms or External Calls use to set volume in 5 levels or in crescendo mode increasing volume Save ...

Page 45: ...al Switching the ringtone off for the current call Silence Switching the alert tone beep on off Switch on an alert tone beep instead of the ringtone Press the Profile key to select Profile Silent press Beep within 3 seconds the following icon appears in the status bar Switching off the alert tone Press the Profile key to change profile Switching advisory tones on off The handset notifies acoustica...

Page 46: ... the digit key Press the display key QuickDial The directory opens use to select an entry OK use to select a number if necessary OK the entry is saved to the digit key Dialling a number Press and hold the digit key the number is dialled immediately or Briefly press the digit key the number name possibly in abbreviated form is shown on the left display key press the display key the number is dialle...

Page 47: ...tion Incoming calls to the number designated to a connection will be forwarded to all handsets assigned to the connection use to select Settings OK Telephony OK Connections OK use to select connection OK Assigned Handsets all registered handsets are displayed use to select handset Change handset is assigned Seize Line Initiate call using handsfree function INT Open the list of handsets registered ...

Page 48: ...event internal listening in only on a CAT iq router If the function is enabled an internal party can listen in to an external call and take part in the conversation conference use to select Settings OK Telephony OK Connections OK use to select connection OK Listening In OK Change on Changing the handset PIN The handset is protected against unauthorised use by a PIN The handset PIN must be entered ...

Page 49: ...OK OK if there is new firmware the update will start Resetting the handset to the default settings Reset any individual settings and changes that you have made use to select Settings OK System OK Handset Reset OK Yes the handset s settings are reset The base router to which the handset is registered must also support this function wiki gigasetpro com If your base router does not support this funct...

Page 50: ...gaset product Manufacturer s advice Authorisation This device is intended for use worldwide Use outside the European Economic Area with the exception of Switzerland is subject to national approval Country specific requirements have been taken into consideration Hereby Gigaset Communications GmbH declares that the radio equipment type Gigaset Maxwell C is in compliance with Directive 2014 53 EU The...

Page 51: ... pre condition for reuse and recycling of used electrical and electronic equipment For more detailed information about disposal of your old appliance please contact your local council refuse centre or the original supplier of the product Care Wipe the device with a damp cloth or an antistatic cloth Do not use solvents or microfibre cloths Never use a dry cloth this can cause static In rare cases c...

Page 52: ... dect org cat iq certification aspx GAP standard Supported No of channels 60 duplex channels Radio frequency range 1880 1900 MHz Duplex mode Time division multiplexing 10 ms frame length Repetition frequency of the transmission pulse 100 Hz Duration of the transmission pulse 370 μs Channel grid 1728 kHz Bit rate 1152 kbit s Modulation GFSK Language code 32 kbit s Transmission power 10 mW average p...

Page 53: ...Technical data Character charts Standard characters Press the relevant key the number of times indicated 1 Space 2 Line break 1x 2x 3x 4x 5x 6x 7x 8x 9x 10x 1 a b c 2 ä á à â ã ç d e f 3 ë é è ê g h i 4 ï í ì î j k l 5 m n o 6 ö ñ ó ò ô õ p q r s 7 ß t u v 8 ü ú ù û w x y z 9 ÿ ý æ ø å 0 1 2 www internetvoipphone co uk sales internetvoipphone co uk 0333 014 4343 ...

Page 54: ...green if Maximum Range off Answer machine activated indicator flashes Answer machine is recording a message or is being operated by another internal participant Profile Silent activated Ringtone switched off Beep ringtone activated Keypad lock activated Icon Meaning Icon Meaning Last number redial Delete text Open the directory Copy number to the directory Divert a call to answer machine Icon Mean...

Page 55: ... 2014 ModuleVersion 1 0 Display icons Other display icons Icon Meaning Alarm clock is activated display with alarm time Timer switched on display with countdown Action complete green Action failed red Information Security prompt Please wait Icon Meaning www internetvoipphone co uk sales internetvoipphone co uk 0333 014 4343 ...

Page 56: ...isplay language 42 earpiece volume 44 handsfree volume 44 Changing the device name Bluetooth 39 Changing the handset PIN 48 Character charts 53 CLIP picture view in Resource Directory 37 Colour scheme 43 Connecting the power cable 10 Connecting the USB data cable 13 Connection assigning handset 47 changing name 47 headset 4 Contact with liquid 51 Contents of the package 9 Control key 4 14 Correcti...

Page 57: ...t Bluetooth 38 Headset connection 4 Headset key 4 LED 4 Headset socket 12 Help 50 I Icons alarm clock 32 displaying new messages 26 indications 54 on display keys 54 status bar 54 Idle status returning to 17 Indications icons 54 Internal listening in 48 K Key end back 4 headset 4 volume 4 Key assigning 46 Keypad lock automatic 43 Keys control key 4 14 display keys 4 15 handsfree 20 handsfree key 1...

Page 58: ...ivating 45 changing 44 melody for internal external calls 45 time control 35 volume 44 Room monitor activation 33 Room monitoring 33 S Safety precautions 8 Screensaver 42 quick dial keys 16 Searching in directory 23 Sending entire directory to handset 24 Setting the date 12 Setting the time 12 Show new messages 26 Signal strength 54 Signal tone see Advisory tones Snooze mode alarm 32 Sound delete ...

Page 59: ...18 Template Go Version 1 01 07 2014 Issued by Gigaset Communications GmbH Frankenstr 2a D 46395 Bocholt Gigaset Communications GmbH 2018 Subject to availability All rights reserved Rights of modification reserved gigasetpro com www internetvoipphone co uk sales internetvoipphone co uk 0333 014 4343 ...

Reviews: