background image

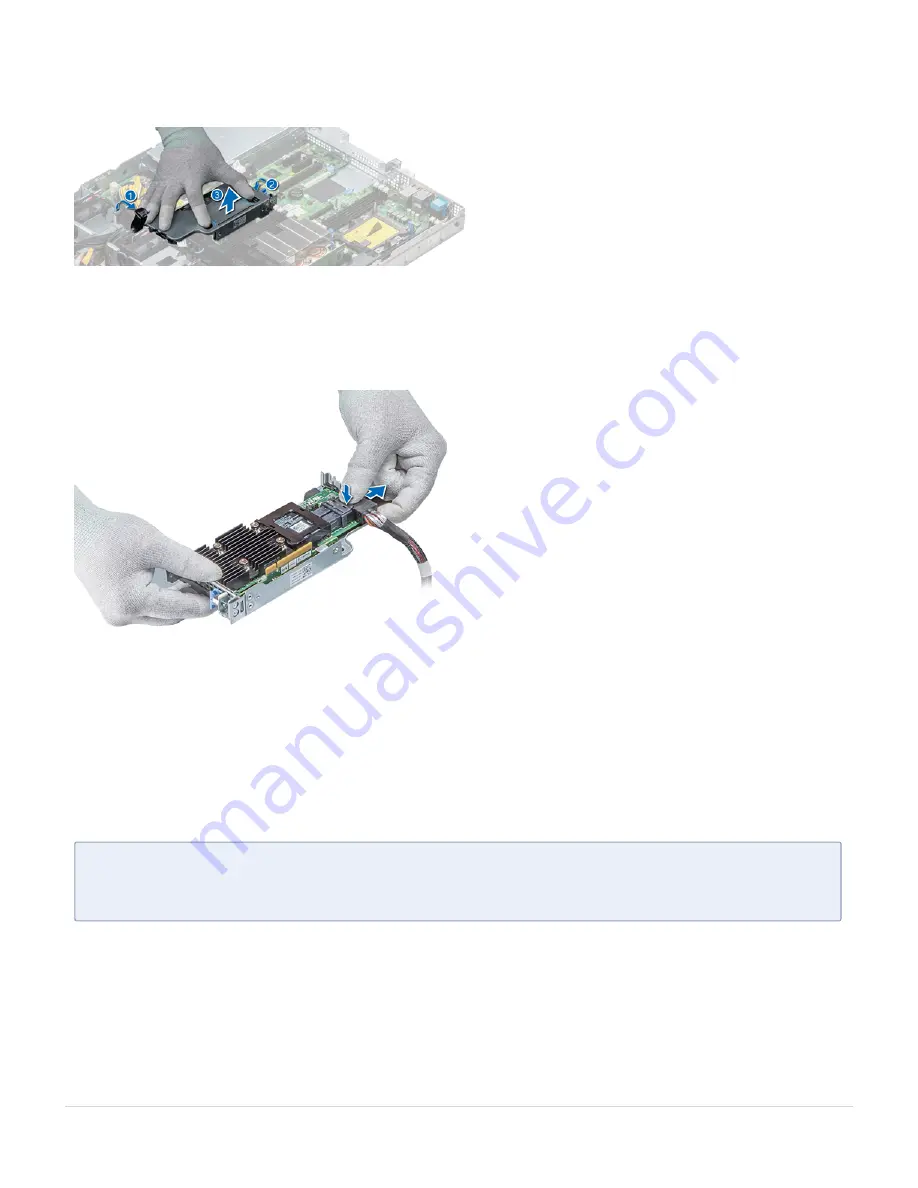
4. Hold the blue touch points and lift the internal PERC riser out of the system.

5. Turn the internal riser so that the PERC card is facing up.

6. Press the cable connector and disconnect the cable that is connected to the internal
PERC card

After removing the Internal PERC riser you can do the following :

1. Install the air shroud.

2. Follow the procedure listed in

After working inside your system

.

3. Install the internal PERC card.

Installing the Internal PERC Riser

N

OTE

:

The new generation PERC 11 H750, H350, and HBA350i adapters cannot be

mixed with the PERC H740P, H730P, H330, HBA330 adapters of the previous
generations in one system. For more information, see Cable routing.

l

Follow the safety guidelines listed in

Safety instructions

.

Follow the below steps to install the Internal PERC Riser:

1. Connect the cable to the internal PERC card.

Installing and Removing System Components

Internal PERC riser

60

GigaVUE-FM Hardware Appliance Guide for GFM-HW1-FM010 and GFM-HW1-FM001-HW

Summary of Contents for GFM-HW1-FM001-HW

Page 1: ...GigaVUE FM Hardware Appliance Guide for GFM HW1 FM010 and GFM HW1 FM001 HW GigaVUE FM Product Version 5 16 Document Version 1 0 See Change Notes for document updates...

Page 2: ...butions Gigamon and the Gigamon logo are trademarks of Gigamon in the United States and or other countries Gigamon trademarks can be found at www gigamon com legal trademarks All other trademarks are...

Page 3: ...ing on the Appliance Manually 15 Logging in to the GigaVUE FM application from the appliance 15 Accessing the Appliance Remotely 15 Running Configuration Jump Start 17 Upgrade GigaVUE FM 19 Supported...

Page 4: ...drive carrier 46 System Memory 47 System memory guidelines 47 Processors and heat sinks 54 Removing Processor and Heat Sink Module 54 Installing a Processor and Heat Sink Module 55 Removing the Proces...

Page 5: ...l USB memory key 88 Replacing the optional internal USB memory key 88 Optical drive optional 88 Removing the optical drive 88 Installing the optical drive 89 Power supply units 90 Removing a Power Sup...

Page 6: ...ctors 107 System board jumper settings 108 Disabling forgotten password 108 Using System Diagnostics 110 Embedded System Diagnostics 110 Getting Help 112 Contacting Gigamon 112 Locating your system Se...

Page 7: ...system health and system ID status LED and the iDRAC Quick Sync 2 wireless indicator Status LED Enables you to identify any failed hardware components There are five status LED s and an overall syste...

Page 8: ...the appropriate Online Diagnostics test Restart the system and run embedded diagnostics ePSA If the drives are configured in a RAID array restart the system and enter the host adapter configuration u...

Page 9: ...d Reinstall the card Right Control Panel View Table 8 Right control panel Item Indicator or Button Icon Description 1 Power button Indicates if the system is powered on or off Press the power button t...

Page 10: ...ht PCIe expansion card on low profile riser 5 Low profile riser left slot N A Use the card slot to connect half height PCIe expansion card on low profile riser 6 Power supply unit PSU N A For more inf...

Page 11: ...stem s iDRAC IP address The LCD panel is available only on the optional front bezel The optional front bezel is hot pluggable The statuses and conditions of the LCD panel are outlined here The LCD bac...

Page 12: ...ring normal system operation when there are no status messages or errors When the system turns off and there are no errors LCD enters the standby mode after five minutes of inactivity Press any button...

Page 13: ...u NOTE When you select an option in the View menu you must confirm the option before proceeding to the next action Option Description iDRAC IP Displays the IPv4 or IPv6 addresses for iDRAC9 Addresses...

Page 14: ...nect the second Ethernet cable to the same management switch You can connect to a different management switch if you want to access iDRAC from a different subnet 5 Connect the peripherals to the appli...

Page 15: ...screen for GigaVUE FM 2 At the login prompt enter admin 3 When the system prompts for a password enter admin123A The system will automatically run the configuration jump start script the first time yo...

Page 16: ...enter the IP address in the URL field The following screen displays in the browser b Enter the default username and password root admin123A c Click Submit a Enter the default username and password ro...

Page 17: ...GigaVUE FM The hostname may contain letters numbers periods and hyphens but may not begin with a hyphen No other special characters are permitted This will also appear as part of the command line prom...

Page 18: ...by entering the names configuration with spaces For example abc com def com Enable NTP If you respond yes to this option you will be asked to provide the address of an NTP server and its NTP version...

Page 19: ...es 3 Once the GigaVUE FM image is obtained download it to a server within your environment This must be a server that your current GigaVUE FM instance can access to upload it 4 Important Save your cur...

Page 20: ...M HW1 FM010 GFM HW1 FM001 HW Node or a Cluster from GigaVUE FM in the GigaVUE Fabric Management Guide l If upgrading from GigaVUE FM versions lower than 5 10 xx You cannot directly upgrade your GigaVU...

Page 21: ...er upgrading to 5 11 00 or above Best Practice Before performing an upgrade in addition to taking a backup of GigaVUE FM also take a Sysdump which provides valuable configuration information that is n...

Page 22: ...ng operating system For this reason when upgrading from any pre 5 8 xx version of FM to version 5 8 xx or above you must first migrate your existing configurations and data such as audit logs events s...

Page 23: ...Check the number of images currently available for installation with the following command from the GigaVUE FM CLI fmctl image list Important If there are three images listed in the Images available t...

Page 24: ...fmctl image fetch tftp myserver gigamon com tftpboot gigamon gigavue fm 5 16 img Specify the base directory when using TFTP NOTE Fetching the image using TFTP is time consuming due to the size of the...

Page 25: ...t version You cannot downgrade l When using the Firefox browser clear the cache before upgrading to prevent issues with the browser l When upgrading GigaVUE FM to the latest image file the upgrade ope...

Page 26: ...External Server page appears d On the Images Server page specify the following An alias to help identify the image server The host IP address of the server The protocol to use for the download SCP or...

Page 27: ...n external image server or the GigaVUE FM CLI or you can use the GigaVUE FM internal storage to store the GigaVUE FM image and point to it as if it were an external server as follows 1 Add the GigaVUE...

Page 28: ...rough the UI 6 Click Upgrade NOTE When you change the IP address of the GigaVUE FM instance using the jump start configuration the internal database and the in memory caches of the GigaVUE FM instance...

Page 29: ...w the GigaVUE FM v3 0 User s Guide and upgrade to release GigaVUE FM v3 1 You cannot directly upgrade from a pre 3 3 releases to the current release You can only upgrade from GigaVUE FM v3 3 or v3 4 r...

Page 30: ...ve Current Settings Prior to Upgrade c Follow the system prompts to record a snapshot of GigaVUE FM s current state Figure 2 Power Off Command Upgrade GigaVUE FM 30 GigaVUE FM Hardware Appliance Guide...

Page 31: ...l is not covered by your warranty Read and follow the safety instructions that are shipped with your product NOTE It is recommended that you always use an antistatic mat and antistatic strap while wor...

Page 32: ...edure to remove the front bezel with and without the LCD panel is the same Follow the safety guidelines listed in Safety instructions 1 Unlock the bezel by using the bezel key 2 Press the release butt...

Page 33: ...nnect the system from the electrical outlet and disconnect the peripherals Follow the below steps to remove the System Cover 1 Using a 1 4 inch flat head or a Phillips 2 screwdriver rotate the latch r...

Page 34: ...e 3 Using a 1 4 inch flat head or Phillips 2 screwdriver rotate the latch release lock clockwise to the locked position l Reconnect the peripherals and connect the system to the electrical outlet l Tu...

Page 35: ...rd 8 internal expansion riser 9 low profile expansion riser 1 10 low profile expansion riser 2 11 processor blank 12 heat sink 13 air shroud 14 cooling fan blank 15 left control panel cable cover 16 i...

Page 36: ...lane cover 2 Lift the backplane cover away from the system Installing the backplane cover l Follow the safety guidelines listed in Safety instructions l Follow the procedure listed in Before working i...

Page 37: ...erheated quickly resulting in shutdown of the system and loss of data l Follow the safety guidelines listed in Safety instructions l Follow the procedure listed in Before working inside your system Fo...

Page 38: ...the system along the system wall and secure the cables by using the cable latch Follow the below steps to install the Air Shroud 1 Align the tabs on the air shroud with the slots on the system 2 Lower...

Page 39: ...e the cables out of the way to access the cooling fan cable connector on the system board Follow the below steps to remove the Cooling Fan 1 Press the tabs on the side of the cable connector to discon...

Page 40: ...t place the cooling fan into the cooling fan cage 2 Route the cooling fan cable and connect it to the connector on the system board After installing the Cooling Fan ensure the following 1 Install the...

Page 41: ...emove them from the system board 2 Slide the intrusion switch out of the intrusion switch slot Installing the intrusion switch l Follow the safety guidelines listed in Safety instructions l Follow the...

Page 42: ...system cooling drive blanks must be installed in all empty drive slots CAUTION Mixing drive blanks from previous generations of PowerEdge servers is not supported Follow the below steps to remove the...

Page 43: ...rs are off the hard drive is ready for removal For more information see the documentation for the storage controller CAUTION Before attempting to remove or install a hard drive while the system is run...

Page 44: ...insertion CAUTION Mixing hard drives from previous generations of PowerEdge servers is not supported CAUTION Combining SAS and SATA hard drives in the same RAID volume is not supported CAUTION When in...

Page 45: ...release handle 2 Insert the hard drive carrier into the hard drive slot and slide until the hard drive connects with the backplane 3 Close the hard drive carrier release handle to lock the hard drive...

Page 46: ...er 1 Insert the drive into the drive carrier with the connector end of the drive towards the back of the carrier 2 Align the screw holes on the drive with the screws holes on the drive carrier When al...

Page 47: ...to each processor Processor 1 has four 2 DIMM slots per channel and two 1 DIMM slot per channel Processor 2 has six 1 DIMM per channel Memory channels are organized as follows Table 1 Memory channels...

Page 48: ...d or Custom can be run at high speed or lower Maximum supported DIMM speed of the processors Maximum supported DIMM speed of the processors Maximum supported speed of the DIMMs NOTE MT s indicates DIM...

Page 49: ...ase tabs Memory modules of different capacities can be mixed provided other memory population rules are followed NOTE For example 8 GB and 16 GB memory modules can be mixed In a dual processor configu...

Page 50: ...stem memory is one half of the total installed physical memory Half of the installed memory is used to mirror the active memory modules This feature provides maximum reliability and enables the system...

Page 51: ...xteen 16 GB dual rank memory modules the available system memory 16 GB x 16 memory modules 8GB 1 rank sparing channel x 12 channel 256 GB 96 GB 160 GB For multi rank sparing in a dual processor config...

Page 52: ...ed NOTE NOTE Odd number of DIMMs will result in unbalanced memory configurations which in turn will result in performance loss It is recommended to populate all memory channels identically with identi...

Page 53: ...Odd number of DIMM population is allowed NOTE NOTE Odd number of DIMMs will result in unbalanced memory configurations which in turn will result in performance loss It is recommended to populate all m...

Page 54: ...ome time after the system is powered down Allow the heat sink to cool before removing it l Follow the safety guidelines listed in Safety instructions l Follow the procedure listed in Before working in...

Page 55: ...f the heat sink to the system board and then place the processor and heat sink module PHM on the processor socket CAUTION To avoid damaging the fins on the heat sink do not press down on the heat sink...

Page 56: ...screws should not be tightened to more than 0 13 kgf m 1 35N m or 12 in lbf After installing the Processor Heat Sink Module follow the procedure listed in After working inside your system Removing th...

Page 57: ...s of the bracket to release the bracket from the processor NOTE Ensure that the processor and the bracket are placed in the tray after you remove the heat sink Installing the Processor into a Processo...

Page 58: ...ng a clean lint free cloth 4 Use the thermal grease syringe included with your processor kit to apply the grease in a quadrilateral design on the top of the processor CAUTION Applying too much thermal...

Page 59: ...e internal PERC riser NOTE The new generation PERC 11 H750 H350 and HBA350i adapters cannot be mixed with the PERC H740P H730P H330 HBA330 adapters of the previous generations in one system For more i...

Page 60: ...system 3 Install the internal PERC card Installing the Internal PERC Riser NOTE The new generation PERC 11 H750 H350 and HBA350i adapters cannot be mixed with the PERC H740P H730P H330 HBA330 adapters...

Page 61: ...atch to close the latch After installing the Internal PERC Riser you could do the following 1 Install the air shroud 2 Follow the procedure listed in After working inside your system Removing the PERC...

Page 62: ...eplace the air shroud 3 Follow the procedure listed in After working inside your system Installing PERC card into the Internal PERC riser l Follow the safety guidelines listed in Safety instructions F...

Page 63: ...system configuration the following PCI Express PCIe generation 3 expansion cards are supported Table 3 Expansion card riser configurations Expansion card riser PCIe slots on the riser Height Length L...

Page 64: ...d Slot Low Profile RAID PERC9 14G PERC10 Internal PERC11 Dell Integrated Slot Low Profile Non RAID PERC 11 Internal Dell Integrated Slot Low Profile Non RAID PERC 11 External Dell 2 Full Height RAID P...

Page 65: ...ot Low Profile Non RAID PERC 11 External Dell 3 Low Profile PERC 10 External adapter Dell 3 Low Profile RAID PERC10 External Dell 3 Low Profile NVMe PCIe SSD Samsung Intel 3 Low Profile 1G NICs Broadc...

Page 66: ...ile Non RAID PERC 11 Internal Dell Integrated Slot Low Profile Non RAID PERC 11 External Dell 3 2 Low Profile PERC 10 External adapter Dell 3 2 Low Profile RAID PERC10 External Dell 3 2 Low Profile NV...

Page 67: ...External adapter Dell 2 Low Profile RAID PERC9 14G PERC10 Internal PERC11 Dell 3 Low Profile Non RAID PERC 11 Internal Dell 3 Low Profile Non RAID PERC 11 External Dell 2 Low Profile PERC 10 External...

Page 68: ...risers The R440 system supports four types of expansion card risers l LOM riser One x8 PCIe Gen 3 for OCP form factor cards connected to Processor1 l Right riser One x16 PCIe Gen3 for low profile hal...

Page 69: ...instructions Follow the below steps to install an Expansion Card Riser 1 If removed install the expansion cards into the expansion card riser 2 Holding the touch points align the slot on the riser wi...

Page 70: ...guidelines listed in Safety instructions l Follow the procedure listed in Before working inside your system l Disconnect any cables connected to the expansion card Follow the below steps to remove an...

Page 71: ...stem l If applicable remove the air shroud l Remove the expansion card riser l If applicable disconnect the cables from the expansion card Follow the below steps to remove an Expansion Card from the E...

Page 72: ...pansion card NOTE You must install a filler bracket over an empty expansion card slot to maintain Federal Communications Commission FCC certification of the system The brackets also keep dust and dirt...

Page 73: ...Follow the below steps to install an Expansion Card from the Expansion Card Riser 1 Open the PCIe card holder latch 2 If installed remove the filler bracket NOTE Store the filler bracket for future us...

Page 74: ...eated 5 Close the expansion card latch Follow the below steps to remove an Expansion Card from Expansion Card Riser 1 If applicable connect the cables to the expansion card 2 Install the expansion car...

Page 75: ...edure to remove the BOSS card is similar to the removing an expansion card Follow the below steps to install a M 2 SSD module 1 Connect the M 2 SSD module to the connector on the BOSS card 2 Place the...

Page 76: ...remove the BOSS card is similar to the removing an expansion card Follow the below steps to remove a M 2 SSD module 1 Loosen the screw and lift the retention strap that secures the M 2 SSD module on...

Page 77: ...the MicroSD card and remove it from the slot NOTE Temporarily label each MicroSD card with its corresponding slot number after removal After removing the MicroSD card you could do the following 1 Fol...

Page 78: ...o lock it into place After installing the MicroSD card you could do the following 1 Follow the procedure listed in After working inside your system Optional IDSDM or vFlash module Removing the Optiona...

Page 79: ...ard Installing optional IDSDM or vFlash card l Follow the safety guidelines listed in Safety instructions Follow the below steps to install a IDSDM vFlash card 1 Locate the IDSDM vFlash connector on t...

Page 80: ...move the risers Follow the below steps to remove the LOM riser card 1 Using a Phillips 2 screwdriver loosen the screws that secure the LOM riser card to the system board 2 Release the two blue side pl...

Page 81: ...card until the card is firmly seated on the system board connector and the two blue plastic snap hold the LOM riser card in place 3 Using a Phillips 2 screwdriver replace the screws to secure the LOM...

Page 82: ...tor Installing the hard drive backplane l Follow the safety guidelines listed in Safety instructions NOTE The procedure to install the backplane is similar for all backplane configurations Follow the...

Page 83: ...re removing the backplane CAUTION Note the number of each hard drive and temporarily label them before you remove the hard drive so that you can replace them in the same location NOTE NOTE The procedu...

Page 84: ...e from the hooks on the system 2 To remove a backplane with an expander board a Loosen the captive screws that secure the expander board a Press the release tabs and lift the backplane to disengage th...

Page 85: ...ower cable 3 SAS cable SAS_A and SAS_B cable connectors to internal riser 4 Backplane signal cable 5 Cable routing clip 6 Power interposer board 7 Internal PERC 8 System board Installing and Removing...

Page 86: ...Appliance ver 2 0 supports CR 2032 3 0 V lithium coin cell system battery Replacing the system battery WARNING There is a danger of a new battery exploding if it is incorrectly installed Replace the...

Page 87: ...y 2 Use a plastic scribe to pry out the system battery 3 To install a new system battery hold the battery with the positive side facing up and slide it under the securing tabs 4 Press the battery into...

Page 88: ...rnal USB Memory Key 1 Locate the USB port or USB memory key on the system board To locate the USB port see the Jumpers and connectors 2 If installed remove the USB memory key from the USB port 3 Inser...

Page 89: ...t of the system until it is out of the optical drive slot 3 If you are not adding a new optical drive install the optical drive blank The procedure to install the optical drive blank is the same as th...

Page 90: ...ithout redundancy is configured in system BIOS In redundant mode power is supplied to the system equally from both PSUs when Hot Spare is disabled When Hot Spare is enabled one of the PSUs is put into...

Page 91: ...U for normal operation On power redundant systems remove and replace only one PSU at a time in a system that is powered on l Follow the safety guidelines listed in Safety instructions l Disconnect the...

Page 92: ...steps to install the Power Supply Unit 1 Slide the PSU into the system until the PSU is fully seated and the release latch snaps into place 1 If you have unlatched the cable management arm relatch it...

Page 93: ...nnect all the cables connected from the PSU to the system board l If applicable remove the expansion card riser Follow the below steps to remove a non redundant cabled AC power supply unit 1 Using a P...

Page 94: ...your system l Remove the air shroud l Disconnect all the cables connected from the PIB to the system board NOTE Ensure that you note the routing of the cables as you remove them from the system board...

Page 95: ...g a Phillips 2 screwdriver replace the two screws to secure the PIB to the system 3 Route the cables and connect it to the system board After installing the Interposer Board you could do the following...

Page 96: ...u note the routing of the cables as you remove them from the system board You must route the cables properly when you replace them to prevent the cables from being pinched or crimped 2 Using a Phillip...

Page 97: ...the left control panel you could do the following 1 Follow the safety guidelines listed in Safety instructions 2 Install the air shroud 3 Install the internal PERC riser 4 Follow the procedure listed...

Page 98: ...the system 4 Holding the control panel by its sides remove the control panel away from the system Installing the right control panel l Follow the safety guidelines listed in Safety instructions Follo...

Page 99: ...key If you replace this system board you must supply the recovery key when you restart your system or program before you can access the encrypted data on your hard drives CAUTION Do not attempt to re...

Page 100: ...board from the chassis CAUTION Do not lift the system board by holding a memory module processor or other components 2 Using a Phillips 2 screwdriver remove the screws that secure the system board to...

Page 101: ...ace the system board in place 3 Using a Phillips 2 screwdriver replace the screws that secure the system board to the chassis After installing the system board you could do the following 1 Replace the...

Page 102: ...g iDRAC Enterprise license Restoring the system using Easy Restore The easy restore feature enables you to restore your service tag license UEFI configuration and the system configuration data after r...

Page 103: ...Once the service tag is entered it cannot be updated or changed 5 Click OK Entering the system Service Tag by using System Setup If Easy Restore fails to restore the Service Tag use System Setup to en...

Page 104: ...ystem or program before you can access the encrypted data on your hard drives CAUTION Once the TPM plug in module is installed it is cryptographically bound to that specific system board Any attempt t...

Page 105: ...system Initializing TPM for BitLocker users l Initialize the TPM l The TPM Status changes to Enabled Activated Initializing the TPM 1 2 for TXT users Follow the below steps to initialize the TPM 1 Whi...

Page 106: ...n Menu screen click System BIOS System Security Settings 9 From the Intel TXT option select On Installing and Removing System Components Initializing TPM for BitLocker users 106 GigaVUE FM Hardware Ap...

Page 107: ...n 6 connector 2 CPU1 Processor socket 1 3 CPU1_PWR_CONN P2 CPU1 power connector 4 J_INTRU Intrusion switch connector 5 J_BP_SIG1 Backplane signal connector 1 6 LFT_CP_CONN Left control panel connector...

Page 108: ...attery connector 29 PCIE_G3_X16 CPU1 Riser 1 connector 30 A6 A5 A10 A4 A9 A7 A1 A8 A2 A3 Memory module sockets 31 B3 B2 B1 B4 B5 B6 Memory module sockets 32 CPU2 Processor socket 2 33 PCIE_A0 NVMe con...

Page 109: ...ed until the system boots with the jumper on pins 4 and 6 However before you assign a new system and or setup password you must move the jumper back to pins 2 and NOTE If you assign a new system and o...

Page 110: ...s allowing you to Run tests automatically or in an interactive mode Repeat tests Display or save test results Run thorough tests to introduce additional test options to provide extra information about...

Page 111: ...cted in the system The diagnostics starts executing the tests on all the detected devices System diagnostic controls Menu Description Configuration Displays the configuration and status information of...

Page 112: ...For support go to gigamon com support and services contact support 2 For sales inside sales gigamon com or 1 408 831 4025 Locating your system Service Tag Your system is identified by a unique Express...

Page 113: ...nd Software Guides DID YOU KNOW If you keep all PDFs for a release in common folder you can easily search across the doc set by opening one of the files in Acrobat and choosing Edit Advanced Search fr...

Page 114: ...ffic monitoring sessions for the cloud platforms GigaVUE V Series Quick Start Guide GigaVUE Cloud Suite for AWS GigaVUE V Series 2 Guide GigaVUE Cloud Suite for AWS GigaVUE V Series 1 Guide GigaVUE Cl...

Page 115: ...notes regarding installing and upgrading to this release NOTE Release Notes are not included in the online documentation NOTE Registered Customers can log in to My Gigamon to download the Software and...

Page 116: ...oving our documentation to make it more accessible while maintaining accuracy and ease of use Your feedback helps us to improve To provide feedback and report issues in our documentation send an email...

Page 117: ...ossible Any other comments Contact Technical Support For information about Technical Support Go to Settings Support Contact Support in GigaVUE FM You can also refer to https www gigamon com support an...

Page 118: ...ation Ask and answer questions and learn best practices from other members Join special interest groups to have focused collaboration around a technology use case vertical market or beta release Take...

Page 119: ...lacklist F forward list selective forwarding forward formerly whitelist L leader leader in clustering node relationship formerly master M member node follower in clustering node relationship formerly...

Page 120: ...its sync info to clocks in its network segment formerly grandmaster R receiver follower in a bidirectional clock relationship formerly slave S source leader in a bidirectional clock relationship forme...

Reviews: