background image

English

1

2

Congratulations on your purchase of the GIGABYTE Notebook.

This manual will help you to get started with setting up your notebook. The final product 

configuration depends on the model at the point of your purchase. GIGABYTE reserves 

the right to amend without prior notice. For more detailed information, please visit our 

website at www.gigabyte.com

Using GIGABYTE Notebook for the First Time

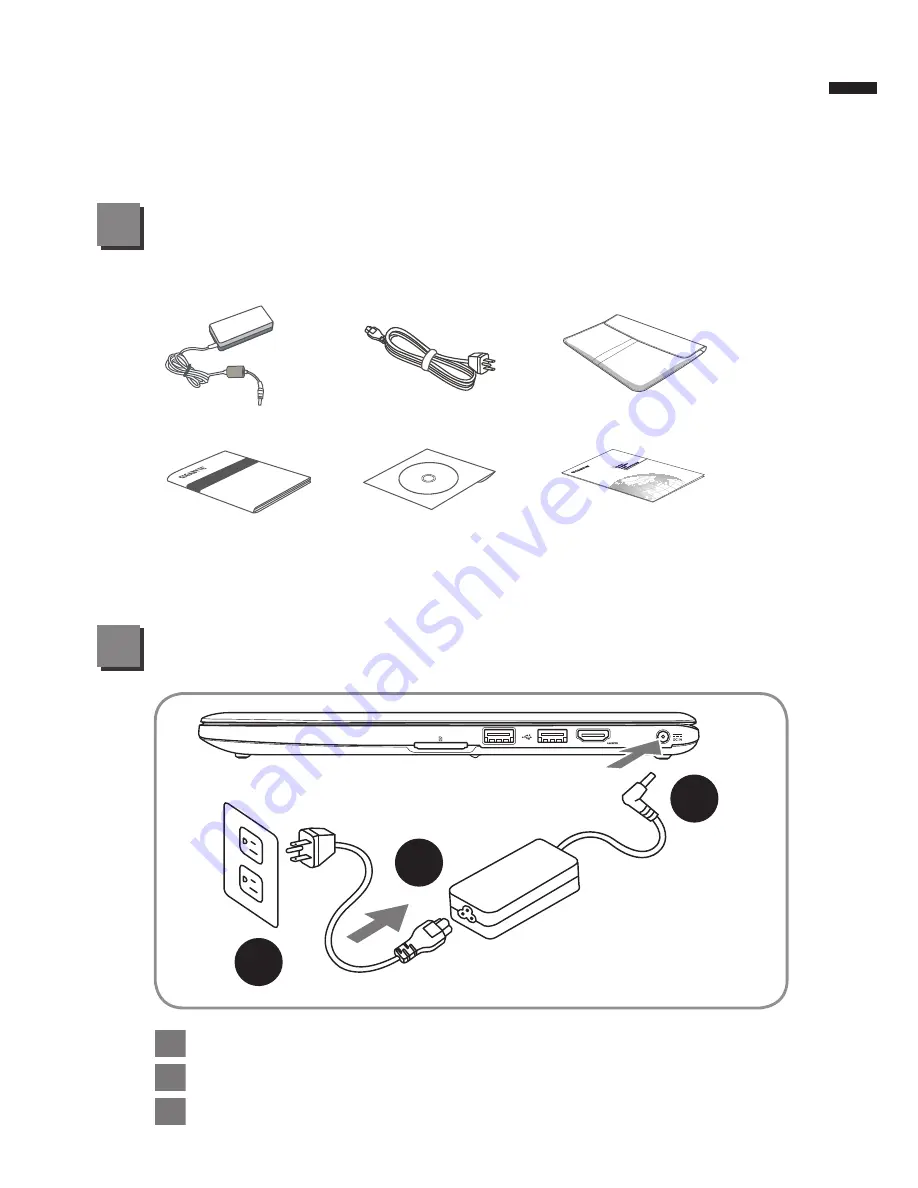
Check Supplied Items

1

AC Adapter

Power Cord

Handy Bag (Optional)

Manual

Driver CD

Warranty Card

* The illustrations in this document may appear differently from your model.

1

2

3

1

Connect the the power cord to the AC adapter.

2

Connect the AC adapter to the DC-in jack on the right side of the notebook. 

3

Connect the power cord to the power outlet.

Summary of Contents for U2442C

Page 1: ......

Page 2: ...ior notice For more detailed information please visit our website at www gigabyte com Using GIGABYTE Notebook for the First Time Check Supplied Items 1 AC Adapter Power Cord Handy Bag Optional Manual Driver CD Warranty Card The illustrations in this document may appear differently from your model 1 2 3 1 Connect the the power cord to the AC adapter 2 Connect the AC adapter to the DC in jack on the...

Page 3: ...e for the audio will not function until Windows Setup has completed Booting Up the U2442 for the First Time Depending on your configuration the Microsoft Windows Boot Screen will be the first screen that you will see as the notebook starts up Follow the on screen prompts and instructions and enter your personal information to complete the setup of the Windows Operating System ...

Page 4: ... battery power Bluetooth Status LED Wireless Lan Status LED HDD Status LED Battery Status LED Power Status LED To call out smart manager function Smart Setup Under off condition Push to enter smart setup menu in off mode You can choose BIOS Setup Utility system recovery in the setup menu Smart Manager In Windows Mode Press button to initiate Smart Manager 1 Ethernet Port 2 D sub VGA Port 3 USB Por...

Page 5: ...English 4 Base View Right View 1 SD Card Reader 2 USB Port x 2 3 HDMI Port 4 DC in Jack 1 Memory Compartment 1 3 4 2 1 ...

Page 6: ...htness Fn F4 Brightness Up Increases the screen brightness Fn F5 Display Toggle Switches display output between the display screen external monitor if connected and both Fn F6 Screen Display Toggle Turns the screen display on and off Fn F7 Speaker Toggle Turns the speaker on and off Fn F8 Volume Down Decreases the sound volume Fn F9 Volume Up Increases the sound volume Fn F10 Touchpad Toggle Turns...

Page 7: ...art Manager according to the actual version built in GIGABYTE Smart Recovery If the machine you purchase already has operating system built in you can restore the system back to factory default by using GIGABYTE Smart Recovery Please be noted that the GIGABYTE Smart Recovery interface icons utilities and software versions may vary based on the purchased models Please operate GIGABYTE Smart Recover...

Page 8: ... Continue to OS button to enter operating system Press BIOS Setup Utility button to enter BIOS setup utility Press System Recovery button to enter GIGABYTE Xpress Recovery Press Shutdown button to shutdown the system ...

Page 9: ...ophone I O Port USB 3 0 2 USB 2 0 2 HDMI D sub RJ45 Mic in Earphone out SD Card Reader DC in Jack Communications 10 100 1000Mbps Ethernet 802 11b g n Wireless Bluetooth v4 0 Webcam 1 3 Megapixel Battery Li polymer 4000mAh 4 2V 44Wh Dimensions 339 W x 233 D x 18 5 20 5 H mm This specification is for users reference only The final configuration depends on the users bought Specification 6 Appendix 7 ...

Reviews: