background image

English

5

Using the <Fn> key with another key creates a hot key, providing a quick and 

convenient method for controlling various functions. To use a hot key, first hold down 

the <Fn> key. Next, press the second key (ex:<~>, <F1>~<F12>) in the combination. 

Finally, release both keys.

Hotkey

Description 

ICON

Fn + ~

Play/Pause (in Audio/Video Programs)

Fn + F1 

TouchPad Toggle

Fn + F2  

Turn LCD Backlight Off

(Press any key or use TouchPad to turn on)

Fn + F3 

Mute Toggle

Fn + F4

Sleep Toggle

Fn + F5 

Volume Decrease

Fn + F6 

Volume Increase

Fn + F7 

Display Toggle

Fn + F8

Brightness Decrease

Fn + F9 

Brightness Increase

Fn + F10 

PC Camera Power Toggle

Fn + F11 

WLAN Module Power Toggle 

Fn + F12 

Bluetooth Module Power Toggle

Pressing the hot keys to adjust BIOS setup, system recovery and boot option menu.

Hotkey

Function

Description

F2

BIOS setup

Enter BIOS setup

F9

system recovery

Enter system recovery

F12

boot option

Enter boot option menu

Function & Hot Key Indicators

System Setup

Summary of Contents for Q1700C

Page 1: ......

Page 2: ...ge without prior notice written or otherwise 1 Connect the power cord to the AC adapter 2 Connect the AC adapter to the DC in jack on the left side of the notebook 3 Connect the power cord to the power outlet 1 2 3 To install the battery please follow these steps 1 Slide the battery into the slot until both latches click into place Shown as 1 You may hear a clicking sound once the battery is secur...

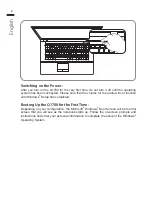
Page 3: ...me for the audio will not function until Windows Setup has completed Booting Up the Q1700 for the FirstTime Depending on your configuration the Microsoft Windows Boot Screen will be the first screen that you will see as the notebook starts up Follow the on screen prompts and instructions and enter your personal information to complete the setup of the Windows Operating System ...

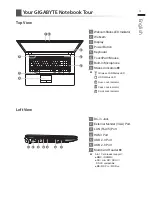
Page 4: ... Wireless LAN Status LED HDD Status LED Num Lock Indicator Caps Lock Indicator Scroll Lock Indicator 1 DC in Jack 2 External Moniter VGA Port 3 LAN RJ 45 Port 4 HDMI Port 5 USB 2 0 Port 6 USB 2 0 Port 7 Multi Card Reader 9 in 1 Card reader support MMC RSMMC SD mini SD SDHC SDXC compatible MS MS Pro MS Duo 3 5 4 2 1 8 7 6 1 2 4 5 3 6 7 Your GIGABYTE Notebook Tour ...

Page 5: ...ght View 1 Microphone Jack 2 Headphone Jack 3 USB 2 0 Port 4 Optical Disc Drive 5 Kensington Lock Slot 1 Power Indicators 2 Battery Bay 3 Component Compartment 4 Speakers 5 HDD Compartment Power LED Battery Status LED 3 2 4 1 5 3 2 1 5 4 ...

Page 6: ...klight Off Press any key or use TouchPad to turn on Fn F3 Mute Toggle Fn F4 Sleep Toggle Fn F5 Volume Decrease Fn F6 Volume Increase Fn F7 Display Toggle Fn F8 Brightness Decrease Fn F9 Brightness Increase Fn F10 PC Camera Power Toggle Fn F11 WLAN Module Power Toggle Fn F12 Bluetooth Module Power Toggle Pressing the hot keys to adjust BIOS setup system recovery and boot option menu Hotkey Function...

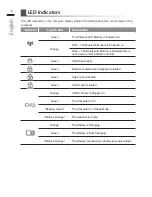
Page 7: ...s Installed this is not a power on off indicator in Win8 Green Hard Disk Activity Green Number Lock Numeric Keypad Activated Green Caps Lock Activated Green Scroll Lock Activated Orange AC DC Power is Plugged In Green The Computer is On Blinking Green The Computer is in Sleep Mode Blinking Orange The webcam is in Use Orange The Battery is Charging Green The Battery is Fully Charging Blinking Orang...

Page 8: ...d Devices with DOS do not have the recovery function Launch System Recovery The system recovery feature is preinstalled before the laptop is shipped from the factory The option menu allows you to launch the Windows recovery tool to reinstall the operating system to factory default The brief introduction below will show you how to start the recovery tool and restore your system Windows 7 Recovery G...

Page 9: ...you want to remove all of your files you can reset your PC completely Caution All personal data and files will be lost During the laptop turn on process press and hold F9 key to launch the tool 2 1 3 4 Turn off and restart the laptop Choose Troubleshoot to enter the recovery settings Also you can choose Continue to exit recovery system and continue to Windows 8 for files or data backup A progress ...

Page 10: ...te recovery function 5 Choose Reset your PC Click on Next Choose a target operating system Click on Windows 8 Choose an option to recover your system Just remove my files Only personal data and files will be removed but computer settings will be kept Fully clean the drive The drive will be completely restored to factory default settings It takes more time Click on Reset to execute recovery functio...

Page 11: ...or data backup Here are what will happen Your files and personalization settings won t be changed Your PC settings will be restored to factory default settings Apps from Windows Store will be kept Apps you installed from discs or websites will be removed A list of removed apps will be saved on your desktop Here are what will happen All of your personal files and apps will be removed Your PC settin...

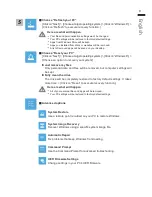
Page 12: ...m Image Recovery Recover Windows using a specific system image file Automatic Repair Fix problems that keep Windows from loading Command Prompt Use the Command Prompt for advanced trobleshooting UEFI Firmware Settings Change settings in your PC s UEFI firmware Startup Settings Change Windows Startup behavior ...

Page 13: ...tion please refer to the warranty card or GIGABYTE service website as the below link http www gigabyte com support downloads technical support aspx FAQ FAQ Frequent Asked Questions please refer to the below link http www gigabyte com support downloads faq aspx Appendix ...

Reviews: