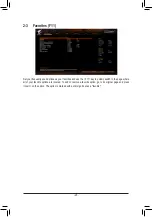
Gigabyte H470 AORUS PRO AX User Manual Download Page 35


&

Max Link Speed


Allows you to set the operation mode of the PCI Express slots to Gen 1, Gen 2, or Gen 3. Actual operation 

mode is subject to the hardware specification of each slot. 

Auto

 lets the BIOS automatically configure this 

setting. (Default: Auto)


&

3DMark01 Enhancement


Allows you to determine whether to enhance some legacy benchmark performance. (Default: Disabled)


ƒ

Trusted Computing


Enables or disables Trusted Platform Module (TPM).


ƒ

PC Health Status


&

Reset Case Open Status


Disabled   

Keeps or clears the record of previous chassis intrusion status. (Default)


Enabled   

 Clears the record of previous chassis intrusion status and the 

Case Open

 field will 

show "No" at next boot.


&

Case Open


Displays the detection status of the chassis intrusion detection device attached to the motherboard CI 

header. If the system chassis cover is removed, this field will show "Yes", otherwise it will show "No". To 

clear the chassis intrusion status record, set 

Reset Case Open Status

 to 

Enabled

, save the settings to 

the CMOS, and then restart your system.


&

 CPU Vcore/CPU VCCSA/DRAM Channel A/B V3.3V/+5V/+12V/CPU VAXG


Displays the current system voltages.


ƒ

Smart Fan 5


&

Monitor


Allows you to select a target to monitor and to make further adjustment. (Default: CPU FAN)


&

Fan Speed Control


Allows you to determine whether to enable the fan speed control function and adjust the fan speed.


Normal 


 Allows the fan to run at different speeds according to the temperature. You can adjust 

the fan speed with System Information Viewer based on your system requirements. 

(Default)


Silent   


Allows the fan to run at slow speeds.


Manual   

Allows you to control the fan speed in the curve graph.


Full Speed  

Allows the fan to run at full speeds.


&

Fan Control Use Temperature Input


Allows you to select the reference temperature for fan speed control.


&

Temperature Interval


Allows you to select the temperature interval for fan speed change.


&

Fan Control Mode


Auto   


 Lets the BIOS automatically detect the type of fan installed and sets the optimal control 

mode. (Default)


Voltage   

Voltage mode is recommended for a 3-pin fan.


PWM   


PWM mode is recommended for a 4-pin fan.


&

Fan Stop


Enables or disables the fan stop function. You can set the temperature limit using the temperature curve. 

The fan stops operation when the temperature is lower than the limit. (Default: Disabled)


&

Temperature


Displays the current temperature of the selected target area.

- 35 -

Summary of Contents for H470 AORUS PRO AX

Page 1: ...g the packaging materials of this product are recyclable and reusable GIGABYTE works with you to protect the environment For more product details please visit GIGABYTE s website H470 AORUS PRO AX User...

Page 2: ...may be reproduced copied translated transmitted or published in any form or by any means without GIGABYTE s prior written permission In order to assist in the use of this product carefully read the Us...

Page 3: ...lling the Memory 10 1 5 Installing an Expansion Card 11 1 6 Back Panel Connectors 11 1 7 Internal Connectors 14 Chapter 2 BIOS Setup 23 2 1 Startup Screen 23 2 2 The Main Menu 24 2 3 Favorites F11 25...

Page 4: ...5 5 User s Manual 5 5 One antenna KB_MS_U32 DP_HDMI USB20 U32_LAN LGA1200 ATX AUDIO ATX_12V_2X4 Intel H470 CLR_CMOS M_BIOS PCIEX1_1 PCIEX4 PCIEX16 PCIEX1_2 PCIEX1_3 F_U32 CODEC H470 AORUS PRO AX SYS_F...

Page 5: ...x16 6 SATA 6Gb s LPC Bus iTE Super I O 1 USB Type C with USB 3 2 Gen 2 1 USB 3 2 Gen 2 Type A 6 USB 3 2 Gen 1 M 2 CNVi WIFI DDI DP 1 4 M2M_SB Intel 2 5GbE LAN M2A_SB DDI HDMI 1 4 Center Subwoofer Spe...

Page 6: ...metal object to eliminate static electricity Prior to installing the motherboard please have it on top of an antistatic pad or within an electrostatic shielding container Before connecting or unplugg...

Page 7: ...support 1 x HDMI port supporting a maximum resolution of 4096x2160 30 Hz Support for HDMI 1 4 version and HDCP 2 3 1 x DisplayPort supporting a maximum resolution of 4096x2304 60 Hz Support for Displa...

Page 8: ...through the internal USB headers Internal Connectors 1 x 24 pin ATX main power connector 1 x 8 pin ATX 12V power connector 1 x CPU fan header 1 x water cooling CPU fan header 3 x system fan headers 2...

Page 9: ...ay also vary depending on motherboard specifications BIOS EasyTune Fast Boot Game Boost ON OFF Charge RGB Fusion Smart Backup System Information Viewer Support for Q Flash Plus Support for Q Flash Sup...

Page 10: ...hannel memory mode will double the original memory bandwidth Please visit GIGABYTE s website for details on hardware installation Triangle Pin One Marking on the CPU Notch Notch LGA1200 CPU Alignment...

Page 11: ...ower outlet before installing an expansion card to prevent hardware damage 1 6 Back Panel Connectors PS 2 Keyboard Mouse Port Use this port to connect a PS 2 mouse or keyboard USB 3 2 Gen 1 Port The U...

Page 12: ...fter installing the HDMI DisplayPort device make sure to set the default sound playback device to HDMI DisplayPort The item name may differ depending on your operating system Activity LED Connection S...

Page 13: ...peaker Out a a a Line In Side Speaker Out a Line Out Front Speaker Out a a a a Mic In Side Speaker Out a If you want to install a Side Speaker you need to retask either the Line in or Mic in jack to b...

Page 14: ...ent damage to the devices After installing the device and before turning on the computer make sure the device cable has been securely attached to the connector on the motherboard 1 ATX_12V_2X4 2 ATX 3...

Page 15: ...9 GND 8 Power Good 20 NC 9 5VSB stand by 5V 21 5V 10 12V 22 5V 11 12V Only for 2x12 pin ATX 23 5V Only for 2x12 pin ATX 12 3 3V Only for 2x12 pinATX 24 GND Only for 2x12 pinATX ATX_12V_2X4 Pin No Defi...

Page 16: ..._ F_USB3 F_USB30 3 _ _3 S _ D_LED1 D_LED2 Connect your addressable LED strip to the header The power pin marked with a triangle on the plug of the LED strip must be connected to Pin 1 of the addressab...

Page 17: ...ATA SSD or a SATA hard drive To create a RAID array with an M 2 PCIe SSD you must set up the configuration in UEFI BIOS mode Refer to Chapter 3 Configuring a RAID Set for instructions on configuring a...

Page 18: ...nnectors The availability of the SATA connectors may be affected by the type of device installed in the M 2 sockets The M2A_SB connector shares bandwidth with the SATA3 1 connector Refer to the follow...

Page 19: ...s front panel The LED is on when the hard drive is reading or writing data RES Reset Switch Connects to the reset switch on the chassis front panel Press the reset switch to restart the computer if th...

Page 20: ...ers conform to USB 2 0 1 1 specification Each USB header can provide two USB ports via an optional USB bracket For purchasing the optional USB bracket please contact the local dealer Pin No Definition...

Page 21: ...3 No Pin 9 IRQ 4 NC 10 NC 5 Data Input 11 NC 6 CLK 12 RST _ B B S_ B S B_ B _ S S_ _ B _ U _ B F_USB3 F F _ 0 S S _ 0 F _ F S F_ B_ F_USB30 3 _ _3 U S _ 17 QFLASH_PLUS Q Flash Plus Button Q Flash Plus...

Page 22: ...ve side and the negative side of the battery the positive side should face up Used batteries must be handled in accordance with local environmental regulations 20 CPU DRAM VGA BOOT Status LEDs The sta...

Page 23: ...aution Inadequate BIOS flashing may result in system malfunction It is recommended that you not alter the default settings unless you need to to prevent system instability or other unexpected results...

Page 24: ...r make changes F1 Show descriptions of the function keys F2 Switch to Easy Mode F3 Save the current BIOS settings to a profile F4 Load the BIOS settings from a profile created before F5 Restore the pr...

Page 25: ...favorites and use the F11 key to quickly switch to the page where all of your favorite options are located To add or remove a favorite option go to its original page and press Insert on the option The...

Page 26: ...onfigure this setting Default Auto No of CPU Cores Enabled Allows you to select the number of CPU cores to enable in an Intel multi core CPU the number of CPU cores may vary by CPU Auto lets the BIOS...

Page 27: ...to lets the BIOS automatically configure this setting Default Auto Intel R Turbo Boost Max Technology 3 0 Note Enables or disables Intel Turbo Boost Max Technology 3 0 Intel Turbo Boost Max Technology...

Page 28: ...to Package C State Limit Note Allows you to specify the C state limit for the processor Auto lets the BIOS automatically configure this setting This item is configurable only when C States Control is...

Page 29: ...memory performance and stability Auto lets the BIOS automatically configure this setting Default Auto Memory Boot Mode Provides memory detection and training methods Auto Lets the BIOS automatically c...

Page 30: ...default values by loading optimized defaults or clearing the CMOS values Vcore Voltage Mode CPU Vcore Dynamic Vcore DVID BCLK Adaptive Voltage CPU Graphics Voltage VAXG DRAM Voltage CH A B CPU VCCIO...

Page 31: ...you need an ATX power supply providing at least 1A on the 5VSB lead Disabled Disables this function Default Password Set a password with 1 5 characters to turn on the system Keyboard 98 Press POWER bu...

Page 32: ...uto lets the BIOS automatically configure this setting Default Auto RC6 Render Standby Allows you to determine whether to let the onboard graphics enter standby mode to decrease power consumption Defa...

Page 33: ...Hand off Determines whether to enable XHCI Hand off feature for an operating system without XHCI Hand off support Default Enabled USB Mass Storage Driver Support Enables or disables support for USB s...

Page 34: ...support for external SATA devices EZ RAID Allows you to quickly set up a RAID array Refer to Chapter 3 Configuring a RAID Set for instructions on configuring a RAID array Intel R Ethernet Connection T...

Page 35: ...isplays the current system voltages Smart Fan 5 Monitor Allows you to select a target to monitor and to make further adjustment Default CPU FAN Fan Speed Control Allows you to determine whether to ena...

Page 36: ...emperature exceeds the threshold BIOS will emit warning sound Options are Disabled default 60o C 140o F 70o C 158o F 80o C 176o F 90o C 194o F Fan Fail Warning Allows the system to emit warning sound...

Page 37: ...ystem Language Selects the default language used by the BIOS System Date Sets the system date The date format is week read only month date and year Use Enter to switch between the Month Date and Year...

Page 38: ...UEFI string on the boot device list To boot from an operating system that supports GPT partitioning select the device prefixed with UEFI string Or if you want to install an operating system that supp...

Page 39: ...power This item is configurable only when Fast Boot is set to Enabled or Ultra Fast Mouse Speed Allows you to set the mouse cursor movement speed Default 1 X Windows 10 Features Allows you to select t...

Page 40: ...enter the administrator password or user password at system startup and when entering BIOS Setup However the user password only allows you to make changes to certain BIOS settings but not all To cance...

Page 41: ...he device you select and select Yes to confirm Your system will restart automatically and boot from that device Save Profiles This function allows you to save the current BIOS settings to a profile Yo...

Page 42: ...re RAID make sure to set NVMe RAID mode to Enabled 2 To use the EZ RAID feature follow the steps in C 1 To configure UEFI RAID follow the steps in C 2 To enter the legacy RAID ROM refer to C 3 for mor...

Page 43: ...D ROM You ll need a discrete graphics card to enter the legacy RAID ROM utility Enter the Intel legacy RAID BIOS setup utility to configure a RAID array Skip this step and proceed with the installatio...

Page 44: ...art menu and make sure the Intel Optane Memory has been enabled The SATAcontroller mode is changed to Intel RST Premium With Intel Optane System Acceleration from AHCI mode DO NOT change your SATA con...

Page 45: ...e memory please select which one you are going to use Then select which drive to be accelerated Click Enable Follow the on screen instructions to proceed When completed restart the system 5 Launch the...

Page 46: ...double click the optical drive and execute the Run exe program Xpress Install will automatically scan your system and then list all of the drivers that are recommended to install You can click the Xp...

Page 47: ...atus does not exceed the Class B limits for radio noise emissions from digital apparatus set out in the Radio Interference Regulations of the Canadian Department of Communications This class B digital...

Page 48: ...ed of with other waste Instead the device should be taken to the waste collection centers for activation of the treatment collection recycling and disposal procedure For more information about where y...

Page 49: ...z is for indoor use only for the countries listed in the table below AT BE BG CH CY CZ DE DK EE EL ES FI FR HR HU IE IS IT LI LT LU LV MT NL PL PT RO SE SI SK TR UK Wireless module country approvals W...

Page 50: ...50...

Page 51: ...51...

Page 52: ...912 4000 FAX 886 2 8912 4005 Tech and Non Tech Support Sales Marketing https esupport gigabyte com WEB address English https www gigabyte com WEB address Chinese https www gigabyte com tw GIGABYTE eSu...

Reviews: