background image

- 18 -

GV-RX345256HI Graphics Accelerator

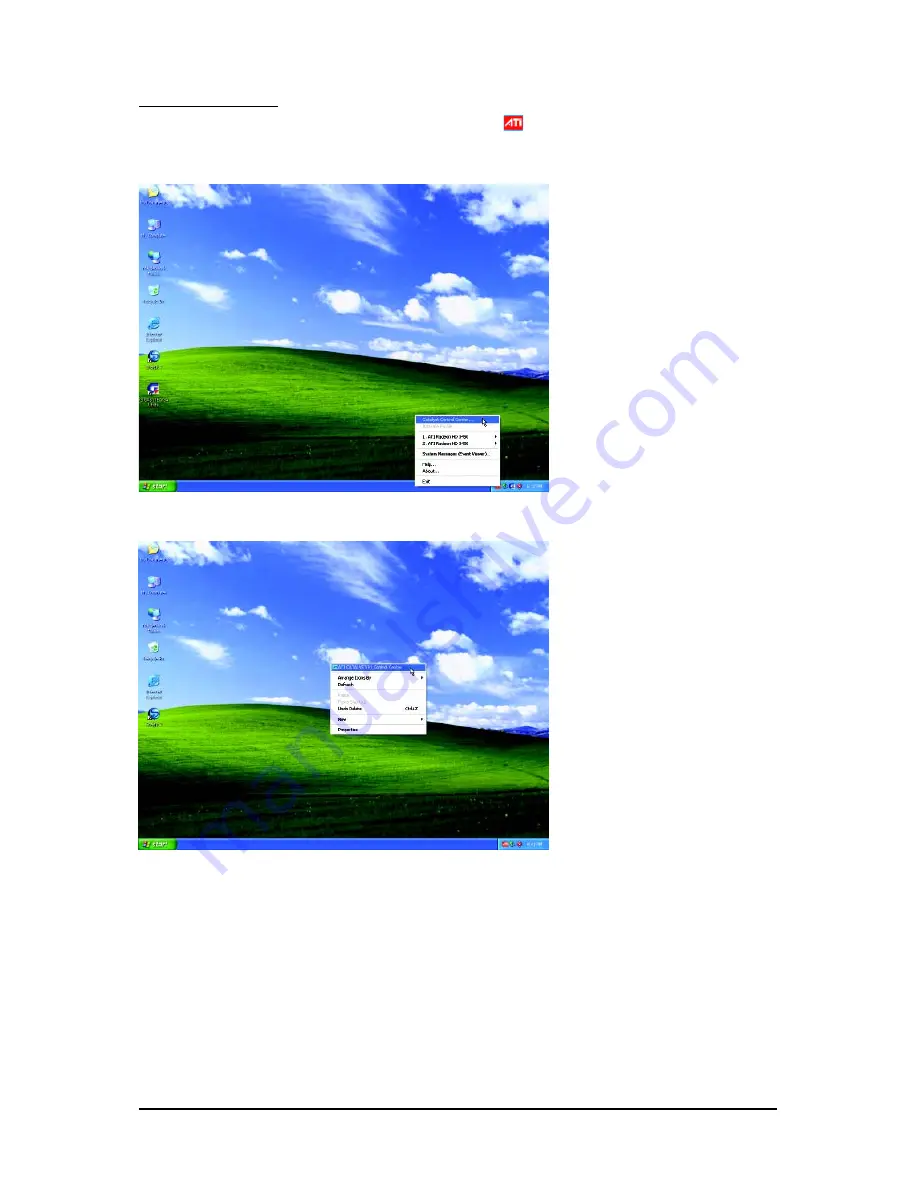
ATI Control Panel

After installation of the display driver, you will find an ATI 

 icon in your system tray. Right-click the

icon to enter the 

Catalyst

®

 Control Center.

 The 

Catalyst

®

 Control Center 

is used to configure all

your graphics card settings.

Right-click the ATI icon to enter the 

Catalyst

®

 Control Center.

Or you can right-click on the desktop and select 

ATI CATALYST(R) Control Center.

Summary of Contents for GV-RX345256HI

Page 1: ...Due to rapid change in technology some of the specifications might be out of date before publication of this this manual The author assumes no responsibility for any errors or omissions that may appe...

Page 2: ...May 28 2008 VGA Card GV RX345256HI VGA Card GV RX345256HI May 28 2008...

Page 3: ...Installation 10 3 1 Windows XP Driver and Utilities Installation 10 3 1 1 Operating System Requirements 10 3 1 2 DirectX Installation 11 3 1 3 Driver Installation 12 3 1 4 Utilities Installation 14 3...

Page 4: ...ports DirectX 10 1 Supports CrossFireTM Supports 1 D Sub connector Supports 1 HDMI connector 1 2 Minimum System Requirements Hardware Intel Pentium 4 or AMD Athlon TM 512 MB of system memory 1 GB or m...

Page 5: ...e Installation 2 Hardware Installation 2 1 Board Layout D Sub monitor Connector 15 pin HDMI Connector D Sub monitor Connector 15 pin Analog LCD Monitor Analog CRT Monitor or D Sub Output HDMI TV HDMI...

Page 6: ...on should be done on a grounded anti static mat The operator should be wearing an anti static wristband grounded at the same point as the anti static mat Inspect the card carton for obvious damage Shi...

Page 7: ...Remove the computer cover If necessary consult your computer s manual for help in removing the cover Step 3 Remove any existing graphics card from your computer To install your new graphics card Step...

Page 8: ...the computer and monitor To connect a D Sub moni tor to your graphics card use the D Sub connector To connect a HDMI monitor to your graphics card use the HDMI connector You are now ready to proceed w...

Page 9: ...er in operating system access the Catalyst Control Center please refer to Page 18 From the Catalyst Control Center enter the CrossFire menu and assure to select the Enable CrossFire checkbox Figure 2...

Page 10: ...an follow the instructions to setup your graphics card driver Please follow the subsection 3 1 3 Driver Installation to install the driver for your graphics card 3 1 Windows XP Driver and Utilities In...

Page 11: ...XP you must install DirectX first Users who run Windows XP with Service Pack 2 or above do not need to install DirectX separately Step 1 When the autorun window shows up click the Install DirectX 9 it...

Page 12: ...y step installation instructions Step 1 Found New Hardware Wizard Video Controller VGA Compatible Click the Next button to install the driver Insert the driver CD ROM that came with your graphics card...

Page 13: ...es not show up please run D setup exe Step 1 When the autorun window shows up click the Install Display Driver item Step 2 Click the Next button Step 3 Click the Yes button Step 5 Click the Finish but...

Page 14: ...then you can see the AUTORUN window If it does not show up please run D setup exe Step 1 When the autorun window shows up click the GIGABYTE Utility item Step 2 Click the Next button Step 4 Click the...

Page 15: ...ortcut of the graphics card s enhanced and other functions You may click the Display Properties item and then click Settings Click Advanced after clicking Settings Click the appropriate tab to change...

Page 16: ...the frequency you saved last time Auto Optimized The V Tuner3 clock configuration utility will determine the recommended GPU and memory clock setting your system If the utility should hang restart yo...

Page 17: ...nstallation Color Adjust Color Adjust allows you to make color adjustments such as brightness contrast and gamma values for each or all of RGB colors VGA Info VGA Info lists the relevant information a...

Page 18: ...an ATI icon in your system tray Right click the icon to enter the Catalyst Control Center The Catalyst Control Center is used to configure all your graphics card settings Right click the ATI icon to e...

Page 19: ...Sounds and Audio Devices Using the picture to the left as the example to set HDMI audio to be the default Sound Playback device in the Default device box select ATI HD Audio rear output Otherwise sel...

Page 20: ...og box shows the information of display adapter color the range of display area and the refresh rate Settings Resolutions and Color Quality for Windows You may adjust the screen resolution and color q...

Page 21: ...ew and Advanced View at any time To access more settings in Basic View click Basic and then click Next Easy Setup Wizards Choose a wizard from the central list and click Go for step by step assistance...

Page 22: ...or the new file If you wish to change the name of the new file enter the new name in the Output File area Finally click Next to start file conversion The video file has been successfully converted Set...

Page 23: ...Setup This option allows you to configure your desktop including changing desktop resolution and desk top mode setting up extended desktop requires more than one display and rotating desktop image to...

Page 24: ...anced features on each page The left navi gation pane displays a tree view that lists all the advanced features The Advanced view is rec ommended for experienced users Custom View The Custom view allo...

Page 25: ...aphics card If there is more than one graphics card installed in your computer you need to select the appropriate card before creating loading or activating a Profile Preferences Properties The Prefer...

Page 26: ...llows you to access the comprehensive online help register your product or generate a problem report should you require technical support The Catalyst Control Center Help feature offers the following...

Page 27: ...Direct 3D applications Use 3D Refresh Rate Override to set a refresh rate of your choice when a full screen application or game has a default refresh rate that is lower than optimal Choose one of the...

Page 28: ...by the attached monitor to determine the limits for the resolution and refresh rate Adjustments Use Monitor Adjustments to resize and reposi tion the computer desktop on your monitor s display screen...

Page 29: ...mering and pixelation problems that are common in rendered 3D images Rather than determining the color to display for each pixel by sampling a single location at the pixel s center anti aliasing sampl...

Page 30: ...mensional perspective and fade away into the background It works best when used in conjunction with Mipmapping Anisotropic Filtering can be set to favor either an increase in system processing perform...

Page 31: ...t s surface as it moves into the background A series of low and high resolution texture maps are stored in memory and selectively used to create the object s surface depending on what level of detail...

Page 32: ...cation Pro grammable Interfaces API These settings are provided for resolving certain incompatibilities within 3D applications that use one of these APIs Use this dialog when you know which type of AP...

Page 33: ...control To adjust the overall brightness use the Brightness control and the overall contrast use the Contrast control AvivoTM Video Presets To quickly adjust your video settings choose one of the vid...

Page 34: ...the deinterlacing settings by checking the Use automatic deinterlacing item The bar determines how the two inter laced video fields are converted into a non interlaced form Note These settings will on...

Page 35: ...cover attempts to reset the graphics processor so that you are able to continue using your computer without interruption or loss of data In most cases VPU Recover will be able to reset the graphics pr...

Page 36: ...ese speeds to meet your specific requirements Finally Overdrive can be configured to run when the computer is booted or only when running 3D applications Note If your computer cannot restart after set...

Page 37: ...ufacturer NOTE Some manufacturers do not allow the built in graphics to be disabled or to become the secondary display Make sure you selected the appropriate display device and graphics card when you...

Page 38: ...960 160 3 3 3 1280 x 1024 120 3 3 3 1440 x 900 60 3 3 3 1600 x 1200 100 3 3 3 1680 x 1050 100 3 3 3 1792 x 1344 85 3 3 3 1800 x 1440 70 3 3 3 1856 x 1392 75 3 3 3 1920 x 1080 75 3 3 3 1920 x 1200 85 3...

Page 39: ...ABYTE are continuing our efforts to develop products that do not use internationally banned toxic chemicals Waste Electrical Electronic Equipment WEEE Directive Statement GIGABYTE will fulfill the nat...

Page 40: ...used batteries properly With your help we can reduce the amount of natural resources needed to produce electrical and electronic equipment minimize the use of landfills for the disposal of end of life...

Reviews: