Gigabyte GV-RX16P256D-RH Manual Download Page 25

Software Installation

- 21 -

English

3.1.6. Display Properties pages

To access Display Properties pages, right-click the GIGABYTE icon on the taskbar and
select 

Display Properties

 or right-click on Desktop and then select 

Properties

. The

Display Properties 

dialog box shows the information of display adapter, color, the range

of display area, and the refresh rate.

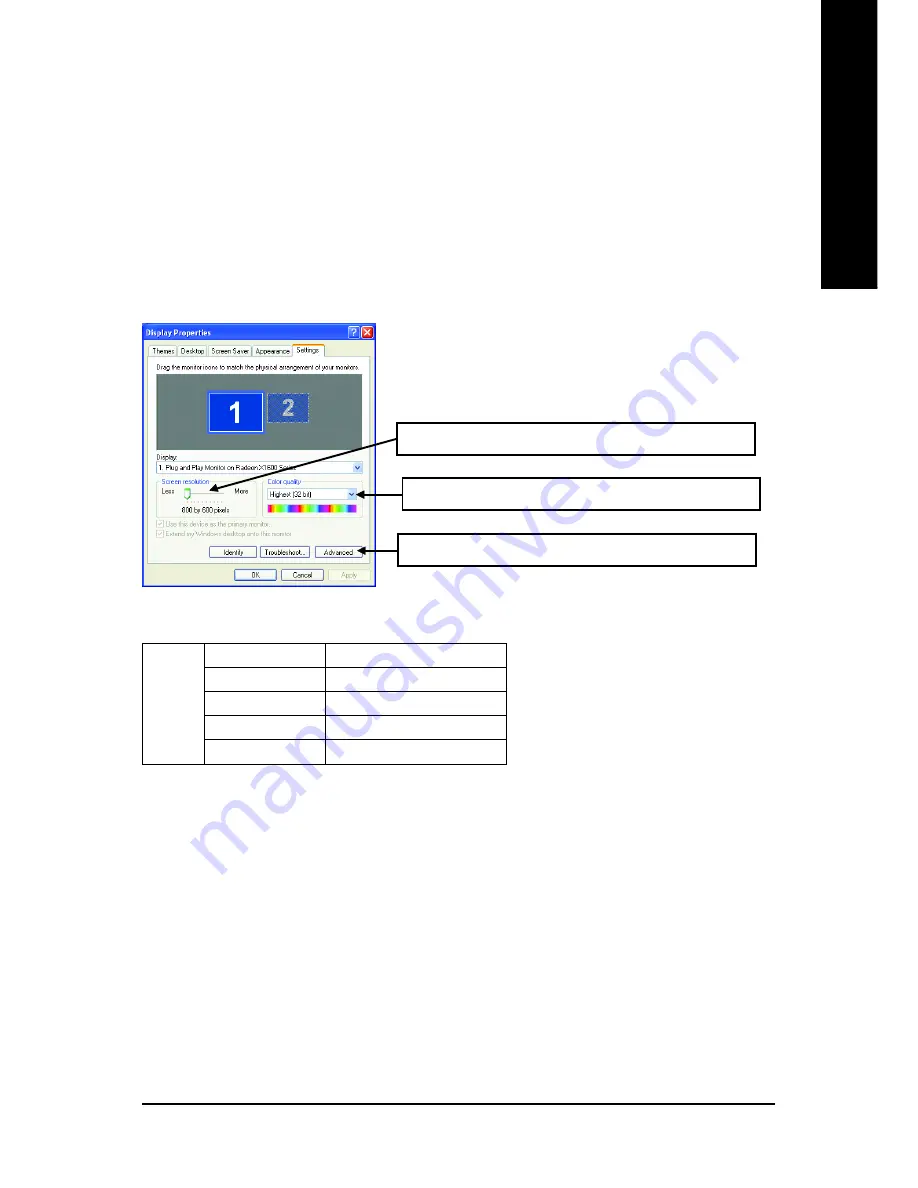
Settings (Resolutions and Color depth for Windows)

You may adjust the screen resolution and color quality settings in this dialog box.

You can click the item to change the color quality.

Click the 

Advanced 

button for adapter and setting.

You can move the slider to change the resolution.

(Note) The CRT+TV configuration requires that you connect your CRT display to the DVI connector on

the card using the DVI-I to VGA adapter to ensure normal operation.
This configuration is not supported if the CRT monitor is directly attached to the VGA port on the
card.

Display
Matrix

Model

GV-RX16P256D(DE)-RH

CRT+TV

(Note)

Yes

CRT+DVI

Yes

DVI+TV

Yes

DVI+TV+CRT

No

Summary of Contents for GV-RX16P256D-RH

Page 1: ...Dec 9 2005 VGA Card GV RX16P256D RH...

Page 2: ...VGA Card Dec 9 2005 GV RX16P256D RH...

Page 3: ...Jan 9 2006 VGA Card GV RX16P256DE RH...

Page 4: ...VGA Card Jan 9 2006 GV RX16P256DE RH...

Page 5: ...might be out of date before publication of this booklet The author assumes no responsibility for any errors or omissions that may appear in this document nor does the author make a commitment to updat...

Page 6: ...and Utilities Installation 11 3 1 1 Operating System Requirement 11 3 1 2 DirectX Installation 12 3 1 3 Driver Installation 13 3 1 4 Utilities on Driver CD 15 3 1 5 Taskbar Icon 18 3 1 6 Display Prope...

Page 7: ...upportsAV S Video and HDTV output Supports TV Out connector Supports DVI I connector 1 2 Minimum System Requirement Intel Pentium 4 or AMD Athlon class processor or higher One PCI Express x 16 slot Op...

Page 8: ...onitor Connector 15 pin DVI I Connector Analog LCD Monitor Analog Monitor OR VGA Output Analog LCD Monitor Digital LCD Monitor DVI Output DVI I to D Sub Connector VGA Output NTSC PAL TV Projector HDTV...

Page 9: ...Connector Analog LCD Monitor Analog Monitor OR VGA Output Analog LCD Monitor Digital LCD Monitor DVI Output DVI I to D Sub Connector VGA Output NTSC PAL TV Projector HDTV S Video Output Pb AV Output P...

Page 10: ...nts are separated from the system The card contains sensitive electric components which can be easily damaged by static electricity so the card should be left in its original packing until it is insta...

Page 11: ...Power off the computer and monitor then disconnect the display cable from the back of your computer 2 Remove the computer cover If necessary consult your computer s manual for help in removing the co...

Page 12: ...ector as shown below You are now ready to proceed with the installation of the graphics card driver Please refer to next chapter for detailed instructions To TV VCR To VGA Monitor To Flat Panel Displa...

Page 13: ...gcolor Y Green Pr Red Pb Blue 2 Connecting S Video If your TV has a S Video connection connect the S Video cable from your TV to the S Video Out port on the adapter 3 ConnectingAV Output If your TV ha...

Page 14: ...soundless optimization High performance heatpipe with sintered powder wicks Design for heavy 3D performance loading Integratedarchitecturedesign Cool Air Hot Air TheSilent PipeIItechnologyfeaturesthe...

Page 15: ...cs card driver Please follow the subsection 3 1 3 Driver installation to install the driver for your graphics accelerator 3 1 Windows XP Driver and Utilities Installation 3 1 1 Operating System Requir...

Page 16: ...s 2000 or Windows XP you must install DirectX first Users who run Windows XP with Service Pack 2 or above do not need to install DirectX separately Step 1 When autorun window show up click the Install...

Page 17: ...tallation guide Step 1 Found new hardware wizard Video controller VGA Compatible Click the Next button to install the driver There is a driver CD disk that came with your graphics accelerator please i...

Page 18: ...up please run D setup exe Click the Install Display Drivers Radeon X1600 Series item Step 1 When autorun window show up click the Install Display Drivers Radeon X1600 Series item Step 2 Click Next but...

Page 19: ...tart computer ThentheV Tuner2installationiscompleted Step 2 Click the Next button Click the GIGABYTE Utility item 3 1 4 Utilities on Driver CD Insert the driver CD disk into your CD ROM and then you c...

Page 20: ...ep 2 Click the Next button Click the Hydravision Install item Step 3 Click the Yes button Step 4 Click the Next button Windows installings the components Step 6 Click the Finish button to restart comp...

Page 21: ...Tuner 2 lets you adjust the working frequency of the graphic engine and video memory Core Clock and Memory Clock Adjust core speed Displays core clock status Displays memory clock status Adjustmemory...

Page 22: ...posed of shortcut of the graphics card s enhanced and other functions You may click the Display Properties item and then click Settings Click Advanced after clicking Settings Click the appropriate tab...

Page 23: ...19 English VGA Information VGA Info lists the relevant information about your card Color Adjust Color Adjust allows you to make color adjustments such as brightness contrast and gamma values for each...

Page 24: ...ties Settings Advanced ATI CATALYST Control Center tab and press ATI CATALYST tm Control Center button refer to Fig 2 Fig 1 Fig 2 HYDRAVISIONTM HYDRAVISION has everything you need to manage increased...

Page 25: ...dows You may adjust the screen resolution and color quality settings in this dialog box You can click the item to change the color quality Click the Advanced button for adapter and setting You can mov...

Page 26: ...each page The left navigation pane displays a tree view that lists all the advanced features The Advanced view is recommended for experienced users Custom View The Custom view allows you to display on...

Page 27: ...The Preferences page helps to restore defaults change skins and update the CATALYST Control Center The CATALYST Control Center Preferences page contains the following options Note A profile applies to...

Page 28: ...a problem report should you require technical support The CATALYST Control Center Help feature offers the following options Help for this Page Help Contents Search Help Go to ATI com About CATALYST C...

Page 29: ...ary devices such as a TV or use the Wizard to help you config ure your display s Displays Manager Advanced View Use Display Manager Advanced View to set your desktop resolution the display refresh rat...

Page 30: ...vided by the attached monitor to determine the limits for the resolution and refresh rate AvivoTM Color Use AvivoTM Color for ATI graphics cards that supports per display color settings Indep endently...

Page 31: ...for any type of 3D application The slider enables you to adjust for overall system performance overall 3D image quality or a balance between the two HDTV Support Use HDTV Support when your CRT or DFP...

Page 32: ...automatically adjust to the application s requirements Anisotropic Filtering Anisotropic filtering is a technique that preserves detail on surfaces that have three dimensional perspective and fade aw...

Page 33: ...round A series of low and high resolution texture maps are stored in memory and selectively used to create the object s surface depending on what level of detail is needed Mipmap detail level can be s...

Page 34: ...the shader programs more complex effects can be created to accurately model the visual properties of materials and surfaces including hair skin wood and water All Settings TheAll Settings page combin...

Page 35: ...games Use the Color Correction Images to e preview the changes before applying them The Color curve is a graphical representation of all the values of gamma brightness or contrast The color curve line...

Page 36: ...configure gamma brightness and hue Use Theater Mode to set aspect ratio and overlay display mode Preview your changes before applying them Standard Settings To quickly adjust your video settings choo...

Page 37: ...river to select the best deinterlacing scheme for different video sources and sizes Bob deinterlacing when selected removes every other line of the video image and is recommended for motion video Adap...

Page 38: ...cover will switch the computer to software rendering mode allowing you to save any work in progress before restarting the computer Enable VPU Recover Prepare an error report if VPU Recover is activate...

Page 39: ...indow will show up Click Install Display Driver item and follow the wizard to install the driver If Windows does not show the CD automatically please run following steps 1 Click the Start button on th...

Page 40: ...ual or manufacturer NOTE Some manufacturers do not allow the built in graphics to be disabled or to become the secondary display Make sure you selected the appropriate display device and graphics card...

Page 41: ...your computer 5 1 2 Reflash BIOS in Windows mode 1 After installing the display drivers you will find a GIGABYTE icon in the lower right corner of the Taskbar Right click to select the VGA utility 2...

Page 42: ...3 1280 x 1024 120 3 3 3 1600 x 1200 100 3 3 3 1792 x 1344 85 3 3 3 1800 x 1440 70 3 3 3 1856 x 1392 75 3 3 3 1920 x 1080 75 3 3 3 1920 x 1200 85 3 3 3 1920 x 1440 75 3 3 3 2048 x 1536 66 3 3 3 Radeon...

Reviews: