background image

- 25 -

Software Installation

„

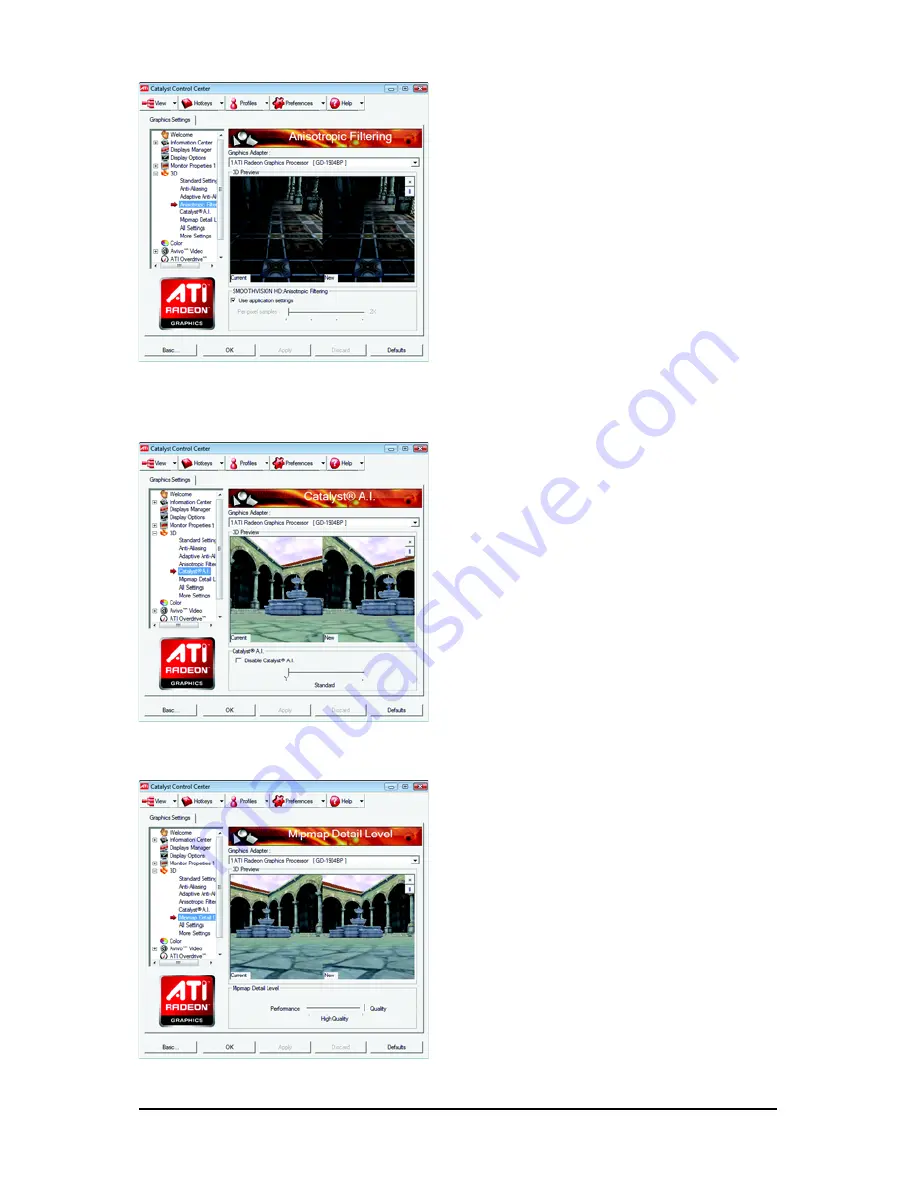
Anisotropic Filtering

Anisotropic Filtering is a technique that preserves
detail on surfaces that have three-dimensional per-
spective and fade away into the background. It works
best when used in conjunction with Mipmapping.
Anisotropic Filtering can be set to favor either an
increase in system processing performance or im-
proved image quality:
• Setting for performance is best used with applica-
tions that display objects with smooth, simple surfaces,
like those seen in CAD applications.
• Setting for quality is best used with applications that
display highly detailed scenes, backgrounds, and
textured objects, like those seen in 3D games.
• If you are unsure how to configure anisotropic
filtering, use the Use application settings option. Your
display will automatically adjust to the application's
requirements.

„

CATALYST

®

 A.I.

Catalyst

®

 A.I. makes use of ATI's new texture

analyzer technology to optimize performance in
3D applications while maintaining or even im-
proving image quality. It analyzes individual
textures as they are loaded to determine the
best and fastest way to display them.

„

Mipmap Detail Level

Mipmapping is a texturing technique that preserves
the detail on a 3D object's surface as it moves into the
background. A series of low- and high-resolution
texture maps are stored in memory and selectively
used to create the object's surface, depending on
what level of detail is needed.
Mipmap detail level can be set to favor either an in-
crease in system processing performance or im-
proved image quality:
• Setting for performance is best used when the 3D
image is animated and smoothness of motion is the
most important consideration.
• Setting for quality is best used when high surface
detail is required, especially if the animated object
rotates or moves into the background.

Summary of Contents for GV-R465-1GI

Page 1: ...rapid change in technology some of the specifications might be out of date before publication of this this manual The author assumes no responsibility for any errors or omissions that may appear in th...

Page 2: ...Oct 9 2008 VGA Card GV R465 1GI VGA Card GV R465 1GI Oct 9 2008...

Page 3: ...5 2 2 Hardware Installation 7 3 SoftwareInstallation 9 3 1 Driver and Utility Installation 9 3 1 1 Driver Installation 9 3 1 2 GIGABYTE Gamer HUD Lite on Driver Disk 11 3 2 Taskbar Icon 13 3 3 Display...

Page 4: ...uirements Hardware Intel Pentium 4 CoreTM 2 or AMD AthlonTM PhenomTM 1 GB or more of system memory for best performance Optical drive for software installation CD ROM or DVD ROM drive A power supply t...

Page 5: ...on 2 Hardware Installation 2 1 Board Layout DVI I Connector AnalogLCDMonitor AnalogMonitor or DVI I to D Sub Adapter Digital LCD Monitor DVI Output D Sub Output HDMI TV HDMI TV HDMI Connector HDMI Con...

Page 6: ...n should be done on a grounded anti static mat The operator should be wearing an anti static wristband grounded at the same point as the anti static mat Inspect the card carton for obvious damage Ship...

Page 7: ...the card in place and replace the computer cover Makesurethatthegoldedgeconnectorofthegraphicscardissecurely inserted Step 3 Plug the display cable into your card then turn on the computer and monitor...

Page 8: ...ystem when an ATI CrossFireX configuration is detected for the first time by the ATI Catalyst display driver ATI CrossFireX support is automatically enabled and the best possible GPU combination is se...

Page 9: ...perating system insert the driver disk into your optical drive The driver Autorun screen is automatically displayed which looks like that shown in the screen shot below If the driver Autorun screen do...

Page 10: ...ator Setp 4 Click the Express or Custom icon and then click Next Step 5 Click the Accept button The system is installing the components Step 6 Click the Finish button to restart the computer Then the...

Page 11: ...YTE Gamer HUD Lite item Step 3 Click the Next button Step 5 Click the Finish button Then the installation of the GIGABYTE Gamer HUD Lite is completed Step 4 Click the Install button The system is inst...

Page 12: ...le Incorrectly doing overclock overvoltage may result in damage to your system and reduce the useful life of the system components Automatically optimizes the frequency Button Function Default Note Al...

Page 13: ...the notification area Right click the icon to enter the ATI Catalyst Control Center The ATI Catalyst Control Center is used to configure all your graphics card settings Right click the ATI icon to en...

Page 14: ...l Hardware and Sound Manage audio devices Using the picture to the left as the example to set HDMI audio to be the default Sound Playback device select Digital Output Device HDMI Otherwise select Digi...

Page 15: ...change the color quality Click the Advanced button for advanced settings 3 3 Display Properties Pages Display Settings Resolutions and Color Quality for Windows To access Display Settings page right c...

Page 16: ...ic View and Advanced View at any time To access more settings in Basic View click Basic and then click Next Easy Setup Wizards Choose a wizard from the central list and click Go for step by step assis...

Page 17: ...e new name in the Output File area Finally click Next to start file conversion The video file has been successfully converted Setup my display configuration This wizard allows you to configure display...

Page 18: ...splay Setup This option allows you to configure your desktop including changing desktop resolution and desk top mode setting up extended desktop requires more than one display and rotating desktop ima...

Page 19: ...features on each page The left navi gation pane displays a tree view that lists all the advanced features The Advanced view is rec ommended for experienced users Custom View The Custom view allows you...

Page 20: ...fic graphics card If there is more than one graphics card installed in your computer you need to select the appropriate card before creating loading or activating a Profile Preferences Properties The...

Page 21: ...llows you to access the comprehensive online help register your product or generate a problem report should you require technical support The Catalyst Control Center Help feature offers the following...

Page 22: ...e not supported on systems running Windows Vista Note On systems Windows XP this page will show up the 3D Refresh Rate Override item Use 3D Re fresh Rate Override to set a refresh rate of your choice...

Page 23: ...r to determine the limits for the resolution and re fresh rate Adjustments Use Monitor Adjustments to resize and reposi tion the computer desktop on your monitor s display screen You can also adjust t...

Page 24: ...ixel s center anti aliasing samples multiple locations within each pixel and blends the results together to pro duce the final color Anti Aliasing can be set to favor either system pro cessing perform...

Page 25: ...e application s requirements CATALYST A I Catalyst A I makes use of ATI s new texture analyzer technology to optimize performance in 3D applications while maintaining or even im proving image quality...

Page 26: ...patibilities within 3D applica tions that use one of these APIs Use this dialog when you know which type of API Direct 3D or OpenGL your 3D application uses and you want to select a particular API spe...

Page 27: ...ightness Contrast Saturation and Tint for video playback Note Certain video formats do not support these adjustments These settings will only affect ap plications with video overlay support Advanced C...

Page 28: ...video overlay support TheaterMode Use Theater Mode to change the way you view streaming video Note These settings will only affect applications with video overlay support Extended Desktop Mode is not...

Page 29: ...eds to meet your specific requirements Finally Overdrive can be configured to run when the computer is booted or only when running 3D applications Note If your computer cannot restart after setting a...

Page 30: ...or manufacturer NOTE Some manufacturers do not allow the built in graphics to be disabled or to become the secondary display Make sure you selected the appropriate display device and graphics card whe...

Page 31: ...x 1024 120 3 3 3 1440 x 900 60 3 3 3 1600 x 1200 100 3 3 3 1680 x 1050 100 3 3 3 1792 x 1344 85 3 3 3 1800 x 1440 70 3 3 3 1856 x 1392 75 3 3 3 1920 x 1080 75 3 3 3 1920 x 1200 85 3 3 3 1920 x 1400 7...

Page 32: ...over we at GIGABYTE are continuing our efforts to develop products that do not use internationally banned toxic chemicals Waste Electrical Electronic Equipment WEEE Directive Statement GIGABYTE will f...

Page 33: ...s properly With your help we can reduce the amount of natural resources needed to produce electrical and electronic equipment minimize the use of landfills for the disposal of end of life products and...

Page 34: ...34 GV R465 1GI Graphics Accelerator...

Reviews: