Gigabyte GV-N26UD-896M User Manual Download Page 23

- 23 -

Software Installation

Video & Television

Video and television features are similar to those for analog for optimal viewing. Tasks in the Video &
Television pages allow you to do the following:
• Adjust your television picture quality and video color settings for the best possible viewing in its

environment.

• Change the position and size of the desktop video to best fit your television screen.

„

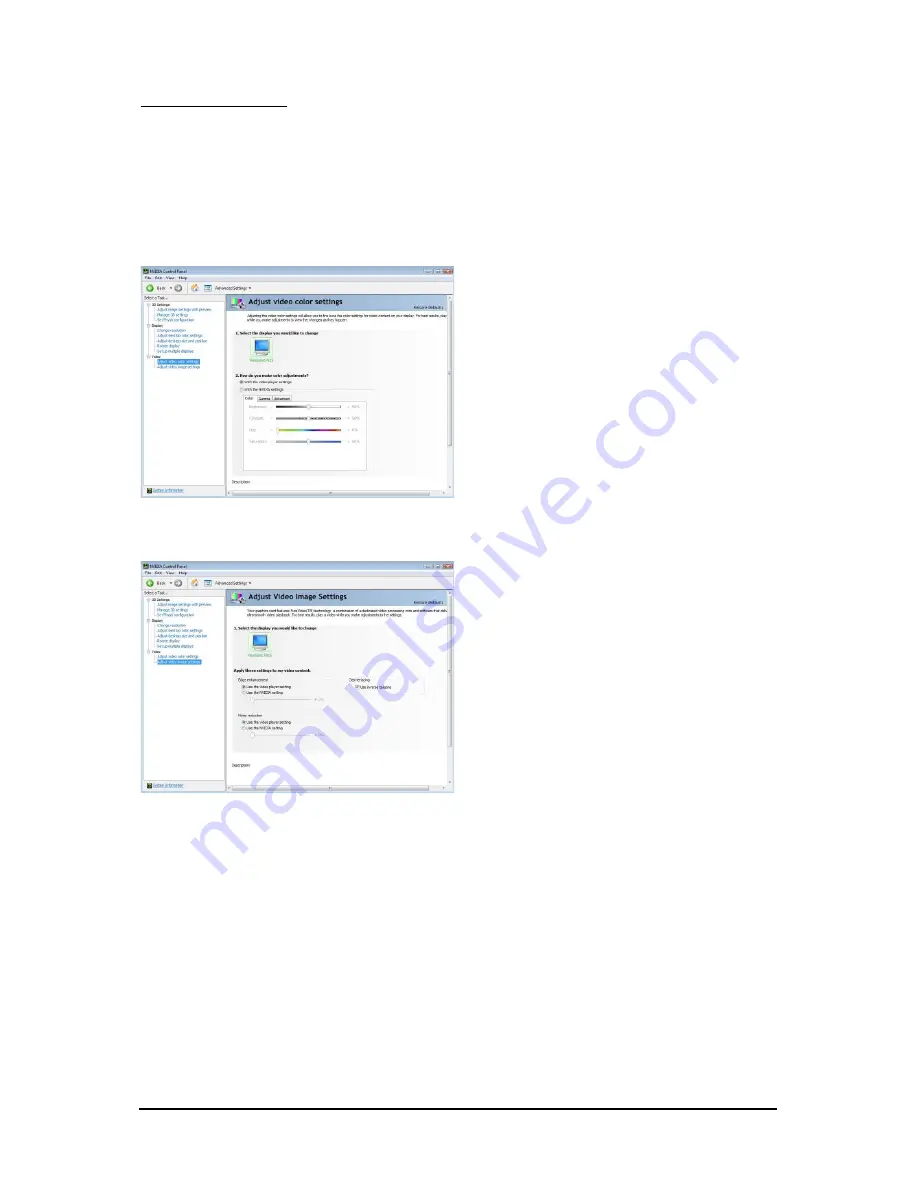
Adjust Video Color Settings

Use the controls on this page to fine tune the
color settings for video content on your display.
Select one of the test images to monitor your
changes. For best results, play a video while
you make adjustment to view the changes as
they happen.

„

Adjust Video Image Settings

Use the controls on this page to fine tune the
image settings for video content on your
display. You can choose to use inverse
telecine, adjust edge sharpness, or apply noise
filtering. For best results, play a video while
you make adjustment to view the changes as
they happen.

Note:
Support for some features under Windows Vista is
in development and may not be available with
your ForceWare graphics driver version. Consult
the release notes for updated information on
supported features.

Summary of Contents for GV-N26UD-896M

Page 1: ...warranty of this card Due to rapid change in technology some of the specifications might be out of date before publication of this this manual The author assumes no responsibility for any errors or om...

Page 2: ...VGA Card GV N26UD 896M Rev1 0 Mar 02 2011 VGA Card GV N26UD 896M Rev1 0 Mar 02 2011...

Page 3: ...VGA Card GV N26UD 896M Rev2 0 Mar 02 2011 VGA Card GV N26UD 896M Rev2 0 Mar 02 2011...

Page 4: ...10 3 SoftwareInstallation 13 3 1 Driver and Utility Installation 13 3 1 1 Driver Installation 13 3 2 Display Properties Pages 15 3 3 Accessing NVIDIA Control Panel 16 4 Troubleshooting Tips 24 5 Appen...

Page 5: ...GB or more for best performance Optical drive for software installation CD ROM or DVD ROM drive Operating System Windows Vista Windows XP with Service Pack 2 SP2 Windows XP Professional x64 Edition SL...

Page 6: ...rdware Installation 2 1 Board Layout DVI I Connector 1 DVI I Connector 2 AnalogLCDMonitor AnalogMonitor or DVI I to D Sub Adapter optional Digital LCD Monitor DVI Output D Sub Output DVI I Connector 1...

Page 7: ...D Sub monitor Connector 15 pin HDMI Connector DVI I Connector AnalogLCDMonitor AnalogMonitor or Digital LCD Monitor DVI Output D Sub Output DVI I to D Sub Adapter optional HDMI TV AnalogLCDMonitor Ana...

Page 8: ...ower connectors on the adapter are connected to the same system power supply cable Correct Connection The two 4 pin power connectors on the adapter are connected to two independent system power supply...

Page 9: ...d from the system The card contains sensitive electric components which can be easily damaged by static electricity so the card should be left in its original packing until it is installed Unpacking a...

Page 10: ...lace and replace the computer cover After installation remember to connect the power cable to your graphics card or the system will not boot refer to page 6 to see the details Do not touch the card wh...

Page 11: ...for detailed instructions Step 4 with optional adapter To connect an HDMI TV follow the steps below to enable the S PDIF in function for the graphics card 1 Connect the provided S PDIF cable to the gr...

Page 12: ...ides two three x16 PCI Express slots to scale graphics performance The picture below shows that two and three graphics cards are linked in parallel in an SLI configuration SLI bridge connector provide...

Page 13: ...allation After installing the operating system insert the driver disk into your optical drive The driver Autorun screen is automatically displayed which looks like that shown in the screen shot below...

Page 14: ...4 GV N260 Series Graphics Accelerator The system is installing the components Step 4 Click the Finish button to restart the computer Then the driver installation is completed Step 3 Click the Yes butt...

Page 15: ...e Advanced button for advanced settings 3 2 Display Properties Pages Display Settings Resolutions and Color Quality for Windows To access Display Settings page right click on desktop and select Person...

Page 16: ...ay Settings you ll see the Generic PnP Monitor and NVIDIA GeForce GTX 260 Properties dialog box Click the GeForce GTX 260 tab to access the NVIDIA Control Panel 3 3 Accessing NVIDIA Control Panel Afte...

Page 17: ...dvanced Settings The following pages provide details on configuring advanced settings In the NVIDIA Control Panel select a category to alter specific NVIDIA display settings The categories are 3D Sett...

Page 18: ...t of 3D settings for a particular game or application Note 1 This item is present only in Advanced view mode 3D Settings Tasks in the 3D Settings pages allow you to do the following Change the image a...

Page 19: ...sks in the Display pages allow you to do the following Move CRT screen position Change resolution Adjust desktop color settings Rotate display Manage custom resolutions Note Set up multiple displays C...

Page 20: ...Video and TV section from the Start page RotateDisplay The NVIDIA Rotate features enable you to change the orientation of your desktop to portrait landscape and inverted modes This is use ful if you...

Page 21: ...one large horizontal desktop Horizontal span Note As one large vertical desktop Vertical span Note 1 The same on both display Clone Clone mode indicates that both displays in the display pair show ima...

Page 22: ...zontal span Note 1 Horizontal Span mode indicates that both displays in the display pair function as one wide virtual desktop The width of each display is half the width of the total virtual desktop w...

Page 23: ...ideo content on your display Select one of the test images to monitor your changes For best results play a video while you make adjustment to view the changes as they happen Adjust Video Image Setting...

Page 24: ...or to become the secondary display Make sure you selected the appropriate display device and graphics card when you install the graphics driver Restart your computer Press F8 on your keyboard after sy...

Page 25: ...may need a startup disk to restart the computer in MS DOS mode 3 Change the command prompt to A 4 To back up the current BIOS at the A prompt type BIOS flash utility name s BIOS file name example gvf...

Page 26: ...3 640 x 400 16 10 60 75 3 3 3 640 x 480 60 240 3 3 3 720 x 480 60 3 3 3 720 x 576 50 60 3 3 3 800 x 600 60 240 3 3 3 848 x 480 60 240 3 3 3 960 x 600 16 10 60 240 3 3 3 1024 x 768 60 200 3 3 3 240 3...

Page 27: ...dard mode High mode True mode 1600 x 1200 60 100 3 3 3 120 3 3 X 1920 x 1080 16 9 60 85 3 3 3 100 3 3 X 1920 x 1200 16 10 60 85 3 3 3 100 3 3 X 1920 x 1440 60 85 3 3 3 2048 x 1536 60 85 3 3 3 2560 x 1...

Page 28: ...eover we at GIGABYTE are continuing our efforts to develop products that do not use internationally banned toxic chemicals Waste Electrical Electronic Equipment WEEE Directive Statement GIGABYTE will...

Page 29: ...s properly With your help we can reduce the amount of natural resources needed to produce electrical and electronic equipment minimize the use of landfills for the disposal of end of life products and...

Page 30: ...30 GV N260 Series Graphics Accelerator...

Page 31: ...31 Appendix...

Page 32: ...32 GV N260 Series Graphics Accelerator...

Page 33: ...33 Appendix...

Page 34: ...34 GV N260 Series Graphics Accelerator...

Page 35: ...35 Appendix...

Page 36: ...36 GV N260 Series Graphics Accelerator...

Reviews: