


Configuring SATA Hard Drive(s)
- 74 -
Step 2:
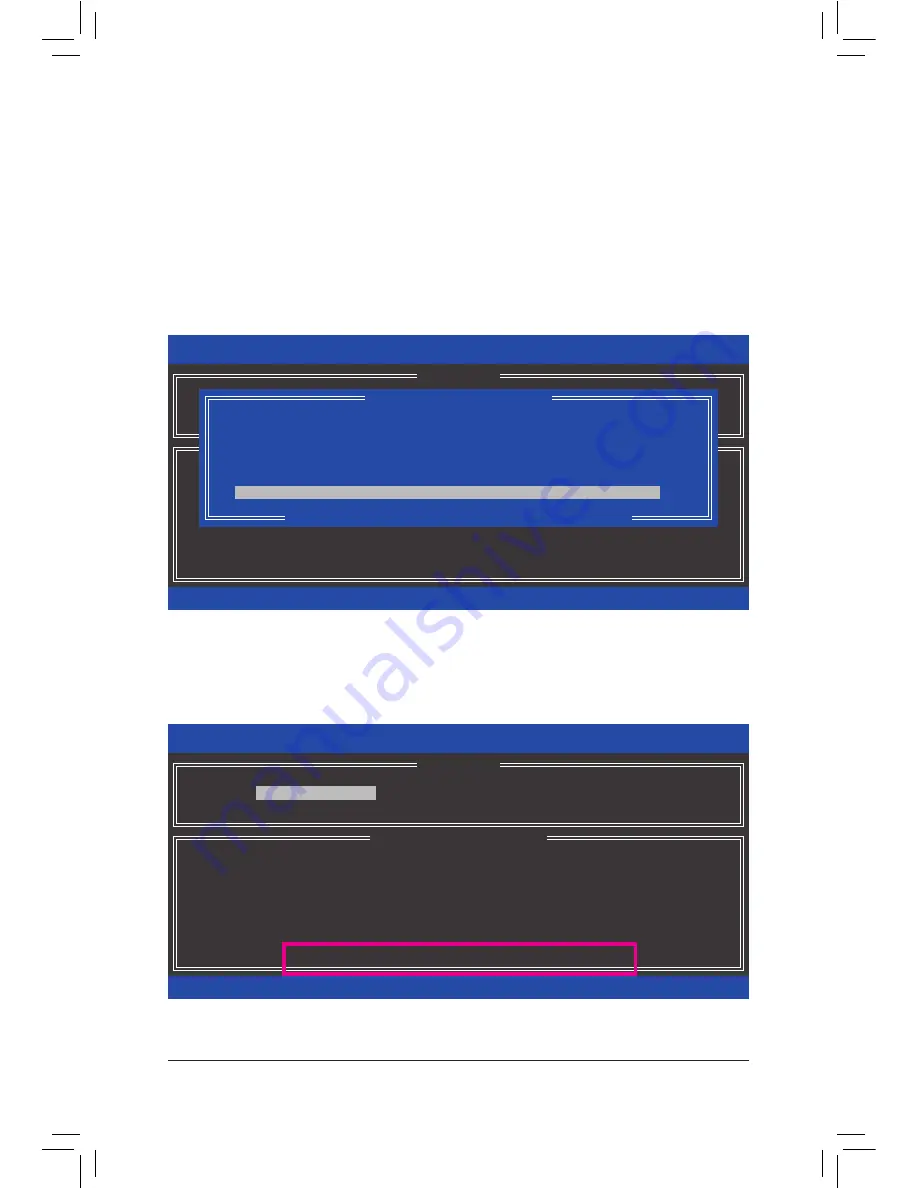
Select the new hard drive to add into the array to be rebuilt and press <Enter>. The following screen appears,
indicating that an automatic rebuild will be performed after you enter the operating system. If you do not enable
automatic rebuild on this stage, you have to manually rebuild the array in the operating system (see the next
page for more details).
Intel(R) Rapid Storage Technology - Option ROM - 13.0.0.2075
Copyright (C) Intel Corporation. All Rights Reserved.
3. Reset Disks to Non-RAID
4. Exit
RAID Volumes :
None defined.
Physical Disks :
ID
Drive Model
Serial #
Size
Type/Status(Vol ID)
0
Hitachi HDS72105
JP1532FR3BWV7K
465.7GB
Member Disk (0)
1
Hitachi HDS72105
JP1532FR3ABMPK
465.7GB
Non-RAID Disk
[
hi
]-Select
[ESC]-Exit
[ENTER]-Select Menu
[ DISK/VOLUME INFORMATION ]
[ MAIN MENU ]
1. Create RAID Volume
2. Delete RAID Volume
[
DEGRADED VOLUME DETECTED
]
[
hi
]-Previous/Next [ENTER]-Select [ESC]-Exit
"Degraded volume and disk available for rebuilding detected. Selecting
a disk initiates a rebuild. Rebuild completes in the operating system.
Select the port of the destination disk for rebuilding (ESC to exit):
ID Drive Model
Serial #
Size
1
Hitachi HDS721050CLA
JP1532FR3ABMPK
465.7GB
Intel(R) Rapid Storage Technology - Option ROM - 13.0.0.2075
Copyright (C) Intel Corporation. All Rights Reserved.
RAID Volumes :
ID
Name
Level
Strip
Size
Status
Bootable
0
Volume0
RAID1(Mirror)
N/A
465.7GB
Rebuild
Yes
Physical Devices :
ID
Devices Model
Serial #
Size
Type/Status(Vol ID)
0
Hitachi HDS72105
JP1532FR3BWV7K
465.7GB
Member Disk (0)
1
Hitachi HDS72105
JP1532FR3ABMPK
465.7GB
Member Disk (0)
[
hi
]-Select
[ESC]-Exit
[ENTER]-Select Menu
[ DISK/VOLUME INFORMATION ]
Volumes with "Rebuild" status will be rebuilt within the operating system.
[ MAIN MENU ]
4. Recovery Volume Options
5. Acceleration Options
6. Exit
1. Create RAID Volume
2. Delete RAID Volume
3. Reset Disks to Non-RAID
B. Rebuilding an Array
Rebuilding is the process of restoring data to a hard drive from other drives in the array. Rebuilding applies only
to fault-tolerant arrays such as RAID 1, RAID 5 or RAID 10 arrays. The procedures below assume a new drive
is added to replace a failed drive to rebuild a RAID 1 array. (Note: The new drive must have equal or greater
capacity than the old one.)
Turn off your computer and replace the failed hard drive with a new one. Restart your computer.
•
Enabling Automatic Rebuild
Step 1:
When the message "Press <Ctrl-I> to enter Configuration Utility" appears, press <Ctrl> + <I> to enter the RAID
Configuration Utility. The following screen appears after you enter the RAID Configuration Utility.
Summary of Contents for GA-Z97X-UD3H
Page 1: ...GA Z97X UD3H User s Manual Rev 1101 12ME Z97XU3H 1101R...
Page 2: ...Motherboard GA Z97X UD3H Mar 20 2014 Mar 20 2014 Motherboard GA Z97X UD3H...
Page 32: ...32 Hardware Installation...
Page 60: ...BIOS Setup 60...
Page 108: ...Appendix 108...
Page 109: ...109 Appendix...
Page 110: ...Appendix 110...


