


23
G-MAX
TM
N512 User’s Manual
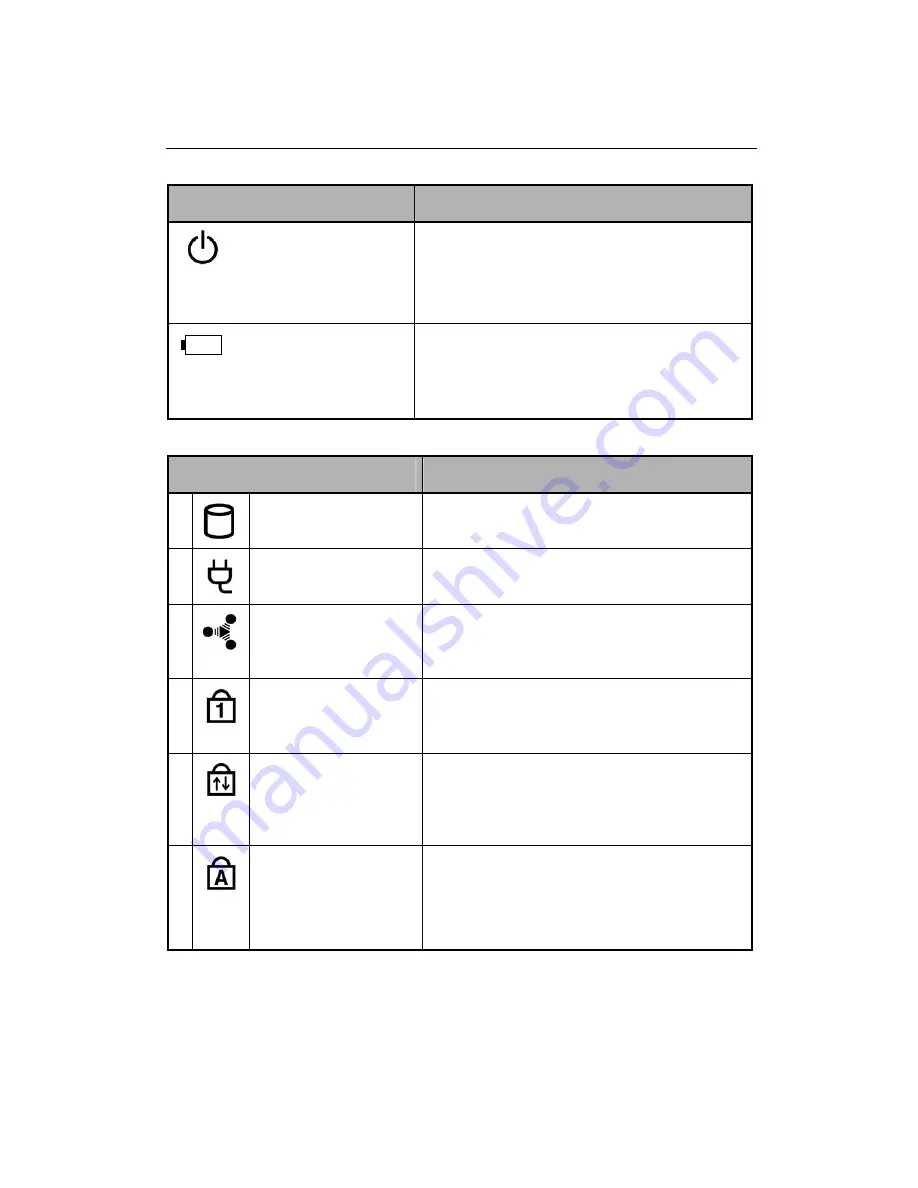
Power Lights
Status Description
Power/Standby Light
Off
: System is powered off, or in
Hibernate mode.
On
: System is in full operation.
Blinking
: System is in standby mode.
Battery Light
On
: Battery pack is charging.
Blinking
: A battery pack has reached
down to 10% level of available power
source.
Status Indicators
Status Description
1
The Drive Access
Indicator
On: When the hard drive, CD, or DVD
drive is being accessed.
2
The AC-Adapter
Indicator
On: When system is connected to an AC
adapter.
3
The Wireless
Communication
Indicator
On: When the wireless function is
activated.
4
The Num Lock
Indicator
On: When the embedded keypad is in
Num Lock mode. In this mode, the
embedded keypad will be activated.
5
The Scroll Lock
Indicator
On: When the keyboard is in Scroll Lock
mode. In this mode, you can lock the
cursor while scrolling through a
document with the arrow scroll keys.
6
The Caps Lock
Indicator
On: When the keyboard is in Caps Lock
mode. In this mode, all characters
you typed are in uppercase.
Summary of Contents for G-MAX N512
Page 8: ...VIII G MAXTM N512 User s Manual...
Page 10: ...X G MAXTM N512 User s Manual...
Page 40: ...28 G MAXTM N512 User s Manual...
Page 46: ...34 G MAXTM N512 User s Manual...
Page 50: ...38 G MAXTM N512 User s Manual...
Page 65: ...53 G MAXTM N512 User s Manual...
Page 71: ...59 G MAXTM N512 User s Manual...
Page 77: ...65 G MAXTM N512 User s Manual...
Page 81: ...69 G MAXTM N512 User s Manual...


