

USB Power On Func�on:
Allows Device Power-on Via USB. Useful When Mounted Behind a Display or TV
USB Power On Funk�on / Fonc�on Démarrage par USB / Función USB Power On
Função USB Power On / Funzione USB Power On / Функция USB Power On
Opcja USB Power On / USB Güç Açık Fonksiyonu / USB
埠啟動功能
USB
接口启动功能
/ USB
機器からの電源
ON
機能
/ USB
포트를
이용한
전원
켜기
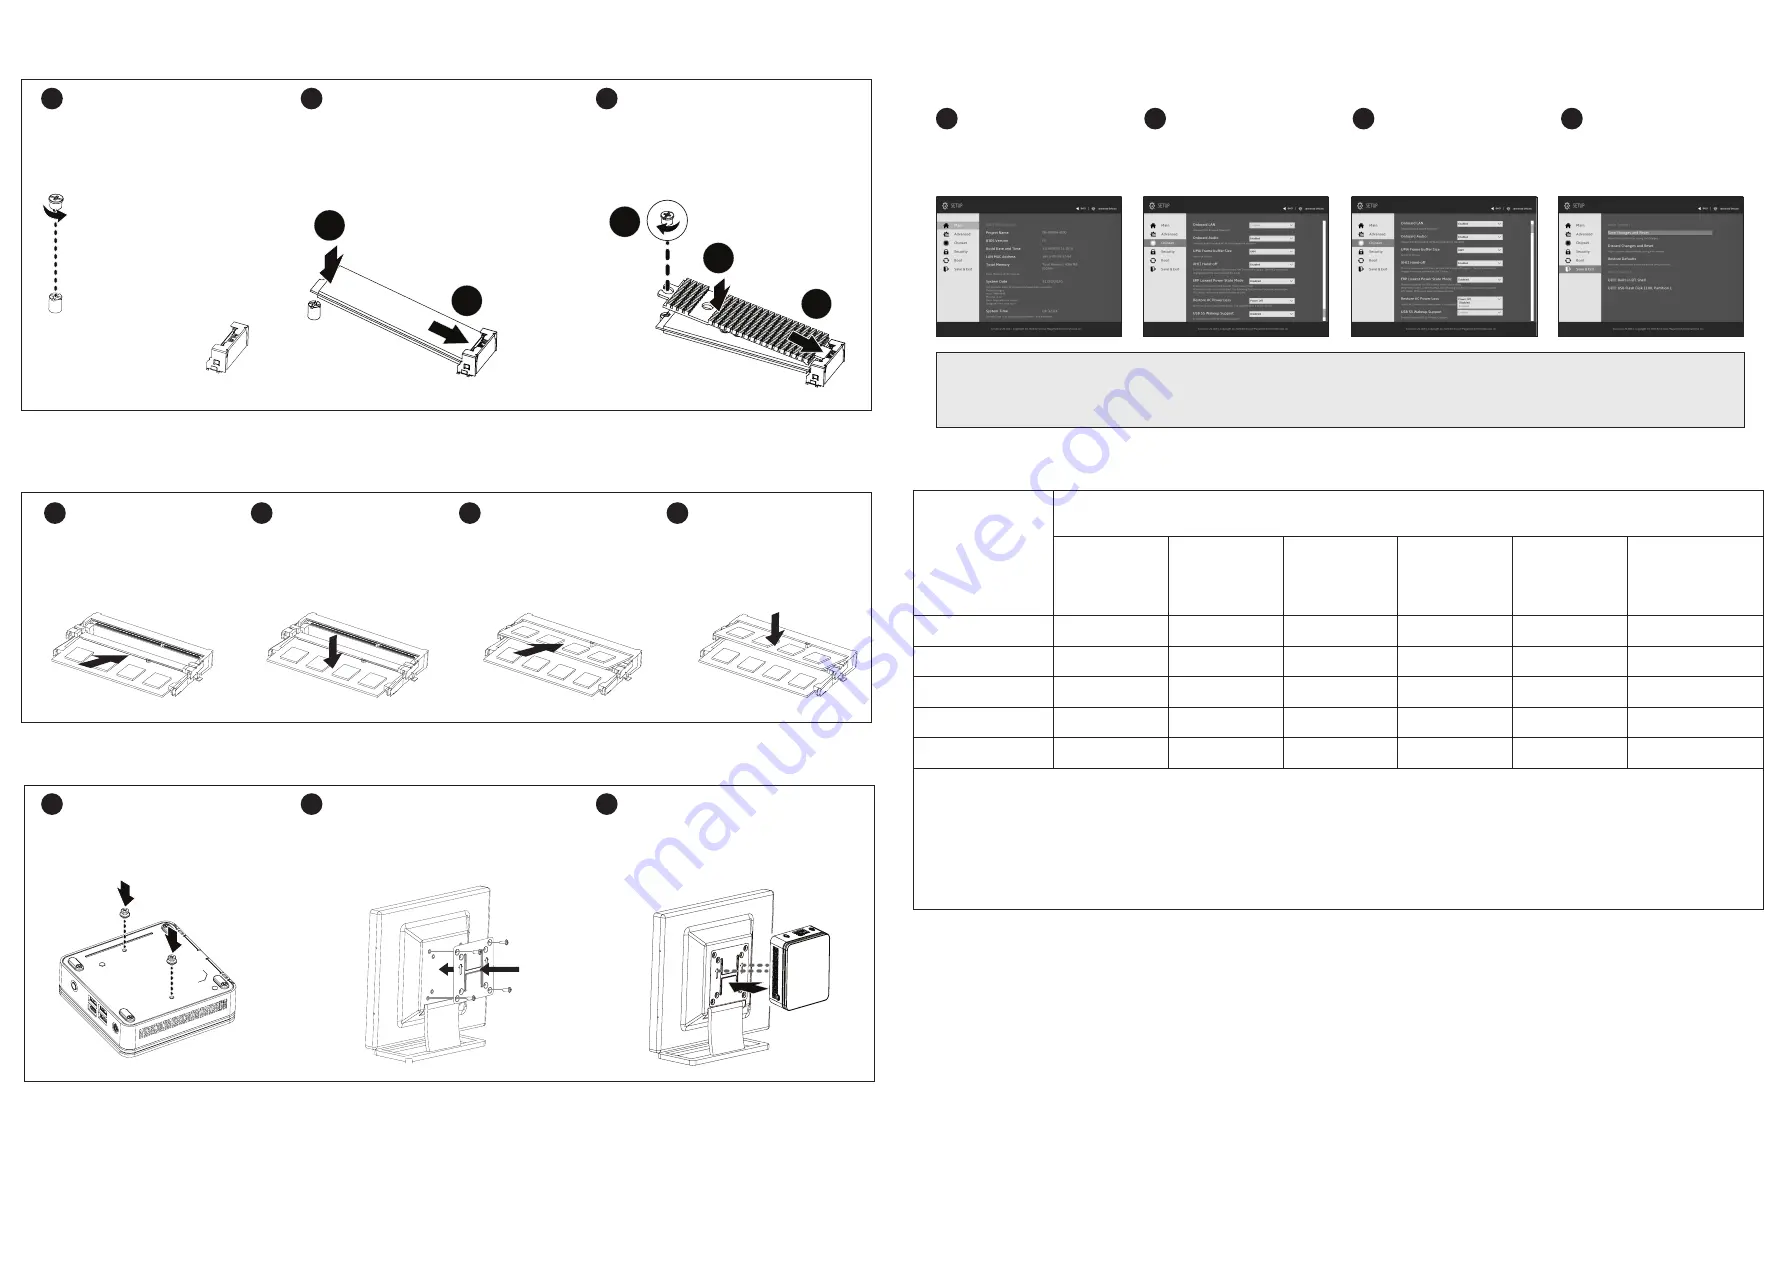
Press “Del” during device start up to enter
BIOS.
開機後按啟
Del
鍵進入
BIOS
設定畫面。
1
Select “Chipset” from the menu.
在
BIOS
主選單選取
“Chipset”
。
2
Manually configure “USB S5 Wakeup
Support” se�ngs to “Enable”.
進入
Chipset
的
USB S5 Wakeup Support
選項,手動控制將其
“Enable”
。
3
Press F4 to Save and Exit.
按啟
F4
存儲設定並離開
BIOS
選單重新
開機。
4
B) M.2 SSD:
How to Install the M.2 2280 SSD
M.2 SSD:
Installa�on der M.2 2280 SSD /
SSD M.2 :
Comment installer le SSD M.2 2280 /
SSD M.2:
Como instalar el SSD M.2 2280 /
M.2 SSD:
Como instalar o M.2 2280 SSD /
SSD M.2:
Come installare l'SSD M.2 2280 /
M.2 SSD:
Установка модуля M.2 2280 SSD /
M.2 SSD:
Instalacja dysku SSD M.2 2280 /
M.2 SSD:
M.2 2280 SSD nasıl Yüklenir /
M.2 SSD
:
M.2 2280 SSD
安裝方式
/
M.2 SSD
:
如何安装
M.2 2280 SSD /
M.2 SSD
:
M.2 2280 SSD
のインストール方法
/
M.2 SSD:
M.2 2280 SSD
설치 방법
C) Memory Installa�on:
SO-DIMM DDR4
Arbeitsspeicher Installa�on:
SO-DIMM DDR4 /
Installa�on de la mémoire :
SO-DIMM DDR4 /
Instalación de la memoria:
SO-DIMM DDR4 /
Instalação de memória:
SO-DIMM DDR4 /
Installazione della memoria:
SO-DIMM DDR4 /
Установка модулей памяти:
SO-DIMM DDR4 /
Instalacja pamięci:
SO-DIMM DDR4 /
Ha�za Yüklemesi:
SO-DIMM DDR4 /
安裝記憶體:
SO-DIMM DDR4 /
内存安装:
SO-DIMM DDR4 /
メモリインストール:
SO-DIMM DDR4 /
메모리 설치:
SO-DIMM DDR4
Carefully insert SO-DIMM memory modules.
小心並由下至上安裝
SO-DIMM
記憶體於
記憶體插槽。
1
Carefully insert SO-DIMM memory modules.
安裝下層記憶體後,重覆前述動作安裝上
層記憶體。
3
Push down un�l the modules click into place.
當記憶體固定於插槽後,再輕輕下壓至
定點。
2
Push down un�l the modules click into place.
當記憶體固定於插槽後,再輕輕下壓至
定點。
4
NOTE: ‘USB Power On’ func�onality in Windows requires an addi�onal Windows patch. This is provided on GIGABYTE’s official website labeled ‘USB Power-On Patch’. Your GIGABYTE
BRIX can be powered on via a connected USB device such as a keyboard or mouse, offering greater convenience when mounted behind a display or monitor.
注意:在
Windows
的版本環境下需要額外的應用程式來啟動
"USB Power On"
功能。你可以透過技嘉官網的產品支援與更新下載
"USB Power-On Patch"
來執行。
USB Power
On
提供了方便的開機功能,使用者可以透過連接到
BRIX
上的
USB
裝置啟動
BRIX
;讓安裝於顯示器後方的
BRIX
更方便使用。
單元
Unit
限用物質及其化學符號
Restricted substances and its chemical symbols
鉛
Lead
(Pb)
汞
Mercury
(Hg)
鎘
Cadmium
(Cd)
六價鉻
Hexavalent
chromium
(Cr
+6
)
多溴聯苯
Polybrominated
biphenyls
(PBB)
多溴二苯醚
Polybrominated
diphenyl ethers
(PBDE)
電路板總成
-
○
○
○
○
○
散熱器
○
○
○
○
○
○
外殼
-
○
○
○
○
○
電源供應器
-
○
○
○
○
○
線材
-
○
○
○
○
○
備考
1.
“
超出
0.1 wt %”
及
“
超出
0.01 wt %”
係指限用物質之百分比含量超出百分比含量基準值。
Note 1
:
“Exceeding 0.1 wt %” and “exceeding 0.01 wt %” indicate that the percentage content of the restricted substance exceeds the reference percentage value of
presence condition.
備考
2.
“
○
”
係指該項限用物質之百分比含量未超出百分比含量基準值。
Note 2
:
“
○
” indicates that the percentage content of the restricted substance does not exceed the percentage of reference value of presence.
備考
3.
“
-
”
係指該項限用物質為排除項目。
Note 3
:
The “−” indicates that the restricted substance corresponds to the exemption.
VESA Bracket
VESA Halterung / Support VESA / Soporte VESA / Suporte VESA / Staffa VESA / Кронштейн VESA / Wspornik VESA / VESA Brake� / VESA
支架
/ VESA
支架
/ VESA
ブラケット
/ VESA
브래킷
A�ach the VESA moun�ng plate to the rear of a compa�ble
display using the screws provided.
安裝隨附的
VESA
支撐架於支援
VESA
支撐架的電腦螢幕
或電視機後背。
NOTE!
VESA screws: Length 5.0 mm with M3 type screws, Metal enclosure with bo�om side.
2
The BRIX s can now be mounted by sliding the device into
place.
將已安裝
VESA
支撐架螺絲的
BRIX
插入
VESA
支撐架的滑
軌孔,向下壓至定位點後即可固定。
3
1
A�ach the screws provided on the underside of the
BRIX S.
安裝隨附的
VESA
支撐架螺絲於
BRIX
底部。
Carefully insert the M.2 SSD into slot B.
小心地把
M.2 SSD
裝入
B
插槽。
2
Insert the tab on the thermal plate into the slit near the
connector, then secure the thermal plate and M.2 SSD in
place with the previously removed screw.
把散熱片裝入插槽旁邊的缺口,然後用之前取下的螺絲將
M.2 SSD
與散熱片固定。
3
1
Remove the small screw secured to the M.2 SSD slot
B screw hole.
取下
M.2 SSD B
插槽螺絲孔上的螺絲。
1
2
1
2
3


