background image

 Inputs and Outputs

2500A Series Operation Manual, 34172 Revision C, March 2008

1.3.1

Front Panel Connector (RF Output)

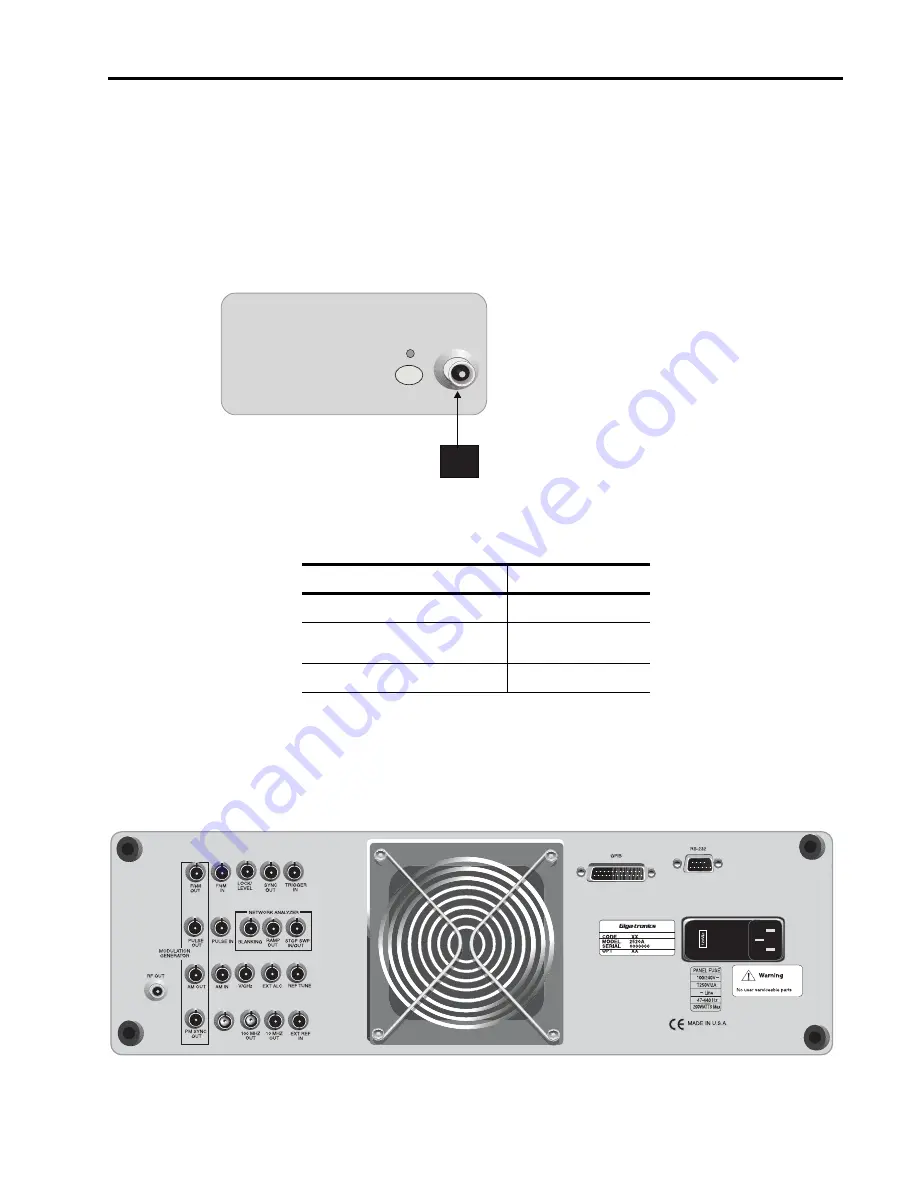
This is the instrument’s RF output. It is located on the front panel of 2500B Series Synthesizer models, 
and on the rear panel of versions of 2500S Series models. 

The type of RF connector that is supplied depends on the frequency range of the instrument. Figure 1-2 
shows the general location of the front panel RF output connector on 2500B Series  models, and        
Table 1-2 indicates by model the type of RF connector that is supplied. 

 
Figure 1-2: Series 2500B Front Panel Output

1.3.2

Rear Panel Interface and I/O Connectors

This section defines the functions of the 2500A Series rear panel connectors (see Figure 1-3). 

Table 1-2: RF Connector Types

Models

RF Connector Type

2508A/2508AS

N (f)

2520A/2520AS

2526A/2526AS

SMA (f)

2540A/2540AS

K (f)

ALC IN

RF OUT

RF

ON

Summary of Contents for 2508A

Page 1: ...2500A Series 2500A Series Microwave Synthesizer Operations Manual 34172 Revision C March 2008 ...

Page 2: ...reserved by Giga tronics MODEL NUMBERS The 2500A Series has model numbers for each instrument with a specific frequency range as described in Chapter 1 All models are referred to in this manual by the general term 2500A except where it is necessary to make a distinction between the models In these cases the specific model number s will be used Giga tronics Incorporated 4650 Norris Canyon Road San ...

Page 3: ...Road San Ramon California 94583 U S A Type of Equipment Model Series Number Standard s to which Conformity is Declared Microwave Synthesizer 2500A Series Model Numbers In Series 2508A 2520A 2526A 2540A Declaration of Conformity Application of Council Directive s Declaration of Conformity on file Contact Giga tronics Inc 4650 Norris Canyon Rd San Ramon CA 94583 Ph 1 925 328 4650 Fx 1 925 328 4700 2...

Page 4: ......

Page 5: ...tion and input and output descrip tions 2 Front Panel Operation This chapter contains information about front panel operation of the instrument Controls features and menus are described operating tasks are explained and factory default settings are listed 3 Remote Operation This chapter contains information about remote operation of the instrument over the General Purpose Interface Bus GPIB or RS ...

Page 6: ...if not strictly corrected or observed could result in injury or death of personnel An example is the proximity of high voltage Caution CAUTION The CAUTION statement is enclosed with single lines and centered in the page This calls attention to a situation or an operating or maintenance procedure or practice which if not strictly corrected or observed could result in temporary or permanent damage t...

Page 7: ...0 1 MHz to 40 GHz Serial Number Each instrument has a seven digit serial number shown on the label of the rear panel Option Number s When options are installed one or more 2 digit numbers are listed on the Opt line and correspond to options installed in the instrument Option numbers are explained in Appendix A Special Configurations When the accompanying product has been configured for user specif...

Page 8: ...record of publication change data Replacement pages will be issued as a TPCI Technical Publication Change Instruction and will be inserted at the front of the binder Remove the corresponding old pages insert the new pages and record the changes here TCPI Number TPCI Issue Date Date Entered Comments Record of Publication Changes ...

Page 9: ...18 1 3 Inputs and Outputs 18 1 3 1 Front Panel Connector RF Output 19 1 3 2 Rear Panel Interface and I O Connectors 19 CHAPTER 2 FRONT PANEL OPERATION 2 1 Introduction 23 2 2 Front Panel At a Glance 23 2 2 1 Front Panel Description 24 2 3 2500A Menus 26 2 3 1 Menu System Overview 27 2 3 1 1 Menu Buttons 27 2 3 2 CW Menu Descriptions 28 2 3 2 1 Cable Cal Menu 30 2 3 3 RAMP Menu Descriptions 30 2 3 ...

Page 10: ... Power Up 55 2 4 1 1 Normal Power Up 55 2 4 1 2 Errors During Power Up 57 2 4 2 Basic Operating Tasks 57 2 4 2 1 Resetting the System Sanitization Procedure 57 2 4 2 2 Entering and Modifying Parameters 57 2 4 3 Signal Generation 59 2 4 3 1 Generating a CW Signal 59 2 4 3 2 Generating an External ALC Leveled Signal 60 2 4 3 3 Using the Ref Tune Feature 62 2 4 3 4 Cable Correction Function 63 2 4 3 ...

Page 11: ...A Specific Commands 82 3 5 Status Register System 83 3 5 1 Status Byte STB and Service Request Enable SRE Registers 84 3 5 2 Standard Event Status ESR and Standard Event Status Enable ESE Registers 84 3 5 3 Questionable Status Condition and Enable Registers 85 3 5 4 List Mode Operation 86 3 5 4 1 Example List Mode 86 CHAPTER 4 SPECIFICATIONS PERFORMANCE VERIFICATION 4 1 Models 89 4 2 Specification...

Page 12: ...3 3 2 Frequency Modulation Tests 107 4 3 3 3 Pulse Modulation Tests 109 4 3 3 4 Internal Modulation Generator Tests 114 4 3 4 2500A Series Test Datasheets 116 APPENDIX A ACCESSORIES OPTIONS A 1 Introduction 123 A 2 List of Accessories and Options 123 APPENDIX B ERROR MESSAGES B 1 Start Up Error Messages 125 B 2 NVRAM Messages 126 B 2 1 NVRAM Reset Due to a Firmware Upgrade 127 B 2 2 NVRAM Reset Du...

Page 13: ...ble in two series with four unique models within each series Table 1 1 lists the model numbers and the frequency ranges covered by each model 2500A Series The 2500A Series includes frequency ranges from 100 kHz to 8 GHz 20 GHz 26 5 GHz and 40 GHz In addition external ALC ramp frequency and power sweep high stability time base 100 MHz reference output DC FM AM FM and Pulse capability and Automation...

Page 14: ...lay Front panel Option 46 Rack Slide Kit Option 55 Command Sets 55A HP 8370 55B HP 8340 55C HP 8673 55D HP 8662 55E Systron Donner 1720 55F Wavetek 90X 55G HP 8350 55H HP 8360 1 1 3 Items Furnished Accessories and Options are detailed in Appendix A of this publication In addition to the options and or accessories specifically ordered the following items are furnished with the instrument Operation ...

Page 15: ...or broken connectors on the front and rear panels dents or scratches on the panels broken handles etc Check the shipping carton for evidence of physical damage and immediately report any damage to the carrier 1 2 2 Cooling A cooling fan is installed in all 2500A Series instruments The cooling air intake is located on the rear panel Care must be taken to avoid obstructing the flow of air into the i...

Page 16: ...Chapter 1 2500A Introduction 16 2500A Series Operation Manual 34172 Revision C March 2008 the power source and safety ground The power cord must not exceed 3 meters 9 feet to meet safety requirements ...

Page 17: ...AC line cord 1 2 5 Line Fuse All 2500A Series models have a line fuse holder on the rear panel The power line fuse is 2A Slow Blow 250V Type T See Figure 1 1 below for the location of the line fuse Figure 1 1 Fuse Holder 1 2 5 1 Line Fuse Replacement Open the housing cover Pull out the small drawer on the right side of the housing marked with an arrow and remove the old fuse Replace with a new fus...

Page 18: ...e instrument with packaging material Take extra precaution to protect the front and rear panels Seal the package with strong tape or metal bands Mark the outside of the package as fol lows If corresponding with the factory or local Giga tronics sales office regarding reshipment please provide the model and serial number If the instrument is being returned for repair be sure to enclose all relevant...

Page 19: ...e frequency range of the instrument Figure 1 2 shows the general location of the front panel RF output connector on 2500B Series models and Table 1 2 indicates by model the type of RF connector that is supplied Figure 1 2 Series 2500B Front Panel Output 1 3 2 Rear Panel Interface and I O Connectors This section defines the functions of the 2500A Series rear panel connectors see Figure 1 3 Table 1 ...

Page 20: ...output pulse of 75 ns width TTL level that can be delayed relative to the leading edge of the video signal at the PULSE OUT connector FM IN2 A 50 Ω input for an external FM signal The input signal can be any waveform compatible within bandwidth considerations A 1 Vp input produces maximum deviation An externally supplied DC signal can be applied to modulate the frequency of the CW output using thi...

Page 21: ...z models the output is 0 25 volts per GHz For 8 and 20 GHz models the output is 0 5 volts per GHz 100 MHz OUT A 5 dBm typical AC coupled 100 MHz low noise reference output signal into 50 Ω 10 MHz OUT A 2 Vp p 10 MHz square wave reference output signal into 50 Ω EXT REF IN The external reference input Can be either a 10 MHz input that is 5 0 dBm into 50 Ω or a 100 MHz input 5 dBm The 100 MHz input ...

Page 22: ...Chapter 1 2500A Introduction 22 2500A Series Operation Manual 34172 Revision C March 2008 ...

Page 23: ...r the front panel or remote operating modes NOTE Chapter 3 provides instructions on using the 2500A Series from a remote host computer over the General Purpose Interface Bus GPIB an RS 232 serial connection USB or Ethernet 2 2 Front Panel At a Glance The 2500A Series front panel contains the controls and display for local operation of the instrument Some functions are not available from the front ...

Page 24: ...A which is used to set the power either to on or standby A blue indicator indicates that main power button is blue an amber indicator indicates that the main power is off but power is applied to the internal timebase oscillator 1 3 10 2 4 8 Microwave Synthesizers Bottom Sectional Differential See A for 2500A Series See B for 2500AS Series 12 Front Panel Layout of 2500 Series Microwave Synthesizers...

Page 25: ... the active display Menus are accessed by pressing the menu buttons The menus appear along the right hand side of the dis play adjacent to the interactive softkeys To select a particular menu item press the adjacent interactive softkey Modify the parameter using the data entry keypad step up step down buttons or knob Interactive Softkeys Selects the menu items adjacent to them in the display for m...

Page 26: ...this button displays the CW Menu which shows parameters related to the CW functions of the instrument and the Cable Correction functions and their associated menu items RAMP Button Pressing this button displays either the Ramp Freq or Ramp Power Menu which shows parameters related to either the frequency or power ramp sweep functions of the instrument and their associated menu items SYSTEM Button ...

Page 27: ...re 2 2 Functional Areas of the 2500A Display The following explains each of the functional areas of the display shown in Figure 2 2 Menu Name This is the name of the menu that is currently shown in the front panel display The menu that is currently shown is called the active menu Menu Area This area displays the various menu choices that are available in the active menu The row containing the menu...

Page 28: ...CW menu SLP Appears if a power slope of greater than 0 dB GHz is set in the CW menu PM Appears if either internal or external pulse modulation is currently enabled EXT LEVEL Appears if the ALC is set to External UNLK Appears if the Phase Lock Loop is unlocked OVEN COLD Appears if the internal temperature of the 2500A has not reached operational tem perature It is not recommended to use the 2500A w...

Page 29: ...ompensate for the inser tion or conversion loss of components that are attached to the instrument s RF output An example appears in Figure 2 4 Figure 2 4 Power Offset Example The Power Offset indicator OFS appears in the upper right hand corner of the display when any power offset value greater than 0 00 dB is entered Power Slope This menu item displays and allows you to modify the instrument s po...

Page 30: ...pical 2 3 2 1 Cable Cal Menu This menu allows you to generate an offset table for use with the power level setting in the CW menu using the pre selected power meter and RS 232 interface Figure 2 5 shows the Cable Cal RS 232 menu A similar menu is displayed if an Agilent EPM power meter is selected Figure 2 5 Cable Cal RS 232 Menu 2 3 3 RAMP Menu Descriptions The RAMP menus display the instrument s...

Page 31: ...e Ramp Freq 1 menu will generate a frequency sweep where the start and stop frequencies are speci fied The Ramp Freq 1 menu allows you to view and modify settings related to the instrument s fre quency sweep features When this menu is used the frequency of the RF output can be swept linearly from a predetermined start frequency to a predetermined stop frequency in a predetermined sweep time NOTE A...

Page 32: ...uring the frequency sweep The range of the power level depends on the following configuration and settings of the instrument Sweep Time This menu item allows you to view and modify the sweep time This is the amount of time that elapses for one cycle of a frequency sweep to complete Resolution This menu item allows you to view and modify the sweep step resolution The sweep step resolution can be se...

Page 33: ...time that elapses for one cycle of a frequency sweep to complete Resolution This menu item allows you to view and modify the sweep step resolution The sweep step resolution can be set to 401 801 and 1601 frequency steps Ramp Power Menu Pressing this softkey invokes the Ramp Power menu in the display See Ramp Power Menu below for Ramp Power menu item descriptions 2 3 3 3 Ramp Power Menu The Ramp Po...

Page 34: ...nuator setting chosen Frequency This menu item displays and allows you to modify the output frequency to be used during the power level sweep The range of the frequency parameter is dependent on the model number of the instrument Sweep Time This menu item allows you to view and modify the sweep time This is the amount of time that elapses for one cycle of a power level sweep to complete Attenuatio...

Page 35: ...arting frequency of the frequency sweep Note that the start fre quency must be less than the stop frequency If the start frequency is set higher than the stop frequency the stop frequency is automatically adjusted to the same value Stop Frequency This menu item displays and allows you to modify the ramp stop frequency This is the frequency that will be used as the ending frequency of the frequency...

Page 36: ...orage locations GPIB address configuration display contrast and system volume control System information including the model number serial number firmware version etc can also be displayed To access the System menus press the front panel SYSTEM menu button There are three menus associated with the SYSTEM menu button 2 3 4 1 System 1 Menu The System 1 menu allows you to save instrument states to no...

Page 37: ...y stored in registers 1 2 and 5 the parameter area would read as follows From Register 1 2 5 If none of the registers have instrument states saved to them as would be the case after the instrument s memory is cleared the following is displayed in the parameter area No register has been saved To recall a previously saved instrument configuration press the Recall softkey enter the number of the regi...

Page 38: ...u to set the instrument s General Purpose Interface Bus GPIB address The GPIB address range is 1 to 30 ALC This menu item allows you to set the instrument s ALC input The ALC input settings are Internal Positive Detector Negative Detector and Power Meter External ALC enables the instrument to compen sate for device transmission losses without user intervention General Information This field displa...

Page 39: ...s you to enable or disable the instrument s Reference Tune feature System 4 Menu Pressing this softkey invokes the System 4 Menu in the display 2 3 4 4 System Menu 4 The System Menu 4 allows you to set up the 2500A for remote operations using the LAN connection Figure 2 14 shows the System 4 menu Figure 2 14 System 4 menu with interactive Sofkeys SYSTEM 3 Disabled External Tune Input System 4 Menu...

Page 40: ...ion features of the instru ment To access the main AM menus press the front panel AM menu button There are three menus that can be accessed from the main AM Menu Figure 2 15 shows the main AM menu Figure 2 15 AM Main Menu with Interactive Soft Keys AM Ext Menu Pressing this softkey invokes the externally driven Amplitude Modulation menu in the display See External AM Menu for AM Ext menu item desc...

Page 41: ...dulation is turned on Sensitivity This menu item allows you to view and modify the AM sensitivity setting AM sensitivity determines the percentage of modulation produced per volt of input into the AM IN connector The AM sensitivity can be modified using either the numeric keypad the step up step down buttons or the rotary knob The AM sensitivity range is 0 to 95 volt and the step size can be set i...

Page 42: ...s the extent of the variation of the modulated RF output signal s amplitude expressed as a percentage Rate This menu item allows you to view and modify the rate frequency of the internal modulating sig nal Waveform This menu item allows you to view and choose the type of waveform used as the internal modulating signal The available selections are Sine Triangle symmetrical triangle wave Ramp posi t...

Page 43: ...rmines the AM mode that is used Pressing either the adjacent soft key or the Step Up or Step Down buttons toggle the AM state Depth This menu item allows you to view and modify the AM depth setting which is the extent of the variation of the modulated RF output signal s amplitude expressed as a percentage 2 3 6 FM Menu Descriptions The FM menus provide access to the internal and external frequency...

Page 44: ... and off Note that this setting only enables or dis ables amplitude modulation it is the active menu that is the menu that is currently being displayed that determines the FM mode that is used Pressing either the adjacent soft key or the Step Up or Step Down buttons toggle the FM state Sensitivity This menu item allows you to view and modify the external FM sensitivity setting which determines how...

Page 45: ...the internal modulating signal The available selections are Sine Triangle symmetrical triangle wave Ramp posi tive going ramp or Square 50 duty cycle square wave 2 3 6 3 DC FM Menu The FM Menu 3 menu allows you to activate and deactivate the DC FM feature of the instrument DC FM requires an externally provided signal to modulate the output frequency of the instrument In DC FM mode the RF output si...

Page 46: ... the front panel PM menu button There are five menus associated with the PM menu button Figure 2 22 shows the PM Main menu Figure 2 22 PM Main Menu with Interactive Soft Keys PM Ext Menu Pressing this softkey invokes the externally driven Pulse Modulation menu in the dis play See PM External Source Menu for PM Ext menu item descriptions PM Int Cont Menu Pressing this softkey invokes the internally...

Page 47: ...e adjacent soft key or the Step Up or Step Down buttons toggle the PM state The PM indicator is displayed in the upper right hand cor ner of the display when pulse modulation is turned on Input Polarity This menu item allows you to view and choose the input polarity Input polarity deter mines whether a high or low TTL level at the PULSE IN PM TRIG IN connector will produce an on condition at the R...

Page 48: ...RI parameter setting gets used for the internal continuous and internal gated pulse modulation modes it is not set and stored separately for those modes Width This menu item allows you to view and modify the width of the internal pulse modulating signal The width parameter sets the amount of time that each pulse of the internal modulating signal is at the high state and thus the RF output s pulse ...

Page 49: ...ernal Gated 3 with Interactive Softkeys NOTE This menu is not available for models with Option 17B The following explains each item in the PM Menu 3 menu PM This menu item turns pulse modulation on and off Pressing either the adjacent soft key or the Step Up or Step Down buttons toggle the PM state The PM indicator is displayed in the upper right hand cor ner of the display when pulse modulation i...

Page 50: ...to view and modify the sync out delay setting which deter mines the amount of delay that occurs between the leading edge of the pulse video and the leading edge of the sync pulse at the PM SYNC OUT connector NOTE The same sync out delay parameter setting gets used for all three internal pulse modulation modes continuous triggered and gated it is not set and stored separately for each of those mode...

Page 51: ...sing either the numeric keypad the step up step down buttons or the rotary knob Width This menu item allows you to view and modify the width of the pulse that appears at the RF out put connector when an appropriate triggering signal is applied to the rear panel PULSE IN PM TRIG IN connector NOTE The same width parameter setting gets used for all three internal pulse modulation modes continuous tri...

Page 52: ... front panel operating mode NOTE Pressing the LOCAL button while the instrument is in the remote operating mode returns it to local operating mode There are two Language menus associated with the LOCAL button 2 3 8 1 Language Menu 1 The Language Menu 1 menu as well as the Language Menu 2 menu allow you to view and choose the language to be used by the instrument during remote operation Some of the...

Page 53: ...g the instrument s GPIB or RS 232 port GT900 This menu item allows you to select GT 900 command set as the remote control language to be used by the instrument using the instrument s GPIB or RS 232 port Language 2 2 Pressing this softkey invokes Language Menu 2 in the display See Language Menu 2 below for Language Menu 2 menu item descriptions 2 3 8 2 Language Menu 2 The Language Menu 2 menu as we...

Page 54: ...y the instrument during remote operations The HP8663 language option must be installed in order to access this menu item Language 2 3 Pressing this softkey invokes Language Menu 1 in the display See Language Menu 1 above for Language Menu 1 menu item descriptions 2 3 8 3 Language Menu 3 The Language Menu 3 menu allows you to view and choose the language to be used by the instrument during remote o...

Page 55: ...section explains how to sanitize the 2500A instrument memory of any instru ment states that might contain instrument state information that might be classified Basic Operating Tasks This section explains how to perform some basic tasks such as how to pre set the instrument to factory default settings and how to set and modify instrument parameters Signal Generation This section explains how to use...

Page 56: ...In the table start up bar number 1 corresponds to the leftmost segment and 14 corre sponds to the rightmost segment After all start up tasks have completed successfully the CW menu appears in the display Table 2 1 Start Up Tasks Start Up Bar Number Start Up Task 1 Loading DSP Boot Code 2 Loading Synth FPGA 3 Loading Synth DSP Code 4 Performing YIG calibration low 5 Performing YIG calibration high ...

Page 57: ...ss and hold the PRESET button at some point while the INITIALIZING GT2500 screen is dis played 4 When the Resetting Memory screen is displayed release the PRESET button The system will continue to power up normally All information stored in the memory locations will be cleared and the system will be reset to factory default settings 2 4 2 2 Entering and Modifying Parameters Parameters in the 2500A...

Page 58: ...meters that toggle between defined states for example the On Off states of modulation parameters To modify a parameter using this method select the menu item that is associated with the desired param eter then press the Step Up button or Step Down button to increase or decrease the selected parameter by the specified step size The step size determines the resolution by which the parameter will be ...

Page 59: ...tput power level setting is varied To set the step attenuator so that it automati cally switches attenuation levels with changes in output power level press the SYSTEM button select the System 1 Menu menu item if it appears select the Attenuation menu item and use the Step Down button to select Auto Fixed Mode In this mode the step attenuator is set to a fixed level of attenuation The maxi mum and...

Page 60: ...press the RF ON button to enable the signal at the RF output connector 9 Verify that the Unleveled indicator is not lit If the Unleveled indicator is lit then the combination of output power level power offset power slope and step attenuator mode if applicable is set inappropriately and the RF output is unleveled Adjust the combination of settings until the Unleveled indicator turns off 2 4 3 2 Ge...

Page 61: ...nu item in the CW menu and enter the desired output level using the keypad Step Up Step Down buttons or the rotary knob 8 When entering a new level setting using the numeric keypad use the dBm or dB Units buttons Units are assumed to be in dBV 9 If the LED indicator that is above the RF ON button is not lit press the RF ON button to enable the signal at the RF output connector The External Power M...

Page 62: ...enabled the LED indicator that is above the RF ON button is blue 2 4 3 3 Using the Ref Tune Feature Ref Tune Reference Tune allows tuning the instrument s output frequency over a range of approxi mately 500 ppm using an analog tuning voltage of 0 to 10 volts applied to the Ref Tune input on the rear panel This is useful in applications where the instrument is be phase locked to another stable sour...

Page 63: ... 4 3 4 Cable Correction Function The Cable Correction feature allows the user to adjust the output of the 2500A Series Microwave Synthe sizer to compensate for losses created by connecting devices such as RF cables connectors and other RF devices The maximum correction is greater than 10 dB The feature creates a user correction table of 1001 points for the frequency range of the unit Level correct...

Page 64: ...Modem cable between the 2500A RS 232 port and the 8650A RS 232 port 2 Connect the BNC cable from the Sync Out connector on the rear panel of the 2500A and the Trig In con nector on the rear panel of the 8650A 3 Connect sensor to the RF path to be characterized 4 From the CW menu press the Cable Cal softkey 5 Press the Device Name softkey and select the Giga tronics 8650A using the Up or Down Arrow...

Page 65: ...the ramp start frequency 3 Select the Power menu item in the RAMP FREQ menu and enter the desired output power level using either the numeric keypad Step Up Step Down buttons or the rotary knob 4 Select the Sweep Time menu item in the RAMP FREQ menu and enter the desired ramp sweep time using either the numeric keypad Step Up Step Down buttons or the rotary knob 5 Select the Resolution menu item i...

Page 66: ...enu item in the RAMP POWER menu and enter the desired ramp stop power level using either the numeric keypad Step Up Step Down buttons or the rotary knob The ramp stop power level can be set equal to greater than or less than the ramp start power level 6 Select the Frequency menu item in the RAMP POWER menu and enter the desired output fre quency using either the numeric keypad Step Up Step Down bu...

Page 67: ...in to set it to On 5 Select the Input Polarity menu item in PM Menu 1 and choose the appropriate polarity setting using the Step Up Step Down buttons With a setting of Active High a TTL high level at the PULSE IN PM TRIG IN connector turns on the carrier at the RF output and with a setting of Active Low a TTL high level at the PULSE IN PM TRIG IN connector turns off the carrier at the RF output 6 ...

Page 68: ... buttons 2 4 4 2 Selecting the Remote Language The instrument can communicate using one of several different languages when in remote operating mode Every 2500A Series instrument is capable of communications using the SCPI Standard Com mands for Programmable Instruments language or any Giga tronics native command set and other optional Command Sets are available 1 If the instrument is not currentl...

Page 69: ...es into generated programs that can be imported into the program environment of your choice such as Visual C or Visual Basic The key to reducing the cost of testing is faster frequency switching The 2500A Series Microwave Syn thesizer offers unmatched frequency and power switching in list mode however the list mode approach might not be suitable for some remote programming situations Automation Xp...

Page 70: ...r Pin Assignments RS 232 This 9 pin connector interfaces communications equipment using RS 232 format See Table 3 2 for the connector pin assignments pin assignments are the same for all 2500A Series models Table 3 3 contains the 2500A Series serial interface communication settings Table 3 2 RS 232 Connector Pin Assignments Pin Signal Pin Signal Pin Signal 1 D101 9 IFC 17 REN 2 D102 10 SRQ 18 GND ...

Page 71: ...ive and can be entered in either uppercase or low ercase characters Abbreviating Commands SCPI commands can be abbreviated as follows Letters noted in upper case If entering more than the required letters the entire command must be entered For example if the command syntax is shown as INITiate either INIT init INITIATE or initiate can be used Optional Commands If the syntax shows a portion of a SC...

Page 72: ...e RF OUT connector is currently off Table 3 5 Source Subsystem CW Mode SCPI Commands Command Syntax Description SOURce FREQuency CW FIXed freq HZ KHZ MHZ GHZ Sets CW frequency to the value specified by freq The units are assumed to be in Hertz if no units designator is supplied SOURce FREQuency CW FIXed Queries the current CW frequency The value returned is in Hz SOURce MODE CW FIXed LIST FSWEep P...

Page 73: ...evel The value returned is in dBm SOURce ROSCillator SOURce Queries the source of the reference oscillator The return value is as follows INT The internal oscillator is being used as the reference EXT A signal at the EXT REF IN connector is being used as the reference Table 3 6 Source Subsystem Correction SCPI Commands Command Syntax Description SOURce CORRection LOSS offset DB Sets the power offs...

Page 74: ...y form SOURce LIST REPeat SWEEp STEP CONTinuous Sets the repeat mode for the current list The choices are as follows SWEEp Upon triggering the entire list is executed from the beginning then execution stops STEP Upon triggering the current list point is executed then execution stops The next trigger executes the next point in the list The list s first point is considered to be the initial current ...

Page 75: ...mmands Command Syntax Description SYSTem COMMunicate GPIB SELF AD DRess address MAXimum MINimum Sets the instrument s GPIB address The choices are as follows address Any integer between 1 and 30 MAXimum Sets the GPIB address to 30 MINimum Sets the GPIB address to 1 SYSTem COMMunicate GPIB SELF AD DRess Queries the instrument s GPIB address SYSTem COMMunicate SERial BAUD rate Sets the RS 232 interf...

Page 76: ... does not reset any part of the status reporting system Same as the RST command SYSTem VERSion Queries the SCPI version to which the instrument applies The response is in the form YYYY V where YYYY is the year version and V is the revision number within that year Command Syntax Description TRIGger IMMediate Initiates an immediate sweep cycle in List mode If Repeat Type is set to either single step...

Page 77: ...op frequency If this rule is violated the start and stop frequencies are set to the same value SOURce FREQuency STOP Queries the ramp stop frequency The return value is in Hertz SOURce FREQuency CENTer f_center HZ KHZ MHZ GHZ Sets the center frequency of the ramp sweep mode SOURce FREQuency CENTer Queries the ramp center frequency The return value is in Hertz SOURce FREQuency SPAN f_center HZ KHZ ...

Page 78: ...waveform to sine wave SQUare Sets the internal amplitude modulation generator waveform to square wave TRIangle Sets the internal amplitude modulation generator waveform to triangle wave PRaMP Sets the internal amplitude modulation generator waveform to a positive going ramp NOIse Selects the internal noise generator as the amplitude modulation generator SOURce AM INTernal FUNCtion SHAP e Queries t...

Page 79: ...equency modulation generator off SINE Sets the internal frequency modulation generator waveform to sine wave SQUare Sets the internal frequency modulation generator waveform to square wave TRIangle Sets the internal frequency modulation generator waveform to triangle wave PRaMP Sets the internal frequency modulation generator waveform to a positive going ramp SOURce FM INTernal FUNCtion SHAPe Quer...

Page 80: ... to on 0 OFF Sets Pulse mode to off SOURce PULSe DELay pm_delay S MS US Sets the delay of the internal pulse modulation generator waveform to the value specified by pm_delay Not available with Option 17A or 17B SOURce PULSe DELay Queries the delay of the internal pulse modulation generator waveform Not available with Option 17A or 17B The return value is in seconds SOURce PULSe FREQuency pm_freq H...

Page 81: ...nds Command Name Description CLS Clear Status Clears the event registers in all status groups It also clears the Event Status Register and the Error Event Queue ESE ese Standard Event Status Enable Sets the Standard Event Status Enable Register A service request is issued whenever the specified event has occurred Range of ese 0 255 ESE Standard Event Status Enable Returns the value of the Standard...

Page 82: ...of CW frequencies and power levels After each frequency and power is set the firmware reads the instrument s LOCK LEVEL status If failing the lock level the test is failed In order to avoid damage to the device the 2500A is connected to maximum attenuation is set if it is available or the power level is set to minimum for the duration of the test The system will be restored to the pre test conditi...

Page 83: ...rs that constitute the 2500A Status Register System Figure 3 1 Status Register System The following paragraphs briefly describe the registers 0 1 2 3 4 5 6 7 0 1 2 3 4 5 6 7 0 1 2 3 4 5 6 7 0 1 2 3 4 5 6 7 Local Control not used not used Error Event MAV RQS MSS OR Power On Occurance not used not used not used Execution Error Command Error Query Error Operation Complete 8 9 10 11 12 13 14 15 Synth ...

Page 84: ...the Service Request Enable Register The following describes each bit in the Status Byte Register 0 Local Control This bit is set whenever the Local button is pressed while the source is in remote operation 1 Not used Always 0 2 Error Event This bit is set whenever a SCPI error has occurred 3 QUES Status Questionable Status This bit is set whenever a condition defined in the question able status re...

Page 85: ...ster The following describes each bit in the Standard Event Status Register 0 Operation Complete This bit is set whenever all pending operations are completed such as a list computation 1 Not used Always 0 2 Query Error This bit is set whenever a query error has occurred 3 Not used Always 0 4 Execution Error This bit is set whenever an execution error has occurred 5 Command Error This bit is set w...

Page 86: ...g the 2500A in remote operation For information on using Automation Xpress and the AXI refer to the Auto mation Xpress online help system Command based remote interface commands can also be used to program list mode operation The remainder of this section includes some examples that explain how to program a 2500A for list mode operation using commands 3 5 4 1 Example List Mode The following exampl...

Page 87: ... for the 3 list points to 8 5 and 0 dBm respectively 4 LIST DWEL 0 200000 0 200000 0 200000 Set the dwell step time for the 3 list points to 0 2 seconds 5 LIST PRECompute Pre compute the created list data 6 LIST REPeat SWEEP Set the list repeat type to single sweep 7 TRIGger SOURce BUS Set the list trigger mode to GPIB software triggering 8 OUTP ON Turn the RF output on 9 TRG Trigger the list Sequ...

Page 88: ...2500A Chapter 3 Remote Operation 88 2500A Series Operation Manual 34172 Revision C March 2008 ...

Page 89: ...recommends a calibration cycle of two years for the 2500A 4 2 1 Frequency Accuracy Same As Timebase after 30 day warm up Resolution 0 001 Hz Internal References 10 MHz Aging Rate 5 X 10 10 day Temperature Stability 2 5 x 10 8 o C Table 4 1 Models1 1 Option 18 Deletes 100 kHz to 2 GHz frequency range Models Frequency Range 2508A 2508AS 100 kHz to 8 GHz 2520B 2520AS 100 kHz to 20 199 GHz 2526B 2526A...

Page 90: ...upled reference output signal 50Ω External Reference Input Frequency 10 MHz or 100 MHz 1 ppm Level 5 dBm 50Ω 4 2 1 1 Frequency Bands Table 4 2 Frequency Bands Band Frequency N Band Index 0 0 1 to 9 99 MHz N A 1 10 to 16 MHz 512 2 16 to 31 MHz 256 3 31 to 63 99 MHz 128 4 63 to 125 MHz 64 5 125to 250 MHz 32 6 250 to 500 MHz 16 7 500 to 1000 MHz 8 8 1 to 2 GHz 4 9 2 to 4 GHz 2 10 4 to 10 1 GHz 1 11 1...

Page 91: ...Hz Model 0 1 10 MHz 0 01 2 GHz 2 8 GHz 8 20 GHz 20 26 5 GHz 26 5 40 GHz 2508 10 14 17 2520 10 14 17 20 2526 10 14 13 15 10 2540 10 14 13 15 10 9 Table 4 4 Minimum Settable Power Model 2508 2520 2526 2540 Standard 107 dBm 100 dBm Option 26 Delete Step Attenuator 17 dBm 10 dBm Table 4 5 Accuracy1 1 Specifcation applies over the 15oC to 35oC range and degrades 0 10 dB per degree Centigrade outside th...

Page 92: ...0 dBc 0 1 2 GHz 55 dBc 2 0 20 0 GHz 55 dBc 20 0 40 GHz 30 dBc Table 4 7 Sub Harmonics1 1 At maximum leveled output or 10 dBm whichever is lower Frequency dBc 6 dBm Setting 0 01 to 2 GHz 80 2 to 20 GHz 60 20 to 40 GHz 50 Table 4 8 Spurious Non Harmonic related Spurs 1 1 Offsets 300 Hz 45 dBc typical Frequency Offsets 300 Hz 100 kHz to 10 1 GHz 65 dBc 10 1 to 20 20 GHz 58 dBc 20 2 to 40 GHz 50 dBc T...

Page 93: ...requency Offsets 5 MHz 100 kHz to 2 GHz 130 dBc Hz 2 to 20 2 GHz 145 dBc Hz 20 to 40 GHz 140 dBc Hz 1 Typical Offset 5 MHz Table 4 11 SSB Phase Noise Frequency Offset from Carrier dBc Hz GHz 10 Hz 100 Hz 1 kHz 10 kHz 100 kHz 1 MHz 1 0 70 96 116 128 126 149 4 0 58 84 103 115 114 144 10 50 78 99 109 108 141 15 46 73 94 105 105 139 20 44 70 93 101 101 132 30 40 67 88 99 99 133 1 See Time for freqeunc...

Page 94: ...iation 125 kHz Input Range 1 Vp p Accuracy 5 of deviation typical Narrow Mode Modulation Index Limited by Deviation Rate 3 dB Bandwidth DC to 50 kHz Peak Deviation 1 MHz N where N Band Index see Table 4 2 Accuracy 5 at 5 kHz rate 6013 volt peak 20 kHz V sensitivity Wide Mode Rate 3 dB Bandwidth 10 kHz to 5 MHz Peak Deviation 20 MHz N or Modulation Index of 3 7 X FGHz whichever is less Accuracy 5 a...

Page 95: ...C Input Range Detector 66 dBV to 6 dBV Max Input 10 volts Accuracy 6 dBV to 40 dBV 1 40 dBV to 66 dBV 2 Mode Availability CW List Pulse 5 usec pulse width min 200 kHz Input Impedance 1 Meg Ohm Table 4 12 Rise Fall Times Frequency Rise Fall Time 0 5 to 20 GHz 10 nsec 20 to 40 GHz 25 nsec Pulse Width Accuracy of Setting dB 100 nsec Not specified 100 to 150 nsec 2 5 0 5 150 to 250 nsec 1 5 0 5 250 ns...

Page 96: ...nc Out Delay 0 to 10 msec Trigger Input Polarity Rising or Falling Edge Table 4 15 AM Modulation Source Parameter Specification Waveforms Sine Square Triangle Ramp Gaussian Noise Rate 0 01 Hz to 10kHz all waveforms Resolution 0 01 Hz Accuracy Same as time base AM Output 2V peak to peak into 10 k Ohm Load Table 4 16 FM Modulation Source Parameter Specification Waveforms Sine Square Triangle Ramp Ra...

Page 97: ...g Temperature 0 to 55 C Environmental Conforms to MIL PRF 28800F Class 3 Safety EN61010 Emissions EN61326 Approvals CE Marked Power 90 253 VAC 47 64 Hz 200 watts typical 300 watts maximum Fuse Rating 2 A SB Width 16 75 inches 425 5 mm Depth 21 inches 533 4 mm Height 3U 5 25 inches 133 4 mm Weight 35 lbs 15 9 kg ...

Page 98: ...ent called Equipment Required appears at the beginning of each procedure The Equipment Required sections indicate by type the test equipment that is required for each test Recommended models for each type of test equipment are included in this section Equivalent test equip ment can be substituted for the recommended models provided that the accuracies and specifications are equal to or better than...

Page 99: ... RF Output to the low frequency input using coaxial cabling and adapters as is necessary Allow the equipment to warm up for at least 30 minutes Because the 2500A and the counter use the same timebase timebase errors are elimi nated The 2500A automatically switches to the external reference when it is connected 2 Set the 2500A for an output frequency of 10 MHz and set the RF output level to 0 dBm 3...

Page 100: ...quipment to warm up for at least 30 min utes Set the 2500A to the first test frequency listed in Datasheet 2 and set the RF amplitude to 10 dBm or maximum leveled output whichever is lower 2 Press the RF ON button to turn on the RF output The indicator above the RF ON button is blue when the 2500A output is active 3 Set the spectrum analyzer to view the 2500A output signal Adjust the analyzer refe...

Page 101: ...ests are presented in this section as manual procedures however for a comprehensive evaluation of the output of the 2500A it is recommended that an automated test system be used to perform these tests NOTE When measuring the flatness and accuracy of the 2500A consideration must be given to the various measurement uncertainties in the test system These include but are not limited to VSWR Cal Factor...

Page 102: ...Test 1 Use the test setup described in the Maximum Leveled Power Test Figure 4 3 2 Set the output level of the UUT to 0 dBm 3 Set the UUT to the first test frequency listed in Datasheet 4 4 Record the measured output power in the Level 0dBm column 5 Repeat Step 4 for the remaining test frequencies shown in Datasheet 4 that are within the operating range of the instrument 6 Set the output level of ...

Page 103: ...to 3 dBm 4 Set the UUT frequency to 12 MHz and activate the output 5 Press the Peak Search button on the Spectrum Analyzer 6 Press the Step Size button on the UUT and set the step size to 10 dB 7 Reduce the RF output level of the UUT in 10 dB increments by pressing the Down Arrow button while observing the measurement on the Spectrum Analyzer 8 Record each level measured of the Spectrum Analyzer i...

Page 104: ...ude Modulation Tests The following procedures test Amplitude Modulation Accuracy and Bandwidth at frequencies within each band See Table 4 2 for frequency band information 4 3 3 1 1 Equipment Required Spectrum Analyzer Function Generator 4 3 3 1 2 Test Setup Figure 4 5 Amplitude Modulation Accuracy and Amplitude Modulation Bandwidth Tests 4 3 3 1 3 Procedure Amplitude Modulation Accuracy 1 Set the...

Page 105: ...r move the marker to the next peak 7 Measure and record the AM Depth in the appropriate column in Datasheet 6 If the first time through the test record the AM Depth in the 30 column If the second time through the test record the AM Depth in the 50 column If the third time through the test record the AM Depth in the 90 column Measure the difference in dB of one sideband and the carrier Use the foll...

Page 106: ... Function Generator for a 1 kHz Sine Wave output at 2 00 V peak to peak NOTE Measure the output of the Function Generator using a precision meter or oscilloscope to ensure that its output is 2 00 Vp p 5 Set the Spectrum Analyzer to the test frequency Center the signal using Peak Search and Marker to Center Frequency functions 6 Measure and record the difference in dB between the carrier amplitude ...

Page 107: ...ode FM 4 3 3 2 1 Equipment Required Function Generator 4 3 3 2 2 Test Setup Figure 4 6 FM Deviation Bandwidth and Accuracy Setup 4 3 3 2 3 Procedure Narrow Mode FM Maximum Deviation Test 1 Connect the test equipment and UUT as shown in Figure 4 6 2 Set the Function Generator to the following settings Waveform Sine wave Rate 41 06 kHz Output 2 Vp p into 50Ω 3 Set the Spectrum Analyzer to the follow...

Page 108: ... of a slight offset voltage associated with the function generator The Bessel null can be moved to the center of the display by either adjusting the center frequency of the spectrum analyzer or slightly adjusting the offset voltage of the function generator 7 Adjust the rate of the function generator X kHz until the FM carrier is 50 dBc or greater Bessel Null from the unmodulated signal reference ...

Page 109: ...st the rate of the function generator until the FM carrier is 50 dBc or greater Bessel Null from the unmodulated signal reference on the spectrum analyzer 8 Using the following formula determine the FM Deviation of the UUT Record the result in Datasheet 9 Deviation 2 4 Rate Function Generator 2 4 is the Bessel Null 1st Order Carrier Zero 9 Repeat steps 5 through 8 for the remaining frequency test ...

Page 110: ... Manual 34172 Revision C March 2008 4 3 3 3 2 Test Setup Figure 4 7 Pulse Modulation Rise and Fall Time Test MICROWAVE SYNTHESIZER UUT Input Oscilloscope RF OUT 2500A Microwave Synthesizer OUTPUT PULSE IN PM TRIGGER IN Rear Panel Pulse Generator Crystal Detector RF In Video Out ...

Page 111: ...r pos itive or negative 4 Set the UUT to the following settings Power Level 0 dBm External PM state ON Trigger Polarity Active high RF Output state On 5 Set the UUT to the first test frequency shown in Datasheet 10 6 Measure the rise and fall times on the oscilloscope and record them in the appropriate columns of Datasheet 10 7 Repeat Step 6 for each of the remaining test frequencies shown in Data...

Page 112: ...asure and record the CW level for each of the frequencies listed in Datasheet 10 in the Level Accuracy CW column of Datasheet 10 6 Set the External PM state of the UUT to On 7 Set the power meter s sensor mode to Peak and adjust the sample delay to 500 nsec 8 Measure and record the peak level for each of the frequencies listed in Datasheet 10 in the Level Accuracy Pulse column of Datasheet 10 9 Co...

Page 113: ...cy shown in Datasheet 10 5 Set the Spectrum Analyzer to the following settings Frequency Same as the frequency set at the UUT Span 0 Hz Sweep Rate Set to display two pulses It might be necessary to adjust the resolution bandwidth Vertical Scale 10 dB div Resolution Bandwidth 3 kHz Video Averaging 100 Trigger type Video 6 Adjust the Spectrum Analyzer reference level so that the peak level of the pu...

Page 114: ...ayed press the AM X 3 softkey until AM Menu 2 is displayed 4 Press the AM softkey and the Step Up button to activate the Internal AM Modulation Generator The AM indicator will appear in the upper left corner of the display 5 Press the Rate softkey and enter the first value on Datasheet 11 Measure and record the reading of the frequency counter 6 Repeat Step 5 for the remaining data points on the d...

Page 115: ...own in Figure 4 10 Press the Display Time button on the Frequency Counter Connect a BNC cable from the PM Out connector to the Band 1 BNC connec tor of the frequency counter 2 Set the CW frequency of the 2500A to 6 GHz 3 Configure the counter to measure the period of the video pulse waveform 4 Press the PM button to activate the PM Menu If PM Menu 2 is not displayed press the PM X 4 softkey until ...

Page 116: ...s readings taken during the perfor mance tests Datasheet 1 Frequency Range Accuracy Test Refer to section 4 2 1 for specifications 2500A Series Test Datasheet Serial Number Record measured values in the Test Result column Date Tested By Test Frequency Measured Frequency 100 kHz 5 MHz 8 MHz 25 MHz 50 MHz 100 MHz 200 MHz 400 MHz 750 MHz 1 5 GHz 3 GHz 7 GHz 15 GHz 23 GHz 2526 2540 series only 40 GHz ...

Page 117: ...for specifications Test Frequency Measured Power Level Harmonics Sub Harmonics Non Harmonics 100 kHz 5 MHz 8 MHz 25 MHz 50 MHz 100 MHz 200 MHz 400 MHz 750 MHz 1 5 GHz 3 GHz 7 GHz 15 GHz 23 GHz 2526 2540 series only 40 GHz 2540 series only Test Frequency Measured Maximum Leveled Power dBm 100 kHz 25 MHz 50 MHz 100 MHz 200 MHz 400 MHz 750 MHz 1 5 GHz 3 GHz 7 GHz 15 GHz 23 GHz 2526 2540 series only 4...

Page 118: ...ecifications Test Frequency Measured Output Power Level 0dBm 0 65 dB 100 kHz to 20 GHz 0 85 dB 20 to 40 GHz 100 kHz 10 MHz 100 MHz 200 MHz 400 MHz 750 MHz 1500 MHz 3 GHz 6 GHz 12 GHz 26 GHz 2526 40 series only 36 GHz 2540 series only 40 GHz 2540 series only Test Frequency Measured Output Power dBm 13 23 33 43 53 63 73 83 93 100 kHz 10 MHz 100 MHz 200 MHz 400 MHz 750 MHz 1500 MHz 3 GHz 6 GHz 12 GHz...

Page 119: ...specifications Test Frequency Sensitivity 30 50 90 10 MHz 100 MHz 200 MHz 400 MHz 750 MHz 1500 MHz 3 GHz 6 GHz 12 GHz 26 GHz 2526 40 series only 36 GHz 2540 series only 40 GHz 2540 series only Test Frequency CarrierAmplitude Sideband Amplitude Delta Spec 3 dB 10 MHz 100 MHz 200 MHz 400 MHz 750 MHz 1500 MHz 3 GHz 6 GHz 12 GHz 26 GHz 2526 40 series only 36 GHz 2540 series only 40 GHz 2540 series onl...

Page 120: ...o section 4 3 3 2 for specifications Datasheet 10 Pulse Modulation Test Refer to section 4 2 7 for specifications Frequency Rate Deviation Pass Fail 38 56 43 56 kHz 4 0 5 0 6 0 7 0 7 99 Frequency Rate Deviation Pass Fail 2 95 5 88 MHz 4 0 5 0 6 0 7 0 8 0 9 0 10 0 Test Frequency Rise Time Fall Time Level Accuracy CW Pulse Delta On Off Ratio dB 500 MHz 750 MHz 1500 MHz 3 GHz 6 GHz 12 GHz 26 GHz 2526...

Page 121: ...uracy Test Refer to section 4 2 9 for specifications Datasheet 13 Function Generator Pulse Accuracy Refer to section 4 2 9 for specifications AM Rate Hz Measured Rate 100 0 250 0 500 0 750 0 1000 0 2500A 0 5000 0 7500 0 10000 0 FM Rate Hz Measured Rate 500 0 1000 0 5000 0 10000 0 500000 0 1000000 0 Pulse Repetition Interval Pulse Width Measured PRI 1 0E 6 5 0E 7 1 0E 5 5 0E 6 1 0E 4 5 0E 5 1 0E 3 ...

Page 122: ...Chapter 4 Specifications Performance Verification 122 2500A Series Operation Manual 34172 Revision C March 2008 ...

Page 123: ...endix A 2 List of Accessories and Options Table A 1 Accessories Options Accessory Option No Description A011 Ruggedized Carrying Case 17A Delete Modulation Suite and Internal Function Generator 17B Delete Internal Function Generator 18 Delete 0 01 to 2 GHz Frequency Extension 2508 2520 26 Delete 90 dB Step Attenuator 31 2 msec Switching Speed Limit Export Restriction 44 Front Panel Includes option...

Page 124: ...ssories Options 124 2500A Series Operation Manual 34172 Revision C March 2008 Table A 2 Option 55 Command Sets Option Command St 55A HP 8370 55B HP 8340 55C HP 8673 55D HP 8663 55E Systron Donner 1720 55F Wavetek 90X 55G HP 8350 55H HP 8360 ...

Page 125: ...uring remote operation of the instrument B 1 Start Up Error Messages If the system encounters any problems during the start up sequence a message is displayed after start up is complete Typically you should contact Giga tronics customer support if any start up error messages are encountered The message that is displayed has the following format Error code xxxxxxxxxxxxxxxxxxxx Startup Failure see m...

Page 126: ...d to NVRAM The following paragraphs explain these instances Table B 1 Start Up Error Messages Error Error Description 1 TIMEBASE_SET_ERROR 2 NVRAM_BATT_FAIL 3 CPU_FPGA_LOAD_FAIL 4 SYN_FPGA_LOAD_FAIL 5 ALC_SP_FPGA_LOAD_FAIL 6 ALC_PM_FPGA_LOAD_FAIL 7 RTOS_UTIL_ERROR 8 SYN_DSP_BOOT_LOAD_FAIL 9 ALC_DSP_BOOT_LOAD_FAIL 10 SYN_DSP_LOAD_FAIL 11 ALC_DSP_LOAD_FAIL 12 ALC_ZERO_FAIL 13 ALC_COMM_ERR 14 ALC_MEM...

Page 127: ...ry might fail which causes NVRAM cor ruption In this case the system resets the NVRAM and displays the following message once the start up process is complete Memory reset due to battery failure Please contact the service center B 2 3 NVRAM Reset Due to a Checksum Failure A checksum of the NVRAM is calculated as a means of ensuring the integrity of the contents of the memory On occasion a comparis...

Page 128: ...n internal event buffer When using the GPIB interface a 2500A will send a service request to the controller and the controller software is responsible for querying the status message When using the RS232 interface the controller software should poll the 2500A for the error condition A user can also query the 2500A using the ERR query GT12000 language mode or SYStem ERR SCPI language mode The messa...

Page 129: ...rt Power is out of range 26 RAMP stop Power is out of range 27 RAMP Frequency span is out of range 28 RAMP start Frequency is out of range 29 RAMP stop Frequency is out of range 30 RAMP time is out of range 31 Sweep frequency is out of range 32 Sweep power is out of range 33 Invalid internal PM polarity RISing or FALLing are supported 34 Invalid External PM polarity NORmal or INVerted are supporte...

Page 130: ...ate internal scan modulation but set output to zero 45 Invalid FM source INTernal or EXTernal is supported 46 Invalid FM mode 1 FM Narrow 2 FM Wide 47 Invalid FM action 0 Deactivate FM 1 Activate external FM 2 Activate internal FM with sine wave 3 Activate internal FM with square wave 4 Activate internal FM with triangle wave 5 Activate internal FM with positive ramp 6 Activate internal FM with ne...

Page 131: ...matches for characterization data in flash and heap 64 Heap allocation has been done previously 65 List RF off time is out of range 66 Incorrect password for setting minimum list step time 67 Unable to update parameter block data 68 List step time is out of range 69 FM deviation is out of range 70 FM sensitivity is out of range 71 PM internal PRI is out of range 72 PM internal width is out of rang...

Page 132: ...2500A Series Microwave Synthesizer Error Messages 132 2500A Series Operation Manual 34172 Revision C March 2008 ...

Reviews: