background image

4

Exploded View - MP4120-SWS/MP4124-SWS 

Summary of Contents for MP4120-SWS

Page 1: ...air and Service Manual Contents Installation Instructions page 2 Pump Specifications page 3 Exploded View page 4 Parts List Repair Kits page 5 Trouble Shooting page 6 Repair Instructions page 7 11 Torque Specifications page 11 Dimensions page 11 Warranty Information back page Updated 07 18 ...

Page 2: ...ght 1kg dm3 viscosity 1 E at max per missible revolutions Operation and Maintenance Check oil level prior to starting and ensure trouble free water supply Oil Use 33 8 fl ounces 1 0 liters of Giant s part number 01154 or ISO VG 220 GL4 e g Aral Degol BG220 or SAE 90 GL4 gear oil Initial change after 50 operating hours and then every 500 hours after 6 months opera tion in any case Caution when oper...

Page 3: ...er one 1 pulley diameter and the required pump RPM must be known Pump RPM x Pump Pulley Diameter Motor RPM Motor Pulley Diameter Motor RPM x Motor Pulley Diameter Pump RPM Pump Pulley Diameter Common Specifications Inlet Pressure 145 PSI 10 Bar Crankshaft Diameter 1 10 28 mm Crankcase Oil Capacity 33 8 fl oz 1 L Inlet Ports 2 1 NPT Discharge Ports 2 3 4 NPT Stroke except MP4126 1 02 26 mm Stroke M...

Page 4: ...4 Exploded View MP4120 SWS MP4124 SWS ...

Page 5: ... 17 07114 Hex Screw Bearing Cover 9 20 07248 Roller Bearing Tapered 2 20A 07249 Shim 2 20B 06962 Fitting Disc 2 21 05375 Shaft Protector 1 22 07251 Crankshaft 1 23 07252 Key 1 24 07253 Connecting Rod 3 25 07596 Crosshead Complete 3 28 07255 Crosshead Pin 3 29A 07256 Centering Sleeve 3 29B 07262 Ceramic Plunger MP4120 3 29B 13046 Ceramic Plunger MP4124 3 29C 13007 Bolt Sold only w 07258 3 29D 07258...

Page 6: ...ade of oil Improper amount of oil in crank case REMEDY Replace packing seals Replace spring Tighten or Replace belt Replace nozzle Clean valve assembly Clean strainer Repair Replace hose Clean Reset and Replace worn parts Check suction lines on inlet of pump for restrictions Check for proper operation Reduce oil change interval Replace seals Replace bearings Refill crankcase oil with recommended l...

Page 7: ... a rubber mallet to dislodge and slide it off the studs 49 The spacer 51 can now be removed by pry ing gently outward with a screw driver through the front of the inlet port 6 To remove the inlet valve assembly insert a 13mm socket with extension through the rear of the inlet manifold 43 port and tap it firmly with a hammer This will force the tension spring 46A valve housing 52 and the remainder ...

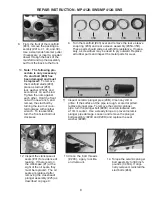
Page 8: ...ch and remove the stud bolt by turning the rear nut coun terclockwise with another wrench To reassemble turn the front stud bolt nut clockwise 11 Inspect ceramic plunger pipe 29B Clean any dirt or grime If the surface of the pipe is rough scored or pitted replace plunger pipe To remove the ceramic plunger pipe turn the plunger bolt 29C counterclockwise with a 13mm socket Use a steady torque to pre...

Page 9: ...g 53 and replace it on to the valve housing Reinstall the entire inlet valve assembly into the manifold 43 Replace the tension plugs 42A and tighten 18 Reassemble the discharge valve assembly by placing the valve plate 45 spring 46 and spring retainer 47 on top of the valve seat 44 Press fit together Place the entire discharge assembly into dis charge port making certain the assembly is properly s...

Page 10: ...ed crosshead plunger assembly 25 from the crankcase 1 by pulling it straight out The oil seals 31 may now be removed by tapping them out through the front of the crankcase Be careful not to damage the snap ring 29 Inspect the surfaces of the crosshead plunger assembly 25 and connecting rods 24 for heavy scoring or galling due to poor lubrication Check for play at the joint between connecting rod c...

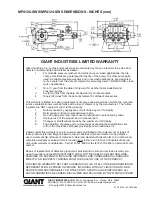
Page 11: ...The side of the seal with the spring must face the oil Make sure that the face of the seal is flush with the crankcase Reassembly Sequence REPAIR INSTRUCTIONS MP 4120 SWS MP4124 SWS 40 Clean the back edge of the crankcase and replace the crankcase cover 4 be careful not to pinch the crankcase cover o ring 5 41 Fill the crankcase with 32 fluid ounces of Giant oil or the equivalent SAE 80W 90 Indust...

Page 12: ...r parts 3 Use of repair parts other than those manufactured or authorized by Giant 4 Improper use of the product as a component part 5 Changes or modifications made by the customer or third party 6 The operation of pumps and or accessories exceeding the specifications set forth in the Operations Manuals provided by Giant Industries Inc Liability under this warranty is on all non wear parts and lim...

Reviews: