background image

ENGLISH

7

3.2.5 Usage

If only 3% of the EnergyPak power is left, the Energy-
Pak will automatically switch assistance to ECO 
mode in order to save energy.
If only 1% of the EnergyPak power is left, assistance 
will automatically stop. Power assist level indication 
bar will blink 3 times. Lights can still be used for 
approximately 2 hours. 
Power in the EnergyPak can be checked by pushing 
the Energy Level check button.
Discharge the EnergyPak completely by riding the 
bicycle after 15 normal charges or at least every 3 
months totally before charging the EnergyPak again. 
This will increase the lifespan of the EnergyPak. 
When an EnergyPak is connected to the bike, some 
power will get lost in the system when the bike is not in use. To prevent this, EnergyPak can be discon-
nected from the bike when not in use for more than a few days.

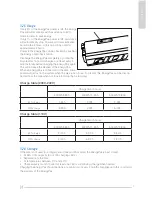
Charge table (200V-240V)

Charge time in hours

300Wh 8,8Ah

400Wh 11,3Ah

500Wh 13,8Ah

80% charge

1:45h

2:00h

2:45h

100% charge

3:30h

4:30h

5:00h

Charge table (110V)

Charge time in hours

300Wh 8,8Ah

400Wh 11,3Ah

500Wh 13,8Ah

80% charge

2:20 h

3:00 h

3:40 h

100% charge

4:40 h

6:00 h

7:20 h

3.2.6 Storage

If the bike is not used for a longer period (one month or more) the EnergyPak is best stored:
•  At 60% of its capacity (3 out of 5 charging LED’s).
•  Separate from the bike.
•  At temperatures between 0°C and 40°C.
•  Checked every month to see if at least one LED is still blinking. Charge when needed.
Charging the EnergyPak should be done at a minimum of every 3 months. Negligence to this could void 
the warranty of the EnergyPak.

Summary of Contents for E-bike 2016

Page 1: ...POLSKI HOWIT WORKS USER MANUAL VERSION 6 2 ITALIANO DEUTSCH FRANÇAIS NEDERLANDS ENGLISH ESPAÑOL ...

Page 2: ...yncDrive 8 3 4 RideControl 8 3 4 1 Overview 8 3 4 2 Settings 9 3 4 3 Reset settings 12 3 4 4 Switch Km h Mph 12 3 4 5 Position adjustment 12 4 BIKE USAGE 13 4 1 Maintenance 13 4 2 Range 14 4 3 Shifting recommendations 14 4 4 EVo display in cold surroundings 14 4 5 keys 14 5 TROUBLESHOOTING 15 5 1 Error indication 15 5 2 EVO display 15 5 3 Charge display 15 6 FREQUENTLY ASKED QUESTIONS 16 6 1 Ridec...

Page 3: ...e world s most innovative bicycles 1 2 USE OF THE MANUAL Read this manual carefully before you start riding on your new Giant E bike Safety instructions are very important and should not be overlooked By doing so you will have a better understanding of the general operation of the various bike parts Some frequently asked questions will be covered as well Obviously legal documentation is included i...

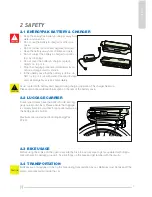
Page 4: ...contact with battery and charger during charging operation The charger heats up Please read note additional information on the rear of the battery case 2 2 LUGGAGE CARRIER Some type of bikes have the battery holder and lug gage carrier combined Please ensure that luggage is securely fixed to avoid that it can cause damage to the battery and or holder Maximum rear carrier load including EnergyPak 2...

Page 5: ...um 80Nm Newton Meters of torque and gives you the option of using a double chainring crankset so you can choose an easier gear which requires less energy from the rider and battery The handlebar mounted command center provides easy to operate controls with a more ergonomic button that controls the display and support levels in a comfortable way The RideControl display has a central position and is...

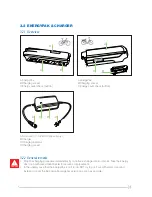
Page 6: ... ENERGYPAK CHARGER 3 2 1 Overview A B C B A C A C D B 3 2 2 General remarks Stop the charging procedure immediately if you notice a strange smell or smoke Take the Energy Pak to an Authorised Giant Dealer for service or replacement In the unlikely case that the EnergyPak is on fire do NOT try to put it out with water Use sand instead to cover the fire and call emergency services as soon as possibl...

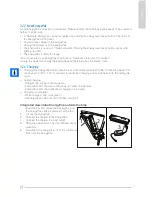
Page 7: ...te 3 2 4 Charging Charging the EnergyPak battery should be at room temperature 20 C 68 F Charging below 0 C or above 40 C 32 F 104 F can lead to insufficient charging and can be harmful to the battery life cycle During charging Charger LED will be continuously red EnergyPak LED s that are continuously red show charge level EnergyPak LED s that blink show charging is in progress Charging is complet...

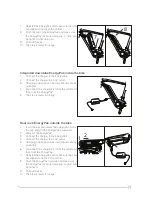
Page 8: ...the outlet and then from the EnergyPak 5 The bike is ready for usage Rear rack EnergyPak outside the bike 1 Insert the key and unlock the EnergyPak hold the grip and pull the EnergyPak backwards 2 Slide out the EnergyPak 3 Connect the charger to the EnergyPak 4 Connect the charger to an AC outlet 5 Charging operation can be discontinued at any given time 6 Disconnect the charger first from the out...

Page 9: ...r will get lost in the system when the bike is not in use To prevent this EnergyPak can be discon nected from the bike when not in use for more than a few days Charge table 200V 240V Charge time in hours 300Wh 8 8Ah 400Wh 11 3Ah 500Wh 13 8Ah 80 charge 1 45h 2 00h 2 45h 100 charge 3 30h 4 30h 5 00h Charge table 110V Charge time in hours 300Wh 8 8Ah 400Wh 11 3Ah 500Wh 13 8Ah 80 charge 2 20 h 3 00 h ...

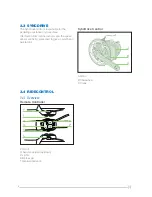
Page 10: ...mation from internal sensors and the speed sensor are being processed to give a smooth and natural ride SyncDrive Central A Motor B Chainwheel C Crank A B C 3 4 RIDECONTROL 3 4 1 Overview Remote Controller P On off Q Assistance level up down R Lights S Walk assist T General indication Q S S T Q T P R ...

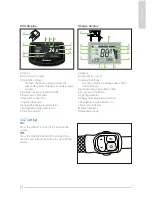
Page 11: ...tor A D E J B K H G F C Charge display A Speed B Units Km h or mph C Indication settings Trip time distance average speed ODO total distance D External charge plug Micro USB E Power assist indication G Lighting indicator H EnergyPak charge indicator bar J EnergyPak charge indicator L Error code indicator M Power indicator N Remaining range B C C N C G L D A E M H J 3 4 2 Settings On Press the ON O...

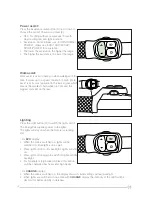
Page 12: ...lest chain wheel up front and the biggest sprocket on the rear Lighting Press the Light button R to switch the lights on off The EnergyPak supplies power to the lights The lights will stay on when the bicycle is standing still For EVO display When the bike is switched on lights will be switched on Backlight is on as well Press light button to dim backlight Lights are still on Press light button ag...

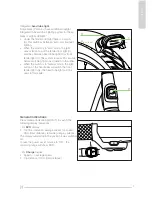
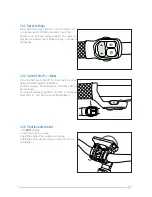
Page 13: ...econds before switching from one situation to the other When the switch is in manual mode the light button on the handle bar will switch the front fender light only The head tube light can t be used in this mode General indications Press General indication button T to switch the following display indications For EVO display Trip time distance average speed top speed ODO total distance remaining ra...

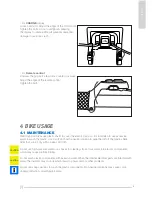
Page 14: ... 4 4 Switch Km h Mph Press the Settings button T for 5 seconds to switch between Km h and Mph indication For EVO displays Both kilometers and miles units will be displayed For Charge display only km h and Km is displayed Both units m and mph will not be displayed 3 4 5 Position adjustment For EVO display Loosen bolts D crosswise Adjust the angle of the aluminium housing Tighten the bolts clockwise...

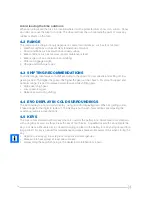
Page 15: ...orbidden to use excessive water to wash the plastic Use a soft cloth with a neutral solution to wipe the dirt off the plastic shells After that wipe it dry with a clean soft cloth Do not use high pressure water or air hoses for cleaning It can force water into electric components which may cause malfunctioning Do not wash plastic components with exessive water When the internal electrical parts ar...

Page 16: ...h support and optimum range it is best to release pedal pressure while shifting gears High speed high gear Low speed low gear Release power during shifting 4 4 EVO DISPLAY IN COLD SURROUNDINGS The EVO display is a liquid crystal display using liquid for displaying data When it s getting colder it takes longer for the digits to fade out The display is not broken New settings like adjusting the assi...

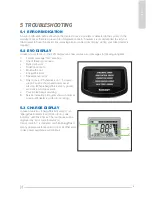
Page 17: ...of these root causes SyncDrive error RideControl error Bluetooth error EnergyPak error Speed sensor error 3 Only in case of SyncDrive error no power support will be shown and power assist will stop When EnergyPak is empty power assistance will stop as well 4 Your E bike needs servicing 5 Service indication pictogram shows in normal screen until dealer is visited for servicing 5 3 CHARGE DISPLAY In...

Page 18: ...fade out The display is not broken New settings like adjusting the assistance level are active instantly 6 2 ENERGYPAK How do I know how much charge my EnergyPak has when it is not connected to the bike By pushing the power button on the EnergyPak LEDs will light up indicating the remaining capacity Can I use the EnergyPak of another Giant E bike Yes Giant EnergyPak are interchangeable There are E...

Page 19: ...ent sound Giant uses different internal structure than some competitors As a consequence we have a slightly higher frequency and better torque value 6 4 MISCELLANEOUS What is the QR code on my bike for The QR code can be used to register your bicycle on an anti theft website What is the best way to clean my bike The E parts are best cleaned with a dry cloth The rest of the bike should be treated a...

Page 20: ...h those of equal or greater value at the sole discretion of Giant This warranty extends from the date of purchase applies only to the original owner and is not transferable In no event shall Giant be responsible for any direct incidental or consequential damages including without limitation damages for personal injury property dam age or economic losses whether based on contract warranty negligenc...

Page 21: ...B category vehicles Hybrid power bicycles with a maximum support speed of 25km h fulfil the requirements of EU Machinery Directive 2006 42 EC These bicycles also comply with the following non harmonized standards Bicycle standard ISO 4210 2 Electric bicycles EN 15194 The declaration of conformity for your specific Giant E bike can be found as an inlay in this user manual Disclaimer We strongly adv...

Page 22: ... be co located or operating in conjunction with any other antenna or transmitter 7 5 IC This device complies with Industry Canada s licence exempt RSSs Operation is subject to the following two conditions 1 This device may not cause interference and 2 This device must accept any interference including interference that may cause undesired operation of the device Le présent appareil est conforme au...

Page 23: ...YOUR GIANT DEALER ...
Reviews: