gfm MJ427GG A Owner'S Manual Download Page 8

8

EN

C

ONNECTION

Basic Connection

This section describes how to connect the unit to an antenna, cable/satellite box, etc.

Note:

  •  Be sure your antenna or other device is connected properly before plugging in the power cord.

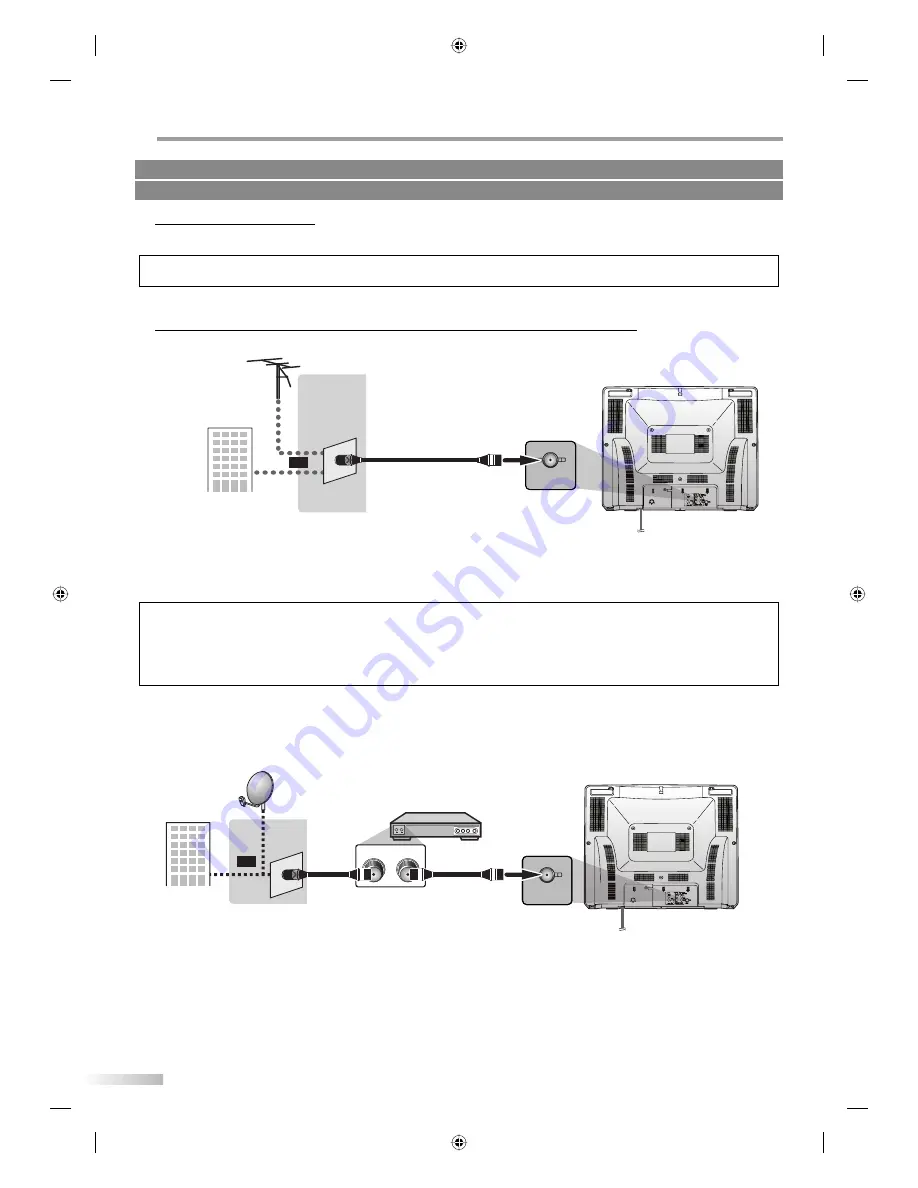
[Antenna Cable Connection]

When connecting the unit to an antenna or cable TV company (without cable/satellite box)
Connect the RF coaxial cable on your home outlet to the antenna input jack of this unit.

rear of this unit

VHF / UHF

antenna

cable TV

company

or

e.g.)

ANT. IN

RF coaxial cable

* Once connections are completed, turn on the unit and begin initial setup.

Channel scanning is necessary for the unit to memorize all available channels in your area. 
(Refer to “Initial Setup” on page 10.)

Note:

  •  For your safety and to avoid damage to device, please unplug the RF coaxial cable from the antenna input jack before moving the unit.
  •  If you use an antenna to receive analog TV, it should also work for DTV reception. Outdoor or attic antennas will be more effective than set-

top versions.

  • To easily switch your reception source between antenna and cable, install an antenna selector.
  •  If you connect to the cable system directly, contact the CATV installer.

[Connection to Cable Box or Satellite Box]

Connect the RF coaxial cable on your home outlet to the input jack of the cable/satellite box.
Use another RF coaxial cable to connect the antenna input jack of the unit to the output jack of the cable/satellite box.

rear of this unit

ANT. IN

cable/satellite box

satellite

dish

e.g.)

cable TV

company

or

RF OUT

ANT. IN

 RF coaxial cable

 RF coaxial cable

* Required cables and connecting methods differ depending on the cable/satellite box.

For more information, please contact your cable/satellite provider.

5

Cables not included.

Please purchase the necessary cables at your local store.

P71B1UT_MJ427GG A_EN.indd   8

P71B1UT_MJ427GG A_EN.indd   8

2007/03/22   17:59:28

2007/03/22   17:59:28

Summary of Contents for MJ427GG A

Page 1: ...OPTIONAL SETTING INFORMATION TROUBLESHOOTING 27 Digital Analog Television Owner s Manual MJ427GG A TO RECEIVE DIGITAL ANALOG SIGNAL YOU MUST CONNECT ANTENNA P71B1UT_MJ427GG A_EN indd 1 P71B1UT_MJ427GG...

Page 2: ...by placing the TV on a bed sofa rug or other similar surface This TV should never be placed near or over a radiator or heat register This TV should not be placed in a built in installation such as a...

Page 3: ...T ATTENTION POUR VITER LES CHOCS LECTRIQUES INTRODUIRE LA LAME LA PLUS LARGE DE LA FICHE DANS LA BORNE CORRESPONDANTE DE LA PRISE ET POUSSER JUSQU AU FOND FCC WARNING This equipment may generate or us...

Page 4: ...ification in case of theft date of purchase dealer purchase from dealer phone No model No serial No dealer address LOCATION For safe operation and satisfactory performance of the unit keep the followi...

Page 5: ...s can access their cable TV channels Program Information Display DTV only You can display the title contents and other information of the current DTV program on the TV screen Auto Channel Scan This un...

Page 6: ...put Mode Press to display the currently selected external input mode 9 AUDIO button p13 digital mode DTV only Press to select the audio language 10 CHANNEL RETURN button p12 Press to return to previou...

Page 7: ...able connection for a decoder or an audio receiver Use digital audio input jack of an external device 2 component video and audio input jacks p9 Component video cable connection for an external device...

Page 8: ...t If you use an antenna to receive analog TV it should also work for DTV reception Outdoor or attic antennas will be more effective than set top versions To easily switch your reception source between...

Page 9: ...R L R AUDIO INPUT T T RCA audio cable or S video cable RCA video cable DVD player with the S video output jack e g To use the S video or video input jack on the rear of this unit press INPUT SELECT t...

Page 10: ...efer to page 11 You can cancel or exit the initial AUTO PRESET CH menu by pressing MENU When no channel can be received by AUTO PRESET CH NO TV SIGNALS is displayed on the TV screen If there is no sig...

Page 11: ...ayed When you selected AUTO PRESET CH TV DTV the lowest memorized analog channel will be displayed when the scanning and memorizing are completed If there is no analog channel the lowest memorized dig...

Page 12: ...4 2 major channel minor channel change automatically change manually by using CH Although you cannot watch the high definition TV HDTV program the unit converts the HDTV signal down to the standard de...

Page 13: ...es differ depending on the broadcast OTHER is displayed when the audio language cannot be acquired or the acquired languages are other than English Spanish or French The current mode will automaticall...

Page 14: ...5 Note When the program guide consists of more than 6 lines use VOL X Y to scroll No description provided is displayed when the program guide is not provided While the program guide is displayed the c...

Page 15: ...nnel will be added Red The selected channel will be deleted 6 Press MENU to exit MENU 5 Note ADD DELETE DTV or ADD DELETE menu will disappear automatically in a few seconds In the digital mode DTV you...

Page 16: ...closed caption on your TV screen broadcast signal must contain the closed caption data Not all TV programs and commercials have the closed caption or all types of the closed caption Captions and text...

Page 17: ...circumstances 5 Press MENU to exit MENU Note CAPTION SERVICE that you can switch differs depending on the broadcast description 5 DTVCC Style DTV You can change the style of DTV CC such as font color...

Page 18: ...ress MENU to display the main menu MENU 2 Use CH K L to select V CHIP SETUP then press VOL X e g digital TV mode or CH CH VOL TV SETUP PICTURE CHANNEL SETUP V CHIP SETUP LANGUAGE ENGLISH CAPTION OFF D...

Page 19: ...e sub ratings to block specific elements of programming To set the sub ratings follow the steps below 1 Use CH K L to select the desired main rating then press VOL X twice to show its sub ratings or C...

Page 20: ...Change Password Although the default code 0000 is supplied with the unit you can set your own password 4 Use CH K L to select CHANGE PASSWORD then press VOL X e g digital TV mode or CH CH VOL V CHIP S...

Page 21: ...cture quality View other TV channels The problem might be limited to the broadcasting station Picture blurred When the outside antenna is used check the wire condition and connection View other TV cha...

Page 22: ...ect C1 C2 or OFF Note Some functions are not available in specific modes but this is not a malfunction Read the description in this owner s manual for more details on correct operations Cabinet Cleani...

Page 23: ...9 G 20 H 21 I 22 J 23 K 24 L 25 M 26 N 27 O 28 P 29 Q 30 R 31 S 32 T 33 U 34 V 35 W 36 W 1 37 38 W 2 W 3 39 W 4 40 W 5 41 W 6 42 W 7 43 W 8 44 W 9 45 W 10 46 W 11 47 W 12 48 W 13 49 W 14 50 W 15 51 W...

Page 24: ...MOVAL OR REINSTALLATION OF THE COVERED PRODUCT EXCEPT AS PROVIDED HEREIN ACCESSORIES USED IN CONJUNCTION WITH A COVERED PRODUCT ANY LOSS OTHER THAN A COVERED BREAKDOWN OF THE COVERED PRODUCT SERVICE W...

Reviews: