


2
2450 Pressure Sensor
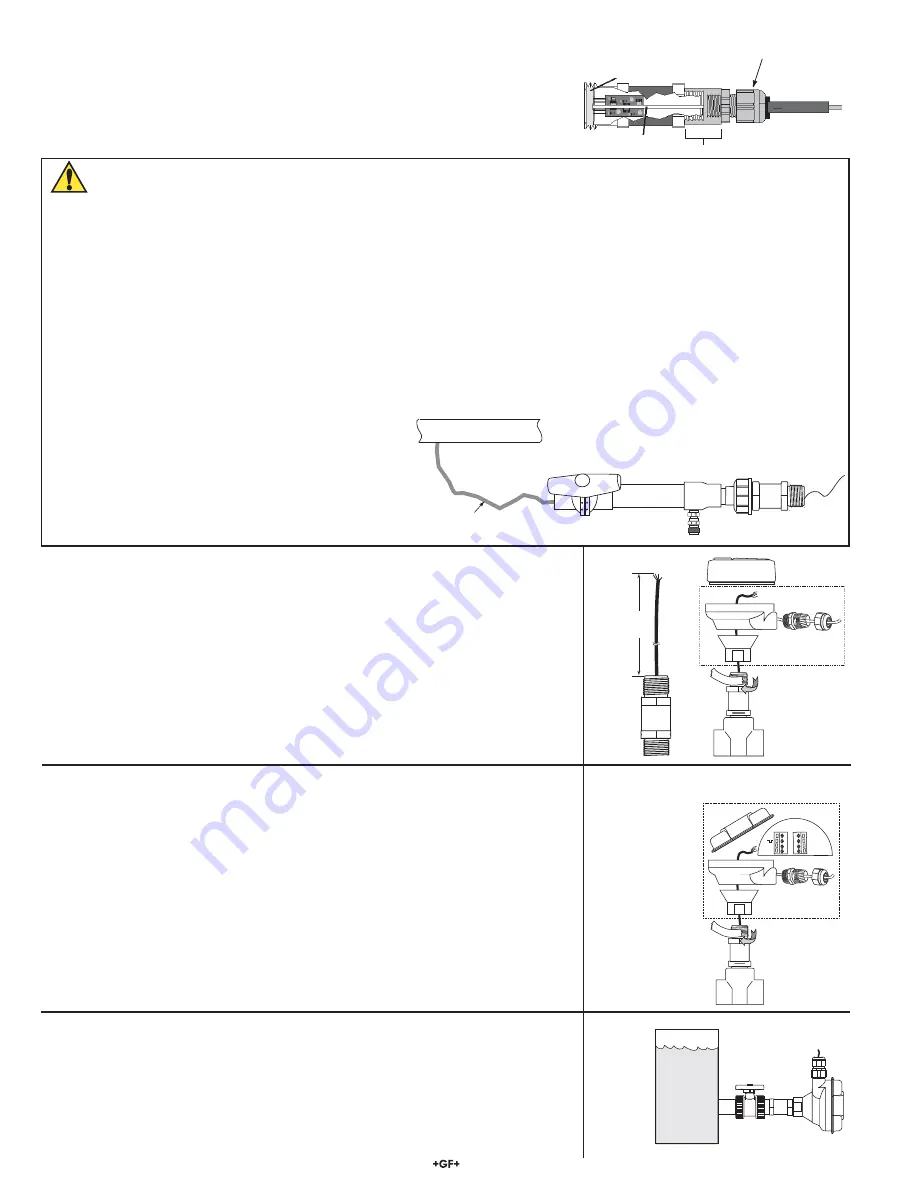
3. Installation
Diaphragm
Capillary Tube
Cable gland
Reducer coupling
•
Signet 2450 Pressure Sensors are gauge pressure sensors. Gauge pressure
sensors measure the difference in pressure between the process on one side of a
diaphragm and the atmospheric pressure on the opposite side of the diaphragm.
A tiny capillary tube inside the sensor body is used to ensure that the back of the
diaphragm remains at atmospheric pressure. If moisture is allowed to propagate
down this tube to the rear of the diaphragm, the sensor may be damaged.
Important Installation Recommendations
•
The ceramic diaphragm is subject to breakage by over-pressure conditions or mechanical contact.
HANDLE WITH CARE. Do not attempt to test the sensor by pressing on the diaphragm.
•
Short duration pressure pulses or shocks, called ‘‘water hammer’’ are generated by a rapid change in
fl
ow rate caused by the
operation of system components such as compressors, pumps, pistons and valves. Water hammer can reach pressure levels
far exceeding the over pressure rating of our pressure sensors and damage the ceramic diaphragm.
•
A pressure snubber is a device for slowing the rate of change of system
fl
ow. Installation of a properly sized snubber at or
near the input of a pressure sensor will protect it from water hammer damage. Snubbers are available through plumbing and
instrumentation dealers.
•
When threading the sensor into a piping system, any backpressure can damage the ceramic diaphragm. Open nearby valves
to relieve any backpressure while threading the sensor into the pipe.
•
If the nearby valves cannot be open while threading the
sensor into the pipe, a bleed valve can be installed to
avoid
over
pressure.
•
Make sure there are no air bubbles in the pipe,
particularly if a long and
fl
exible hose is used to tap into
the process pipe. Air bubbles could cause reading
fl
uctuation and errors.
Main Valve Closed
Bleed Valve Open
Process Pipe
No Air Bubbles
Fle
xib
le h
ose
Integral assembly
Remote assembly
3.3 Tank Installation Options
Submersible:
•
Refer to the GF product 3-2250-XX for submersible installations.
(Refer to Signet Submersion Kit 3-0000.707)
Side Tank Mount:
•
Install GF ball valve to allow isolation of the sensor for maintenance.
•
It is recommended that a 3-8052-1 kit be used to protect the back end of the sensor.
WARNING:
Exposing the sensor body to elevated temperature that are different that the tank
fl
uid temperatures will cause inaccurate reading.
BLK
RED
WHT
SHLD
+
S
-
3-8052-1
Integral junction box,
3/4 in. NPT
*
*
152 mm
(6 in.)
Figure 1
3-8052
Integral mount kit
3-8450
*
Figure 2
The compact integral assembly can be assembled by using thefollowing directions:
3.1 Integral Assembly Sensor Modifi cation
•
Modify sensor part number 3-2450 per
fi
gure 1.
•
Apply sealant or PTFE tape to the process connection threads per
fi
gure 2, after
inspecting threads to ensure integrity. Do not install a sensor with damaged threads.
•
Thread the sensor into the 3-8052 mounting kit.
•
Tighten the sensor 1
1
/
2
turns past
fi
nger tight into the process connection.
•
Install 8450 transmitter (refer to 8450 manual for wiring info).
•
The 3-8052 Integral kit includes:
•
3
/
4
in. NPT process connection
• 3-9000.392-1 liquid tight connector,
1
/
2
in. NPT
• Conduit base to attach 8450.
3.2 In-line Remote Assembly
T
he optional 3-8052-1 Integral Junction box with
3
/
4
in. process connection offers a convenient
terminal point to extend the 2450 cable over a distance greater than 4.6 m (15 ft).
•
The kit includes:
•
3
/
4
in. NPT process connection
• Conduit base and cap with junction terminals
• 3-9000.392-1 liquid tight connector,
1
/
2
in. NPT
To extend the wires longer than 4.6 m (15 ft)
•
Modify sensor 3-2450 as described in
fi
gure 1.
•
Terminate the three wires to the terminal board located in the cap assembly.
•
Add customer supplied wire to extend the cable.
•
Terminate to the transmitter or the 4 to 20 mA input device.
•
Apply sealant or PTFE tape to the process connection threads per
fi
gure 3, after inspecting
threads to ensure integrity. Do not install a sensor with damaged threads.
•
Tighten the sensor 1
1
/
2
turns past
fi
nger tight into the process connection.
Figure 3


