background image

Storing Data in the Document Server

63

2

Storing Data in the Document Server

The Document Server enables you to
store documents in memory and print
them as you want.
For details, see 

General Settings Guide

.

Important

Machine failure can result in data
loss. Important data stored on the
hard disk should be backed up.
The manufacturer shall not be re-
sponsible for any damage that
might result from loss of data.

Note

Data stored in the Document Serv-
er is deleted after three days by set-
ting default. You can specify a
period after which stored data is
automatically deleted. For more
information about settings, see
“Auto Delete File” in “Administra-
tor Tools”, 

General Settings Guide

.

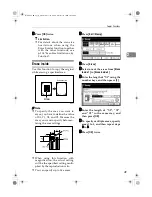
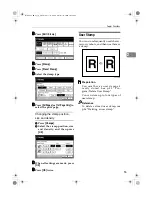
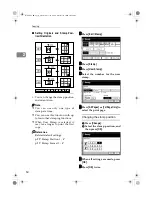
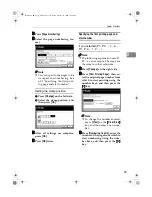
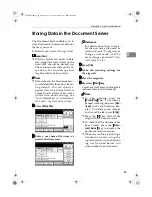
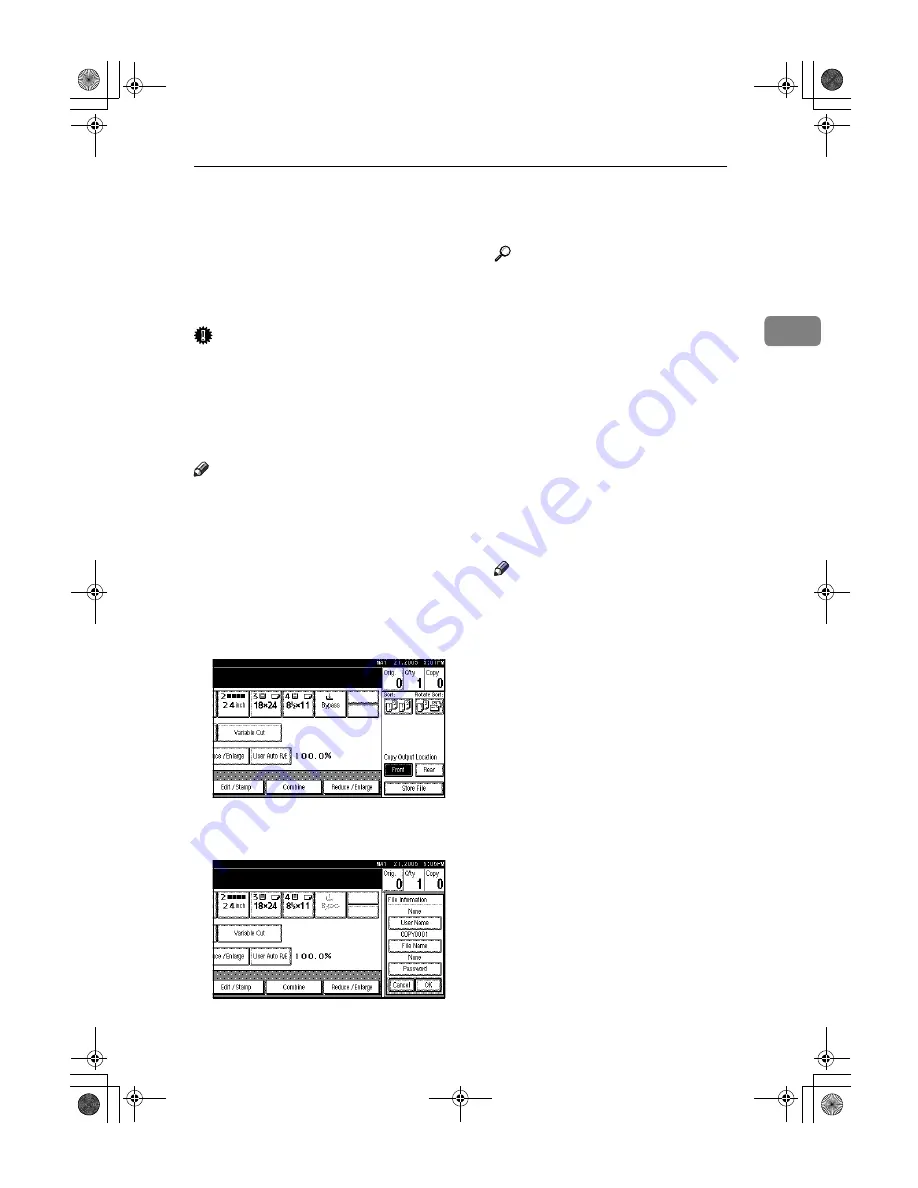
AAAA

Press 

[

Store File

]

.

BBBB

Enter a user name, file name, or
password if necessary.

Reference

For details about how to regis-
ter the user name, file name, or
password, see “To register or
change a user name”, and “To
set or change a password”, 

Gen-

eral Settings Guide

.

CCCC

Press 

[

OK

]

.

DDDD

Make the scanning settings for
the originals.

EEEE

Place the originals.

FFFF

Press the 

{{{{

Start

}}}}

 key.

Copies are delivered, and originals
scanned and stored in memory.

Note

To stop scanning, press the

{{{{

Clear/Stop

}}}}

 key. To resume a

paused scanning job, press 

[

Con-

tinue

]

 in the confirmation dis-

play. To delete saved images
and cancel the job, press 

[

Stop

]

.

Press the 

{{{{

#

}}}}

 key after all the

originals have been scanned.

To check that the document has
been stored, press the 

{{{{

Docu-

ment Server

}}}}

 key to display the

document selection screen.

When the machine is printing a
document stored using the
copier function, wait until print-
ing has finished before you
store another copy document.

DolphinC2_ENcopy_F_FM.book  Page 63  Friday, February 25, 2005  10:46 AM

Summary of Contents for AO80

Page 1: ...r administrators of this machine It describes security func tions that the administrators can use to protect data from being tampered or prevent the machine from unauthorized use Also refer to this ma...

Page 2: ...nder Introduction Guide PDF file CD ROM2 Describes operations of DeskTopBinder Lite and provides an overview of its functions This guide is added to the Start menu when DeskTopBinder Lite is installed...

Page 3: ...iii What You Can Do with This Machine AHD001S DolphinC2_ENcopy_F_FM book Page iii Friday February 25 2005 10 46 AM...

Page 4: ...iv AHD002S DolphinC2_ENcopy_F_FM book Page iv Friday February 25 2005 10 46 AM...

Page 5: ...v AHD051S DolphinC2_ENcopy_F_FM book Page v Friday February 25 2005 10 46 AM...

Page 6: ...2 Copying Basic Procedure 21 Original Counter Reset 22 Auto Start 23 Job Preset 23 Interrupt Copy 24 Copying from the Paper Bypass 25 Copier Functions 27 Selecting Original Type Setting 27 Adjusting C...

Page 7: ...7 Screen 69 If You Cannot Make Clear Copies 70 If You Cannot Make Copies As You Want 73 4 User Tools Copier Document Server Features User Tools Menu Copier Document Server Features 75 Accessing User T...

Page 8: ...viii DolphinC2_ENcopy_F_FM book Page viii Friday February 25 2005 10 46 AM...

Page 9: ...ead the instructions all of which are described in the Safety Information section in the General Settings Guide The statements above are notes for your safety Important If this instruction is not foll...

Page 10: ...l Holder Unit Type A Roll holder Roll Feeder Type 480 Lower tray Paper Cassette Type 480 Cut paper tray Original Tray Type G Original tray Terms Long length original paper Original paper length longer...

Page 11: ...uide 5 Display panel Shows operation status error messages and function menus 6 Check Modes key Press to check the entered copying set tings 7 Program key Press to store or select the program mode See...

Page 12: ...Copy 14 Start key Press to start scanning originals or copy ing Press to start scanning and printing in Document Server mode 15 Clear Stop key Clear Press to clear numbers entered Stop Press to stop a...

Page 13: ...em by lightly pressing them When you select or specify an item on the display panel it is highlighted like this Keys appearing as cannot be used When the lower tray paper roll tray is installed When t...

Page 14: ...6 DolphinC2_ENcopy_F_FM book Page 6 Friday February 25 2005 10 46 AM...

Page 15: ...originals that are not stiff should be output to Rear Straight Original Exit Rear Straight A0 E K or smaller 1 sheet plain paper 1 sheet translucent paper 1 sheet film When output originals of A1 E K...

Page 16: ...al Exit Document Roller Note Originals of 52 3 g m2 104 7 g m2 13 9 lb 27 9 lb can be used with the document roller Do not use the document roller when copying originals that are longer than the maxim...

Page 17: ...l Exit A A A A Press Original Exit B B B B Press Top and then press OK Rear Original Exit Straight A A A A Check that the document roller is raised B B B B Press Original Exit C C C C Press Rear and t...

Page 18: ...p to A1 D L select front output If the output copies are badly curled turn the paper loaded in the cut paper trays upside down or remove the copies during the copy run Rear Output When Rear is selecte...

Page 19: ...ght in the back of the copy output tray You can prevent this by attaching the copy output auxiliary guide A A A A Lower the copy output auxiliary guide and adjust the position Note You do not need to...

Page 20: ...origi nals Custom sizes Length 210 15000 mm Width 210 950 mm Where original is placed Original size Original weight Original table Standard sizes Engineering E 34 44 K D 22 34 K L C 17 22 K L B 11 17...

Page 21: ...ded original The following original types can cause jams or may itself be damaged Originals other than those specified in p 12 Sizes and Weights of Recom mended Originals Stapled or clipped originals...

Page 22: ...he range shown below Front and back curl R 60 mm 2 4 or more height 10 mm 0 4 or less Originals that use more than 20 of the image area may be faint Missing Image Area As shown above part of the origi...

Page 23: ...of the origi nal width Note Make sure the original guides are flush against the original Do not push the original guide side fence with force B B B B Using both hands carefully insert the original bet...

Page 24: ...ginal exit as the original output location the rear edge of the originals are held at the output exit To cancel this press the Scanner Stop key See p 8 Original Output Loca tions Original Orientation...

Page 25: ...checks the original width and then increases the scan size to a slightly larger standard size Note Scan size differs depending on the size of the original See the follow ing table for available scan s...

Page 26: ...t When using the optional carrier sheet set the original output loca tion to rear original exit straight If the original output location is set to top original exit or rear original exit document roll...

Page 27: ...original also face up Note Align the original with the fold of the carrier sheet B B B B Using both hands hold the origi nal copy side up and carefully in sert the folded edge of the carrier sheet in...

Page 28: ...Basics 20 1 DolphinC2_ENcopy_F_FM book Page 20 Friday February 25 2005 10 46 AM...

Page 29: ...rator about your login user name and lo gin password A A A A Make sure d d d d Ready is shown on the display If any other function is displayed press the Copy key on the left of the control panel Init...

Page 30: ...tin ues copies more than 30 sheets A0 E Important When Basic Authentication Win dows Authentication or LDAP Authentication is set always log off when you have finished using the machine to prevent una...

Page 31: ...mati cally Note Each job stored is allocated a job number that is displayed on the Reserved Job screen To switch the display to the cur rent copy job press Reserved Job followed by Printing and then E...

Page 32: ...ess Delete The display returns to the Re served Job screen Interrupt Copy Use this function to interrupt a long copy job to make urgently needed copies A A A A Press the Interrupt key The Interrupt ke...

Page 33: ...r in the paper bypass is 210 914 mm 81 2 36 Do not copy on both sides of the paper Do not use paper already copied or printed on Reference For details about paper type ori entation and number of sheet...

Page 34: ...d copying starts Important Insert the paper evenly on both sides and support it with your hands until it feeds in Note Insert the paper until you hear the beep To make multiple copies insert an additi...

Page 35: ...of several pieces of smaller originals which differ in background density Se lecting this mode tones down the dark background of originals Limitation Thick lines text or solid images in the patched o...

Page 36: ...84 Auto Image Density Priori ty p 85 Image Density A A A A Select the method of image densi ty adjustment Auto image density A Make sure that Auto Image Den sity is selected Auto Image Density is hig...

Page 37: ...ntly load ed in the paper tray and then set your original again Reference p 25 Copying from the Paper By pass Related default settings p 83 Auto Paper Select Priority Auto paper select A A A A Make su...

Page 38: ...o fit it onto the copy pa per Note This function works when Auto Paper Select is selected See p 29 Selecting Copy Paper The default for Auto Tray Switch ing is With image rotation You cannot use Rotat...

Page 39: ...chitecture Synchro cut Note When using Synchro Cut the pa per can be cut from 210 to 15000 mm 8 3 to 590 5 Limitation Depending on the original length and paper copy paper length may be different from...

Page 40: ...from 8 3 to 590 5 A A A A Press Variable Cut Roll paper width Preset K K K K Preset L L L L 841 mm A0K A1L 594 mm A1K A2L 420 mm A2K A3L 297 mm A3K 210 mm A4K 728 mm B1K B2L 515 mm B2K B3L 364 mm B3K...

Page 41: ...te sets are rotated KL and delivered to the output tray Note When using Rotate Sort make sure original and paper image sizes are the same Reference Related default settings p 83 Auto Tray Switching A...

Page 42: ...is made minus one for the sample copy Note If you press Suspend after checking the results return to step A to adjust the copy set tings as necessary Depending on the combination of func tions you ma...

Page 43: ...aper Preparation You can select the following com binations Metric version JIS Japanese Industrial Standard Inch version Note The default setting is to copy at same size full size To change the combin...

Page 44: ...3 Note Preset ratios are set by combining original size and paper size Reference For details about the relationship between the original and paper sizes for preset ratios see p 108 Magnification Ratio...

Page 45: ...the magnification ratio on the screen use 1 1 To specify a decimal value use 0 1 or 0 1 A A A A Press Reduce Enlarge Using the number keys A Press Mag Ratio B Enter the ratio using the num ber keys No...

Page 46: ...sure Size Magnificatn is high lighted C C C C Enter the length of the original using the number keys and then press Note To change the size press Clear and then enter the new one You can enter sizes w...

Page 47: ...arge C C C C Press Specifd Ratio D D D D Press Direct Mag To enter the ratio using the number keys A Press Horizontal B Enter the ratio using the num ber keys and then press Note Use the key to enter...

Page 48: ...size 2 Vertical original size 3 Horizontal copy size 4 Vertical copy size Preparation Measure and specify the lengths of the original and copy by compar ing A with a Note You can enter sizes within th...

Page 49: ...e correction ratio as fol lows Note Fine Magnification is used for orig inals that have already been scanned If you want to apply fine magnification corrections to paper that has stretched due to the...

Page 50: ...onto one side of a sheet Combine 4 Pages Copies 4 one sided originals onto one side of a sheet Combine 8 Pages Copies 8 one sided originals onto one side of a sheet Orientation of the original and co...

Page 51: ...p 87 Image Repeat Separation Line A A A A Press Edit Stamp B B B B Press Edit Image C C C C Press Image Repeat D D D D Press OK twice E E E E Select the paper tray Double Copies Use this function to...

Page 52: ...es image density may deteriorate See p 70 If You Cannot Make Clear Copies A A A A Press Edit Stamp B B B B Press Edit Image C C C C Press Positive Negative D D D D Press OK twice E E E E Select the pa...

Page 53: ...e copy size Y2 should be at least 210 mm 8 3 The maximum length of copy sizes is Y1 Y2 15000 mm 590 6 If the length specified by Y1 and Y2 is larger than the max imum the machine shortens it The value...

Page 54: ...ce the third original The machine makes a compos ite copy of the first and third originals E Place any further originals as required Using the stored image as the background original Note To use this...

Page 55: ...and then press Start Scanning The original is scanned and stored D Press Exit twice Returns to the initial User Tools Counter display Overwriting a stored format A Select a format number you want to o...

Page 56: ...e border area around the original image Preparation The default erase border setting is 10 mm 0 4 Reference Related default settings p 87 Erase Border Width A A A A Press Edit Stamp B B B B Press Eras...

Page 57: ...settings When using this function with magnification the actual setting will be the specified setting multi plied by the reproduction ratio You can specify up to five areas A A A A Press Edit Stamp B...

Page 58: ...ting multi plied by the reproduction ratio A A A A Press Edit Stamp B B B B Press Erase C C C C Press Erase Outside D D D D Enter the length of X1 using the number keys and then press Note To change t...

Page 59: ...s p 88 Margin Adjustment Priori ty A A A A Press Edit Stamp B B B B Press Margin Adjustment C C C C Press Top Margin or Bottom Mar gin D D D D Use or to specify the margin and then press OK Synchro Cu...

Page 60: ...on to print a stamp that already stored in the machine Stamp types are as follows You can change the position and orientation of the stamp You can use this function with up to four other stamping func...

Page 61: ...size and density and then press OK F F F F When all settings are made press OK G G G G Press OK twice User Stamp You can store frequently used charac ters or symbols and then use them as a stamp Prepa...

Page 62: ...opy Reference Related default settings p 92 Stamp Position 1 4 p 92 Stamp Format 1 4 A A A A Press Edit Stamp B B B B Press Stamp C C C C Press User Stamp D D D D Select the number for the user stamp...

Page 63: ...amp A Press Program and then press the stamp number 1 4 you want to program Note Stamp numbers displayed with m next to them already have settings If the stamp number is al ready in use the machine wi...

Page 64: ...p Important You cannot restore a deleted user stamp A Press Delete and then press the stamp number you want to delete B Select Delete and then press Exit C Press Exit G G G G Press the User Tools Coun...

Page 65: ...eneral Settings Guide A A A A Press Edit Stamp B B B B Press Stamp C C C C Press Date Stamp D D D D Press All Pages or 1st Page Only to select the print page Changing the date format A Press Change Fo...

Page 66: ...2 Pn 1 n 2 n n n 1 2 n P 1 P 2 P n 1 2 n 1 1 1 2 1 n Stamp position and orientation of originals You can use the page numbering stamp with up to four other stamping functions Reference Related default...

Page 67: ...rt number If you selected P1 P2 1 2 P 1 P 2 1 2 Note The following explanation uses P1 P2 as an example The steps are the same for other selections A A A A Press Change on the right side B B B B Press...

Page 68: ...d then press the key Note To change the number entered press Clear or the Clear Stop key and then enter a new num ber C C C C Press Numbering from to then en ter the number of page from which to start...

Page 69: ...sing number keys and then press the key Note To change the number entered press Clear or the Clear Stop key and then enter a new num ber C C C C Press First Chapter No enter the chapter number from wh...

Page 70: ...e left of the original Right shift towards the right of the original You can also shift in a combination of up down and left right Reference Related default settings p 87 Adjust Position A A A A Press...

Page 71: ...ord if necessary Reference For details about how to regis ter the user name file name or password see To register or change a user name and To set or change a password Gen eral Settings Guide C C C C...

Page 72: ...nted C Press Print Settings D Press Reduce Enlarge E Select a ratio and then press OK F Enter the number of copies using the number keys G Press the Start key Reference For details about how to print...

Page 73: ...ou delete or over write them with another program Storing a Program A A A A Edit the copy settings so all func tions you want to store in this pro gram are selected B B B B Press the Program key C C C...

Page 74: ...to change D D D D Press Backspace or Delete All and then enter the new program name E E E E Press OK Deleting a Program A A A A Press the Program key B B B B Press Delete C C C C Press the number of t...

Page 75: ...y start copying after it has warmed up See p 23 Auto Start Check paper size An improper paper size is set Select paper manually do not use Auto Paper Select Check original ori entation In User Auto Re...

Page 76: ...maximum copy quantity you can make at a time See p 85 Max Copy Quantity Original was misfed at following point Open the part as shown then remove it The original has jammed original misfeed Follow th...

Page 77: ...tor for Admin Depending on the number of destinations to be updated there may be some delay before you can resume operation Operations are not possible while this message is displayed Wait until the m...

Page 78: ...t static electricity Very long originals A shadow of the reverse side of an original image appears on copies Image density is too dark Adjust the image density set ting See p 28 Adjusting Copy Image D...

Page 79: ...e original has areas of solid color or Positive Negative is selected when copying multi ple sheets When using Repeat Copy with originals that have areas of solid color set the number of originals as f...

Page 80: ...Continuous copies have been made on small sized paper Wait about two minutes and then try copying again When copying on patched originals parts of the image are blurred This may happen when the origi...

Page 81: ...or rectly Place the original correctly See p 15 Placing Originals An improper size of paper is selected Select the proper paper See Copy Paper General Set tings Guide Print Position Adjustment or Marg...

Page 82: ...See p 50 Margin Ad justment and p 61 Adjust Print Position Copies are shorter than the se lected size or cut off before the end Wrinkles appear on the copy The paper is damp Replace the paper with new...

Page 83: ...Drawing Auto Image Density Priority Text On Drawing On Text Photo On Photo Off Background Lines On Patched Original On Generation Copy On Copy Quality Text Normal Drawing Normal Text Photo Normal Pho...

Page 84: ...g 1 64 7 Setting 2 100 0 Setting 3 129 4 Inch version Architecture Setting 1 66 7 Setting 2 100 0 Setting 3 133 3 Enlarge 1 4 Metric version Enlarge 1 141 4 Enlarge 2 200 0 Enlarge 3 282 8 Enlarge 4 4...

Page 85: ...50 0 Reduce 4 66 7 Priority Setting Reduce Enlarge 100 0 User Auto R E Metric version A0 A0 A1 A1 A2 A2 A3 A3 A4 A4 B1 JIS B1 JIS B2 JIS B2 JIS B3 JIS B3 JIS B4 JIS B4 JIS Inch version Engineering 34...

Page 86: ...ne Copy Order in Combine From Left to Right Program Delete Format Margin Adjustment Priority Partial Copy Priority User Tools item menu Default Background Numbering Size Normal Density Normal Preset S...

Page 87: ...rsion Position Top Left Top Margin 8 mm Right Margin 32 mm Inch version Position Top Left Top Margin 0 3 Right Margin 0 8 Stamp Setting All Pages Size Auto Superimpose No Page Numbering Stamp Format P...

Page 88: ...see p 96 Input Output Administrator Tools see Menu Protect Security Reference User Tools item menu Default Rotate Sort Auto Paper Continue No User Tools item menu Default Menu Protect Level 2 Dolphin...

Page 89: ...ools Menu System Set tings General Settings Guide Changing Default Settings A A A A Press the User Tools Counter key The User Tools main menu ap pears Note When Basic Authentication Win dows Authentic...

Page 90: ...hanging default settings press Exit on the User Tools main menu Changes to User Tools are com plete and the machine is ready to copy Note You can also exit User Tools by pressing the User Tools Counte...

Page 91: ...ct is se lected This function is called Auto Tray Switching This set ting specifies whether to use Auto Tray Switching or not Note Default With Image Rotation With Image Rotation Use to copy when usin...

Page 92: ...ched Original Generation Copy Note Custom Setting Your service representative will set this to meet your requirements For details consult your service representative Text Adjusts line and character ou...

Page 93: ...ote Default Standard Max Copy Quantity Specifies the maximum number of copies that can be set Note Default 99 sheets The number can be set from 1 to 99 sheets using the number keys Job End Call You ca...

Page 94: ...1 4 You can customize available re duction ratios by pressing Reduce Enlarge Note Default Metric version Reduce 1 25 0 Reduce 2 35 4 Reduce 3 50 0 Reduce 4 70 7 Inch version Engineering Reduce 1 25 0...

Page 95: ...cifies the default setting for Erase Border See p 48 Erase Bor der Note Default Metric version 10 mm Inch version 0 4 The width can be set as follows Metric version 2 mm 99 mm 1 mm increments Inch ver...

Page 96: ...Program Delete Format Stores a format background im age for use with Format Overlay You can store up to four formats See p 46 Format Overlay and p 47 Program Delete Overlay Format Margin Adjustment Pr...

Page 97: ...e copy size Y2 Note Default Metric version Y1 0 mm Y2 210 mm Inch version Y1 0 Y2 8 3 The size can be set as follows Metric version Y1 0 to 14790 mm 1 mm increments Y2 210 mm to 15000 mm 1 mm incremen...

Page 98: ...mal Preset Stamp Stamp Priority You can select the stamp type given priority when Preset Stamp is pressed See p 52 Preset Stamp Note Default COPY Stamp Language You can select the language of the stam...

Page 99: ...sity You can set the pattern used to print the stamp Note Default Normal Normal The stamp is printed on the image You cannot check which parts will overlap Lighter The image can be seen through the st...

Page 100: ...amp Position 1 4 You can set the position where the stamp is printed Press the arrow keys to adjust the position Note Default Metric version Position Top Right Top Margin 24 mm Right Margin 24 mm Inch...

Page 101: ...Date Stamp font Note Default Font 1 This setting is linked to the Page Numbering function Stamp Position You can set the position where the stamp is printed Press the arrow keys to adjust the position...

Page 102: ...f the image Note Default No Page Numbering Stamp Format You can select the page number format given priority when Page Numbering is pressed Note Default P1 P2 Font You can select the page number font...

Page 103: ...osition where the stamp is printed Press the arrow keys to adjust the position Superimpose You can have page numbers printed in white where they overlap black parts of the image Note Default No Page N...

Page 104: ...the ma chine stops copying and prompts you to supply copy paper When you load paper the machine will continue copying If you select Yes Copying continues using copy paper of a different orienta tion T...

Page 105: ...he selected tray the function selected first has priority means that these functions can be used together means that these functions cannot be used together The second function selected will be the fu...

Page 106: ...can be preset is 9 Depending on the size of original you may not be able to preset more jobs even if below the maximum Selecting Copy Paper If you change the paper type copying may take longer to sta...

Page 107: ...ios 4 reduction ratios The relationship between original size and paper size enlarged reduced by the preset ratios is as follows Paper size Number of sheets A0 E 50 sheets A1 D 100 sheets A2 C 200 she...

Page 108: ...A2 B3 B1 B4 B2 141 4 1 2 in area ratio A1 A0 A2 A1 A3 A2 A4 A3 B2 B1 B3 B2 B4 B3 70 7 1 4 in area ratio A0 A1 A1 A2 A2 A3 A3 A4 B1 B2 B2 B3 B3 B4 50 0 A0 A2 A1 A3 A2 A4 B1 B3 B2 B4 35 4 A0 A3 A1 A4 B1...

Page 109: ...lated ratio is over the maximum or under the minimum ratio it is automatically adjusted within the available range With certain ratios parts of the image might not copy or margins will appear You cann...

Page 110: ...iginal with the image density changed be forehand Erase Border You can specify the width of the erased border margins from 2 to 99 mm 0 1 to 3 9 in increments of 1 mm 0 1 Erase Inside By combining Era...

Page 111: ...down in increments of 1 mm 0 1 If you set the margin too long for the original parts of the image might not copy When using with the stamp functions the stamp position moves according to the orientati...

Page 112: ...Overlay A0 E Erase Erase Inside A0 E or smaller 5 locations Erase Outside 15 m or smaller Erase Inside Erase Border and Format Overlay Combinations A0 E Erase Outside and Format Over lay Combinations...

Page 113: ...Record Sheet 105 5 Settings Record Sheet Program Record Sheet Make copies of this sheet to keep a record of your program settings AHD014S DolphinC2_ENcopy_F_FM book Page 105 Friday February 25 2005 1...

Page 114: ...Specifications 106 5 Stored Format Record Sheet Make copies of this sheet to keep a record of your format settings AHD015S DolphinC2_ENcopy_F_FM book Page 106 Friday February 25 2005 10 46 AM...
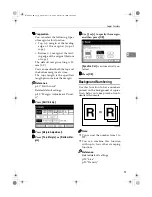
Page 115: ...Settings Record Sheet 107 5 User Stamp Record Sheet Make copies of this sheet to keep a record of your user stamps DolphinC2_ENcopy_F_FM book Page 107 Friday February 25 2005 10 46 AM...
Page 116: ...00 0 70 7 A4 B4 400 0 282 8 200 0 141 4 100 0 Copy size in E D C B A Original size E 100 0 64 7 50 0 32 4 25 0 D 129 4 100 0 64 7 50 0 32 4 C 200 0 129 4 100 0 64 7 50 0 B 258 8 200 0 129 4 100 0 64 7...

Page 117: ...ture Width Length mm A0 841 1189 A1 594 841 A2 420 594 A3 297 420 A4 210 297 B1 728 1030 B2 515 728 B3 364 515 B4 257 364 Width Length in E 34 44 D 22 34 C 17 22 B 11 17 A 81 2 11 Width Length in E 36...

Page 118: ...Copy output locations 10 Copy Quality 84 Custom magnification Settings 1 3 85 Custom size originals 17 D Date stamp 56 93 102 font 93 format 93 position 93 size 94 stamp setting 94 superimpose 94 Del...

Page 119: ...in combine 94 size 94 stamp format 94 stamp position 95 superimpose 95 Partial copy 44 Partial copy priority 89 Patched Original 27 Photo 27 Placing custom size originals 17 Placing originals 15 Posit...

Page 120: ...impose 94 95 Supplementary information 98 Synchro cut 31 T Text 27 Text Photo 27 Top original exit 9 Troubleshooting 67 screen 69 U User Auto R E 86 User auto reduce enlarge 35 User stamp 53 92 102 fo...

Reviews: