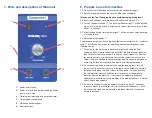
1. Parts and descriptions of Main unit
2. Prepare to use this machine
2.1 Please confirm the voltage before connecting the power supply.
2.2 Install a proper holder and tool into the Ultrasonic handpiece.
(Please use the Tool Changing Rack to avoid damaging handpiece.)
2.3 Insert the handpiece cord into both the handset and main unit
➄
.
2.4 Turn on the power switch
➀
. The tracking indicator light
➂
will be blinking
green in color which shows it is tracing the correct frequency, this will take
about 1-3 seconds.
2.5 After tracking period, tracking lamp light
➂
will be a steady color indicating
it is ready to use.
2.6 Adjust the output power
➃
.
The ultrasonic output can be set by the output power control knob
➃
, indicator
lamp
➂
will change from green to red when power output setting changes
from low to high.
2.7 When in use, the holder must be securely tightened using the Tool
Changing Rack. A loose connection will affect the output power that may
lead to the main unit being unable to find the correct frequency. After use
for a period of time, it is necessary to clean the contact surfaces on the
holder, tools and handpiece to avoid foreign objects caught in between or
avoid chip buildup on surfaces which would affect the output power.
2.8 If an unexpected noise is heard when using the lapping tools, turn off
the unit as it is necessary to check if the tool and the holder are securely
fastened. With these checked, if there is still a noise, it may be because
the tool material is uneven or because of resonance of the polishing
material. Restart the machine
➀
to activate the automatic frequency
adjustment in order to solve this problem. If the problem persists, it will not
affect the grinding outcome.
2.9 If after 3 seconds of turning on power if the tracking lamp
➂
continues
to blink, it means the controller can’t track the correct frequency. Check
the connecting cable and make certain the tool holder and the tool are
securely fastened.
1. Power on/off switch
2. Power inlet with fuse holder (including 20mm
fuse) on back side.
3. Tracking indicator lamp and output indicator.
4. Output power control knob
5. Ultrasonic handpiece port
6. Foot switch port
➀
➅
➁
➂
➃
➄


